3 Ingredient Whole Wheat Pancakes Recipe
I still remember weekend mornings at my grandmother’s house, the smell of fresh pancakes filling every corner while she flipped them with the kind of ease that only comes from decades of practice. What struck me most wasn’t the fancy ingredients—it was how simple the recipe was, yet how loved those pancakes made us feel. That’s exactly what I’m sharing with you today: 3 ingredient whole wheat pancakes that taste like comfort but deliver real nutrition. They pair beautifully with fresh berries, a drizzle of maple syrup, or even a dollop of Greek yogurt. If you’re looking to balance indulgence with wholesome eating, explore my Food Faith Fitness philosophy—it’s all about creating meals that nourish both body and soul.
Why I Created This Simple, Whole Grain Pancake Recipe
Growing up, I watched my family treat breakfast as an art form. My mother would spend hours preparing elaborate morning spreads, but I noticed something interesting: the recipes that stuck with me weren’t the complicated ones. They were the ones built on solid technique and quality ingredients, even when there were only a handful of them.
When I trained in culinary arts, I learned that simplicity is sophistication. This philosophy shaped how I approach cooking today. I wanted to create a pancake recipe that honored that tradition—something that feels like home but also fuels your body properly. Whole wheat flour brings nutty depth and sustained energy. Eggs provide structure and richness. Almond milk keeps things light and dairy-free friendly.
The magic isn’t in the ingredient count. It’s in understanding why each component matters and how they work together to create something greater than the sum of its parts.
What is 3 Ingredient Whole Wheat Pancakes Recipe?
These are straightforward, honest pancakes made without refined flour, excess sugar, or processed additions. Just eggs, unsweetened almond milk, and whole wheat flour come together to create fluffy, satisfying pancakes that cook up golden brown and tender inside.
Whole wheat flour is often misunderstood. Many people think it creates dense, heavy pancakes, but that’s usually because of incorrect ratios or technique. The key is whisking gently and not overmixing the batter. The bran and germ in whole wheat flour contain fiber, B vitamins, and minerals that refined white flour simply doesn’t have. You’re not just eating breakfast—you’re getting sustained energy that keeps you satisfied through your morning.
This recipe makes approximately 8-10 medium pancakes, perfect for a family breakfast or meal prepping for the week ahead. It’s naturally free from dairy and refined sugars, making it adaptable to various dietary preferences.
Why You’ll Love This 3 Ingredient Whole Wheat Pancakes Recipe
- Versatile foundation for creativity – While these three ingredients create delicious pancakes on their own, they’re also a blank canvas. Add cinnamon, vanilla, or mashed banana if you want variation. Top them with anything from berries to nut butter to savory options.
- Genuinely nutritious without compromise – Whole wheat flour provides 4 grams of fiber per cup, which supports digestive health and keeps you fuller longer. This isn’t about deprivation—it’s about choosing ingredients that actually serve your body.
- Lightning-fast preparation – From pantry to plate in about 15 minutes. No complicated steps, no special equipment needed. I can have these on the table faster than I could order from a café.
- Naturally tender and fluffy – When you understand the science—eggs provide structure and lift, almond milk creates moisture without heaviness, whole wheat flour adds flavor—you get pancakes that are both hearty and light.
- Budget-friendly and shelf-stable – You probably already have these ingredients on hand. No specialty products, no wasteful packaging. Real food, honest prices.
The Ingredients

These three ingredients are the foundation of something truly special. I’ve chosen each one deliberately, and I want you to understand what they contribute to the final dish. Quality matters here, especially since we’re working with such a minimal ingredient list—there’s nowhere to hide.
- 2 cups unsweetened almond milk (provides moisture without added sugars that would spike blood glucose)
- 2 large eggs (room temperature, which helps them incorporate smoothly and create better lift)
- 2¼ cups whole wheat flour (measured by spooning and leveling, never scooping directly from the bag, which compacts the flour)
- 1 teaspoon pure vanilla extract (deepens flavor complexity and adds warmth)
- ½ teaspoon fine sea salt (enhances all flavors and balances the nutty wheat notes)
- 2 tablespoons neutral oil such as vegetable or coconut (for cooking, prevents sticking without imparting flavor)
Expert’s Nutritional Tip: I include sea salt in nearly every sweet recipe because it acts as a flavor amplifier. It doesn’t make things taste salty—it makes everything else taste more like itself. In whole grain cooking especially, salt brings out the natural nutty character of the wheat that might otherwise feel bland.
How to Make 3 Ingredient Whole Wheat Pancakes Recipe?
I’m going to walk you through each step with the kind of detail I learned in culinary school—not to overwhelm you, but because understanding the “why” transforms you from following instructions to actually cooking with confidence. You’ll notice what’s happening in the pan and be able to adjust as needed.
Step 1: Combine Your Wet Ingredients with Purpose
Crack your eggs into a large mixing bowl and pour in the unsweetened almond milk. Using a whisk, beat them together with intention—you’re looking for a uniform, pale mixture that takes about 1-2 minutes. This step is crucial because you’re incorporating air into the eggs, which will create lift when the pancakes cook.
I always feel the batter lighten as I whisk. It’s a physical sensation you learn to recognize. The color shifts from dark yellow to a lighter, more homogeneous tone. This means the eggs are properly incorporated and ready to receive the flour.

Step 2: Gradually Introduce the Flour Without Creating Lumps
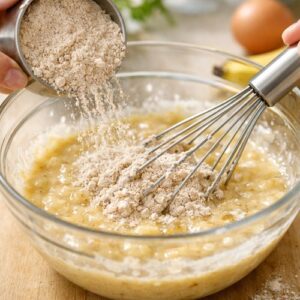
This is where many home cooks stumble. Instead of dumping all the flour in at once, sprinkle it gradually while whisking continuously. I typically add the flour in four additions, whisking for about 10-15 seconds between each addition. This prevents the lumps that form when wet ingredients suddenly meet a large amount of dry flour.
The whisking motion is gentle—I’m not trying to develop gluten like I would with bread dough. I’m just incorporating the flour until I see no visible streaks of white flour remaining. A few tiny lumps are actually fine and will smooth out as the batter rests. Stop whisking once the batter reaches a consistency similar to thick yogurt.
Here’s a professional secret: let the batter rest for 5 minutes before cooking. This allows the whole wheat flour to fully hydrate, which creates more tender pancakes and gives the ingredients time to truly meld together.

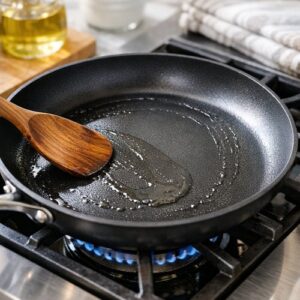
Step 3: Prepare Your Cooking Surface With Care
Place a nonstick skillet over medium heat—medium is crucial, not high. Many people crank the heat thinking they’ll cook faster, but high heat burns the outside before the inside cooks through. Medium heat allows the pancakes to develop a golden exterior while the interior stays fluffy.
Let the pan heat for about 1-2 minutes. You’ll know it’s ready when a drop of water flicked onto the surface sizzles gently and evaporates within a second. Add just ½ teaspoon of oil to the pan and tilt it to coat evenly. The oil should shimmer but not smoke.

Step 4: Cook the First Side Until Bubbles Form
Pour approximately ¼ cup of batter onto the heated skillet for each pancake. I use a ¼-cup measuring cup or ladle—consistency in size means consistency in cooking time. Space them about 2 inches apart so they have room to cook without touching.
Now comes the patience part. Let them cook undisturbed for 1-2 minutes. Watch for bubbles to form across the surface—these bubbles are created by steam escaping from the batter. Once you see bubbles and the edges of the pancake look slightly set and dull (rather than shiny), the bottom has developed enough structure to flip.
Here’s how I check doneness: I gently lift the edge of one pancake with a spatula. If it releases easily and the underside is golden brown with no raw spots, it’s ready to flip. The color should be warm and inviting, not pale.

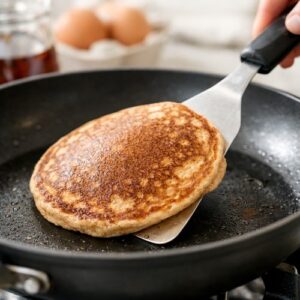
Step 5: Flip and Cook the Second Side to Perfection
Using a thin, flexible spatula, slide it under the pancake and flip it in one confident motion. This takes practice, so don’t worry if your first few aren’t perfect—I’ve flipped plenty of pancakes onto the stovetop in my day.
Cook the second side for 1-2 minutes, until the bottom is also golden brown. The second side always cooks slightly faster than the first, so watch carefully. You’ll notice the pancake will look firmer and less jiggly when it’s fully cooked through. It should feel light and airy when you gently press the center with your spatula.
If the pancakes are browning too quickly or seem raw inside, lower the heat slightly. If they’re cooking too slowly and looking pale, increase the heat just a notch. Every stovetop is different, so be willing to adjust.

Step 6: Keep Cooked Pancakes Warm While You Finish the Batch
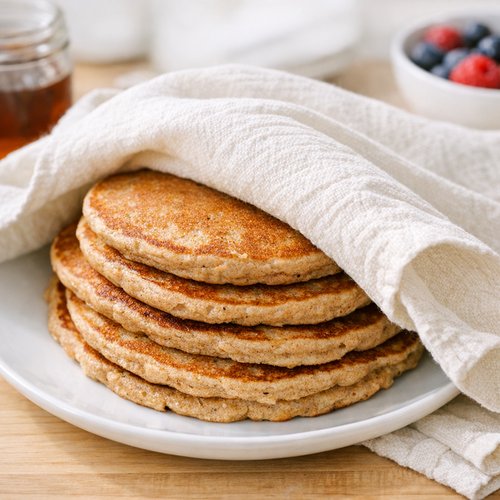
Transfer each finished pancake to a plate and drape it loosely with a clean kitchen towel. This keeps them warm without steaming them into mushiness. The towel traps heat while allowing some steam to escape, keeping the pancakes fluffy rather than soggy.
Repeat the cooking process with the remaining batter. Re-oil the pan after every 2-3 pancakes—this ensures consistent browning and prevents sticking. The pan temperature should remain steady at medium heat throughout the entire batch.
Step 7: Serve Warm With Your Favorite Toppings
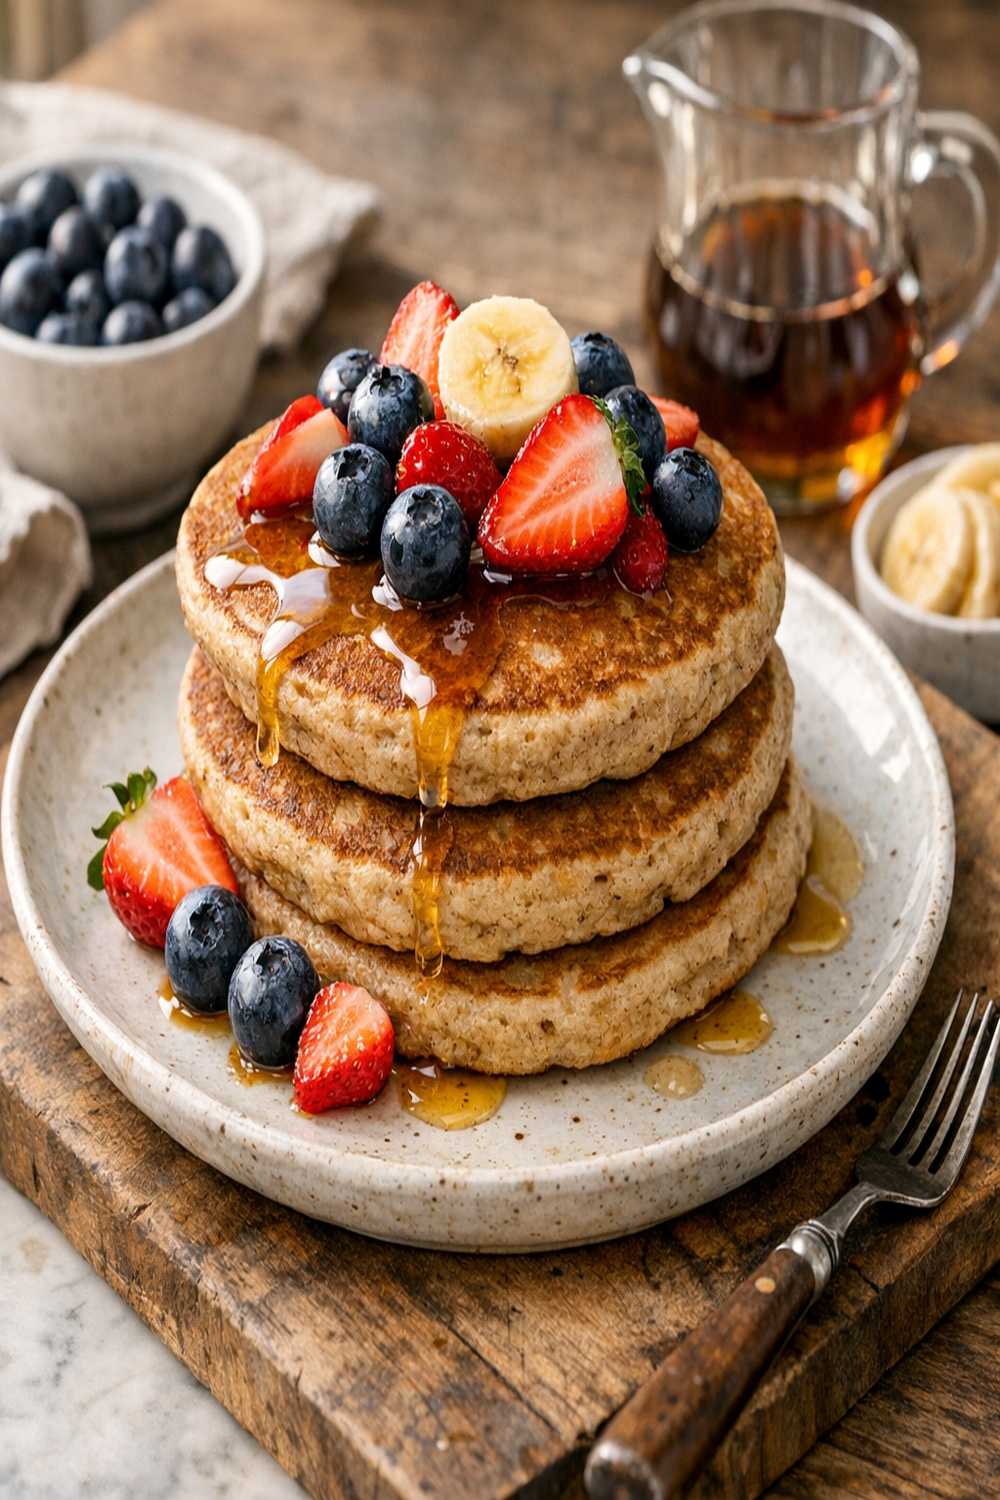
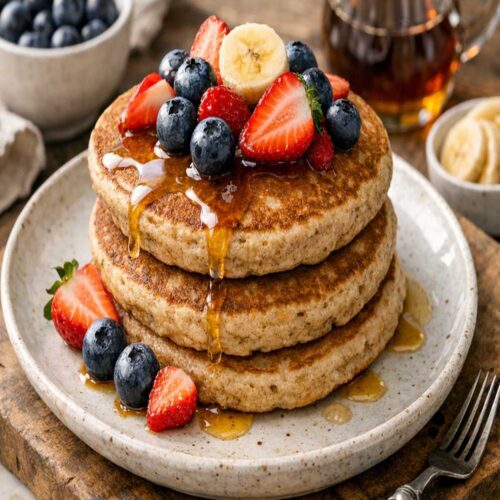
Once all pancakes are cooked, serve them immediately while they’re still warm. This is when they’re at their absolute best—tender, fluffy, and ready to receive whatever toppings speak to you. Whether it’s pure maple syrup, fresh berries, a dollop of Greek yogurt, or even a handful of chocolate chips, these pancakes are the perfect vehicle.

Tips and Tricks
- Room temperature ingredients matter – When eggs are at room temperature, they incorporate more smoothly into the wet mixture, creating better lift. Take them out of the fridge 15 minutes before cooking. Almond milk also combines more evenly at room temperature rather than straight from the cold fridge.
- Don’t overmix the batter – I know this is mentioned often, but it’s worth repeating. Overmixing develops gluten, which makes pancakes tough instead of tender. Mix just until the flour disappears. Tiny lumps are your friends.
- Use a kitchen thermometer for consistency – If you want to be extra precise, verify your skillet is at 350°F (175°C) using an instant-read thermometer. This removes guesswork and ensures every batch cooks identically.
- Add flavor without extra ingredients – A pinch of ground cinnamon, nutmeg, or a splash of vanilla extract elevates these pancakes. Add these to the dry ingredients before mixing with the wet. You’re not changing the recipe—you’re exploring its potential.
- Make pancake “coins” for meal prep – Cook them slightly smaller than normal (2-tablespoon portions). They freeze beautifully and reheat in the toaster for quick breakfasts throughout the week.
Common Mistakes to Avoid
- Using whole wheat flour that’s too old – Whole wheat flour contains natural oils that can go rancid over time. Buy smaller quantities and store in an airtight container in a cool, dark place. If your flour smells even slightly off, replace it. Rancid flour creates pancakes with a bitter aftertaste.
- Cooking on heat that’s too high – This is the number one mistake I see. High heat creates burned exteriors and raw centers. Medium heat is your friend. It takes a few extra minutes, but the results are vastly superior.
- Flipping too early – Impatience is real. Wait for those bubbles to form and the edges to look set before flipping. Flipping too early causes pancakes to deflate and cook unevenly.
- Skipping the rest period – That 5-minute rest after mixing allows flour to fully hydrate and ingredients to bond. It seems like a small thing, but it noticeably improves texture and tenderness.
Can I Store 3 Ingredient Whole Wheat Pancakes Recipe?
Absolutely, and this is where meal prep comes into play. I make a triple batch on Sunday mornings and use them throughout the week.
Room temperature storage: Cooked pancakes will stay fresh for about 1-2 hours at room temperature, covered with a clean towel. This is perfect for a leisurely family breakfast where people eat in shifts.
Refrigerator storage: Place cooked pancakes in an airtight container separated by parchment paper so they don’t stick together. They’ll keep for up to 4 days. Reheat gently in a 300°F oven for about 5 minutes, or place them in the toaster on medium setting for 1-2 minutes until warmed through.
Freezer storage: This is my favorite option for meal prep. Once the pancakes are completely cooled, arrange them in a single layer on a baking sheet and freeze for 2-3 hours until solid. Then transfer them to a freezer-safe bag or container, where they’ll keep for up to 3 months. There’s something wonderful about having healthy pancakes ready at a moment’s notice.
Reheating frozen pancakes: No thawing needed. Pop them straight into the toaster (set to medium-high) or place them on a baking sheet in a 350°F oven for about 8 minutes. They’ll taste almost as fresh as the day you made them.
Make-Ahead Guide: For maximum convenience, I prepare my batter the night before and store it in an airtight container in the refrigerator. The batter will thicken slightly as the flour continues to hydrate—if it seems too thick in the morning, whisk in a tablespoon of almond milk at a time until you reach the right consistency. Batter keeps for up to 2 days refrigerated, making weekday mornings exceptionally simple.
Nutrition Information
Based on USDA nutritional data, each pancake (approximately 1/8 of the recipe) contains roughly 85 calories, 3 grams of protein, 15 grams of carbohydrates, 1.5 grams of fat, and 2 grams of dietary fiber. The whole wheat flour provides essential B vitamins including thiamine, niacin, and folate, plus minerals like manganese and magnesium that support energy metabolism and bone health.
Eggs contribute high-quality complete protein and choline, which supports brain health. Almond milk adds creaminess while keeping added sugars minimal—the unsweetened variety I recommend contains zero grams of added sugar, unlike many commercial varieties.
These are genuinely nutritious pancakes. The combination of whole grain carbohydrates, protein from eggs, and healthy fiber keeps blood sugar stable and provides sustained energy. Unlike refined flour pancakes that might leave you hungry again within an hour, these keep you satisfied.
What Can I Serve With 3 Ingredient Whole Wheat Pancakes Recipe?
The beauty of these simple pancakes is that they serve as a canvas for endless combinations. Here’s how I think about serving them:
- Classic maple syrup with fresh berries – A drizzle of pure maple syrup (not the corn syrup imposters) paired with blueberries, raspberries, or strawberries creates the perfect balance of sweetness and tartness. The berries add antioxidants and fiber.
- Greek yogurt with granola and honey – This transforms pancakes into something almost like a sophisticated parfait. The yogurt adds protein and probiotics, while granola provides texture contrast.
- Almond butter and sliced banana – A more savory-leaning combination that feels almost like a sandwich. The healthy fats in almond butter slow digestion and keep you satisfied longer.
- Fresh fruit compote – Cook down fresh berries with a touch of honey and lemon juice for a bright, fresh topping that feels elegant enough for entertaining.
- Creamy avocado and everything bagel seasoning – Yes, you can make savory pancakes. Top with mashed avocado, a squeeze of lemon, and some everything bagel seasoning for a completely different flavor profile.
- Spiced sautéed apples with cinnamon – In fall especially, sauté diced apples with cinnamon and a drizzle of maple syrup. The warm spices and soft fruit create ultimate comfort food vibes.
If you’re exploring global flavors, consider how these pancakes might pair with Roasted Habanero Mango Salsa Recipe for a completely unexpected sweet and spicy breakfast experience that feels adventurous.
Substitutes
- Regular dairy milk instead of almond milk – Use the same quantity of whole milk or 2% milk. This will make the pancakes slightly richer. For a lighter option, try oat milk or coconut milk, which both have excellent neutral flavors. Avoid sweetened versions unless you want additional sugar.
- All-purpose flour instead of whole wheat – If whole wheat isn’t available, you can use all-purpose flour, though I’d recommend using 2 cups instead of 2¼ cups since all-purpose flour is lighter and more tightly packed. The pancakes will be lighter in color and slightly less nutty in flavor, but the texture will still be good.
- A combination of whole wheat and spelt flour – For variety, use 1¼ cups whole wheat flour and 1 cup spelt flour. Spelt has a slightly sweet, butterscotch-like flavor that adds complexity. Both are whole grain, so the nutrition profile remains excellent.
- Aquafaba (chickpea liquid) instead of eggs – For a vegan option, use 4-5 tablespoons of aquafaba (the liquid from a can of chickpeas) whisked together with 1 tablespoon cornstarch to replace each egg. Whisk thoroughly to incorporate air, just as you would with regular eggs.
- Butter instead of neutral oil for cooking – Use clarified butter (ghee) or regular butter for a richer flavor. Regular butter has a lower smoke point, so cook on medium-low heat. The pancakes will have a subtle, delicious butteriness.
Seasonal Variations
- Spring: Add fresh lemon zest to the dry ingredients and top the warm pancakes with whipped Greek yogurt and fresh strawberries. The brightness feels perfect as the weather warms.
- Summer: Stir fresh blueberries into the batter itself (about ½ cup). In summer, berries are at peak flavor and abundance. Serve with a cooling dollop of coconut yogurt and fresh mint.
- Fall: Add 1 teaspoon pumpkin pie spice to the dry ingredients and substitute ½ cup of the almond milk with pure pumpkin purée. Top with candied pecans and a maple glaze. This feels like fall on a plate.
- Winter: Add ½ teaspoon of cardamom and a pinch of cloves to the dry ingredients. Top with caramelized pears and a drizzle of almond butter. The warm spices feel especially comforting during cold months.
3 Ingredient Whole Wheat Pancakes Recipe
Ingredients
- 2 cups unsweetened almond milk provides moisture without added sugars that would spike blood glucose
- 2 large eggs room temperature, which helps them incorporate smoothly and create better lift
- 2¼ cups whole wheat flour measured by spooning and leveling, never scooping directly from the bag, which compacts the flour
- 1 teaspoon pure vanilla extract deepens flavor complexity and adds warmth
- ½ teaspoon fine sea salt enhances all flavors and balances the nutty wheat notes
- 2 tablespoons neutral oil such as vegetable or coconut for cooking, prevents sticking without imparting flavor
Instructions
Step 1: Combine Your Wet Ingredients with Purpose
- Crack your eggs into a large mixing bowl and pour in the unsweetened almond milk. Using a whisk, beat them together with intention—you’re looking for a uniform, pale mixture that takes about 1-2 minutes. This step is crucial because you’re incorporating air into the eggs, which will create lift when the pancakes cook. I always feel the batter lighten as I whisk. It’s a physical sensation you learn to recognize. The color shifts from dark yellow to a lighter, more homogeneous tone. This means the eggs are properly incorporated and ready to receive the flour.

Step 2: Gradually Introduce the Flour Without Creating Lumps
- This is where many home cooks stumble. Instead of dumping all the flour in at once, sprinkle it gradually while whisking continuously. I typically add the flour in four additions, whisking for about 10-15 seconds between each addition. This prevents the lumps that form when wet ingredients suddenly meet a large amount of dry flour. The whisking motion is gentle—I’m not trying to develop gluten like I would with bread dough. I’m just incorporating the flour until I see no visible streaks of white flour remaining. A few tiny lumps are actually fine and will smooth out as the batter rests. Stop whisking once the batter reaches a consistency similar to thick yogurt. Here’s a professional secret: let the batter rest for 5 minutes before cooking. This allows the whole wheat flour to fully hydrate, which creates more tender pancakes and gives the ingredients time to truly meld together.
Step 3: Prepare Your Cooking Surface With Care
- Place a nonstick skillet over medium heat—medium is crucial, not high. Many people crank the heat thinking they’ll cook faster, but high heat burns the outside before the inside cooks through. Medium heat allows the pancakes to develop a golden exterior while the interior stays fluffy. Let the pan heat for about 1-2 minutes. You’ll know it’s ready when a drop of water flicked onto the surface sizzles gently and evaporates within a second. Add just ½ teaspoon of oil to the pan and tilt it to coat evenly. The oil should shimmer but not smoke.
Step 4: Cook the First Side Until Bubbles Form
- Pour approximately ¼ cup of batter onto the heated skillet for each pancake. I use a ¼-cup measuring cup or ladle—consistency in size means consistency in cooking time. Space them about 2 inches apart so they have room to cook without touching. Now comes the patience part. Let them cook undisturbed for 1-2 minutes. Watch for bubbles to form across the surface—these bubbles are created by steam escaping from the batter. Once you see bubbles and the edges of the pancake look slightly set and dull (rather than shiny), the bottom has developed enough structure to flip. Here’s how I check doneness: I gently lift the edge of one pancake with a spatula. If it releases easily and the underside is golden brown with no raw spots, it’s ready to flip. The color should be warm and inviting, not pale.

Step 5: Flip and Cook the Second Side to Perfection
- Using a thin, flexible spatula, slide it under the pancake and flip it in one confident motion. This takes practice, so don’t worry if your first few aren’t perfect—I’ve flipped plenty of pancakes onto the stovetop in my day. Cook the second side for 1-2 minutes, until the bottom is also golden brown. The second side always cooks slightly faster than the first, so watch carefully. You’ll notice the pancake will look firmer and less jiggly when it’s fully cooked through. It should feel light and airy when you gently press the center with your spatula. If the pancakes are browning too quickly or seem raw inside, lower the heat slightly. If they’re cooking too slowly and looking pale, increase the heat just a notch. Every stovetop is different, so be willing to adjust.
Step 6: Keep Cooked Pancakes Warm While You Finish the Batch
- Transfer each finished pancake to a plate and drape it loosely with a clean kitchen towel. This keeps them warm without steaming them into mushiness. The towel traps heat while allowing some steam to escape, keeping the pancakes fluffy rather than soggy. Repeat the cooking process with the remaining batter. Re-oil the pan after every 2-3 pancakes—this ensures consistent browning and prevents sticking. The pan temperature should remain steady at medium heat throughout the entire batch.

Step 7: Serve Warm With Your Favorite Toppings
- Once all pancakes are cooked, serve them immediately while they’re still warm. This is when they’re at their absolute best—tender, fluffy, and ready to receive whatever toppings speak to you. Whether it’s pure maple syrup, fresh berries, a dollop of Greek yogurt, or even a handful of chocolate chips, these pancakes are the perfect vehicle.

Notes
Nutrition
FAQs
Why are my pancakes coming out dense and heavy?
This is usually caused by one of three things: overmixing the batter, using flour that’s been packed down, or using heat that’s too low. Remember, you’re mixing just until the flour disappears—not until it’s smooth like cake batter. Whole wheat flour naturally has more structure than white flour, but it shouldn’t create heavy pancakes when treated correctly. Also ensure your heat is at medium and that your pan is properly preheated.
Can I make this recipe in advance and refrigerate the raw batter?
Yes! This is one of my favorite make-ahead strategies. Prepare the batter as directed, transfer it to an airtight container, and refrigerate for up to 2 days. The batter will thicken as the whole wheat flour continues to absorb moisture. Before cooking, whisk it again and add a tablespoon of almond milk at a time if it seems too thick. The cooked pancakes will be just as delicious.
Why should I use almond milk specifically?
Unsweetened almond milk provides moisture without added sugars and has a neutral flavor that lets the nutty character of whole wheat shine through. That said, any unsweetened milk will work—dairy milk, oat milk, coconut milk, or cashew milk. I prefer almond milk because it’s widely available, shelf-stable, and creates consistently fluffy pancakes. Just avoid sweetened varieties, which will throw off the ratio and add unnecessary sugar.
How do I prevent sticking without using a nonstick pan?
You don’t need a nonstick pan, though they certainly help. A regular stainless steel skillet works beautifully if you properly preheat it and use enough oil. The key is preheating for a full 1-2 minutes so the surface is hot enough to create a seal that prevents sticking. Add your oil and let it shimmer—don’t skimp on the oil. If your pan seems to stick, you either need more oil or a slightly hotter temperature.
Can these pancakes help with meal prep for the entire week?
Absolutely, and this is something I do regularly. Make a triple batch and freeze them as described in the storage section. Having healthy pancakes in the freezer transforms chaotic mornings into manageable ones. Grab two pancakes, toast them, and top with whatever you have on hand—fruit, nut butter, yogurt. It takes 3 minutes and you’ve got a nutritious, satisfying breakfast. This is real meal prep that actually works with your lifestyle.
More Recipes You’ll Love
- Fresh Pineapple Salsa Fed And Fit Calories – For a tropical topping that brings bright, unexpected flavor to your morning pancakes with natural sweetness and tropical brightness.
- Food Faith Fitness – My philosophy on creating meals that nourish every part of you—body, mind, and spirit—perfectly aligned with these wholesome pancakes.
- Foiled Baked Potatoes – A savory side dish option if you want to create a more complete breakfast spread with protein and vegetables alongside your pancakes.
I hope you make these pancakes this weekend and experience that same warmth I felt all those years ago at my grandmother’s table. There’s something deeply nourishing about feeding yourself and your loved ones with simple, real ingredients prepared with care. These pancakes are proof that you don’t need complicated recipes or a long ingredient list to create something genuinely delicious and nutritious.
The best part? Once you master this basic formula, you have the foundation to experiment endlessly. Add spices, fold in fruits, create seasonal variations. These three ingredients become your starting point, not your limitation.
Happy Cooking!