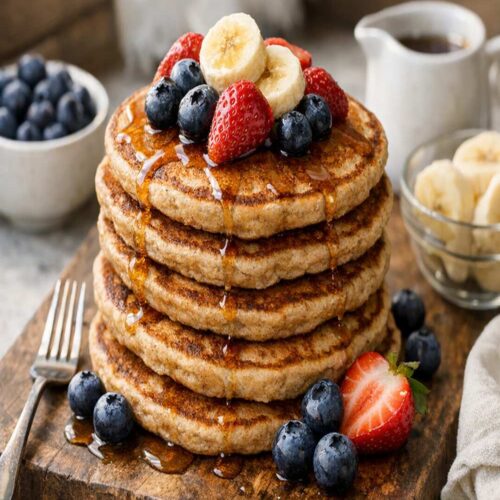
3 Ingredient Whole Wheat Pancakes Recipe
There's something magical about pancakes on a Sunday morning—the kind that brings everyone to the table without anyone asking what's for breakfast. I've created versions of these whole wheat pancakes that pair beautifully with fresh fruit, a drizzle of maple syrup, or even a spoonful of Greek yogurt for extra protein. If you're feeling adventurous, try topping them with a Roasted Habanero Mango Salsa Recipe for a savory-sweet twist that'll surprise your guests.
Instructions
Step 1: Whisk Your Eggs and Milk Together
- In a large mixing bowl, crack your two room-temperature eggs directly into the bowl. Using a whisk, beat them together vigorously for about 30-45 seconds until they're pale and slightly frothy. This isn't just mixing—you're incorporating air, which becomes crucial for structure since we don't have baking powder here. Once your eggs are well-beaten, slowly pour in your almond milk while continuing to whisk. The goal is a completely smooth, homogeneous liquid with no streaks of egg white visible. This step takes about 1-2 minutes of continuous whisking. I listen for the change in sound—when it transitions from thick to liquid and back to slightly thickened, I know the eggs have fully incorporated.

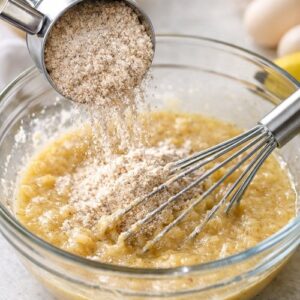
Step 2: Gradually Incorporate the Whole Wheat Flour
- Here's where patience matters most. Rather than dumping all your flour in at once, sprinkle it in gradually—about ¼ cup at a time—while whisking continuously. This prevents lumps from forming because the flour has time to fully hydrate. Lumps are your enemy here; they create tough, dense pockets in your finished pancakes. After each addition of flour, whisk for about 10-15 seconds until you see no white streaks remaining. The batter will go from very thin to gradually thickening as more flour absorbs the liquid. When finished, your batter should have the consistency of thick cream or yogurt—thick enough to hold its shape on the griddle, but still pourable. I add my pinch of salt and cinnamon right along with the flour. The salt doesn't need to dissolve; it'll distribute evenly throughout the flour before the flour hits the wet ingredients.
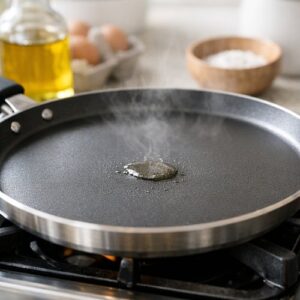
Step 3: Heat Your Griddle or Skillet Properly
- Here's a professional secret I learned in the culinary kitchen: the right temperature makes or breaks pancakes. Set your nonstick skillet or griddle over medium heat. Let it preheat for 2-3 minutes. Don't rush this—if your pan isn't properly heated, your pancakes will be pale and tough on the outside while remaining undercooked inside. To test readiness, flick a few drops of water onto the surface. They should dance and evaporate almost immediately—not sit there sizzling slowly, and not vanish in a fraction of a second. That's your sweet spot. If you're using a regular skillet instead of a griddle, this matters even more because heat distribution is less even. Once your pan is ready, lightly brush or wipe it with neutral oil. You're not trying to fry these pancakes; you're just preventing sticking. A paper towel with a tiny bit of oil works perfectly.
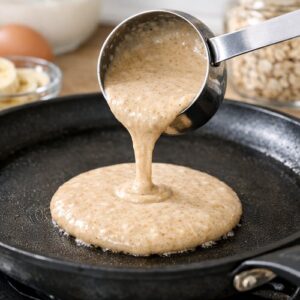
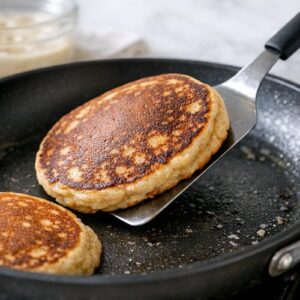
Step 4: Pour and Cook the First Side
- Using a ¼ cup measuring cup or a small ladle, pour your batter directly onto the hot surface. Each pancake will be about 3 inches in diameter—manageable to flip and close enough together that they share warmth without touching. I usually fit 3-4 pancakes on a standard 10-inch skillet at once. Now comes the hardest part: patience. Don't touch the pancakes. Let them cook undisturbed for 1-2 minutes. Watch the top surface carefully. You'll first see moisture disappear, then small bubbles will form across the top—first just one or two, then more. When most of the surface is covered with bubble craters and the edges look set and slightly dry, that's your cue to flip. The bubbles are your signal because they indicate that the bottom has cooked through and set enough to flip without falling apart. This is why we can skip baking powder—we're letting the natural steam and structure of the eggs do the lifting.
Step 5: Flip and Finish Cooking
- Using a thin spatula, slide it completely under each pancake to ensure it's not sticking, then flip it in one confident motion. The bottom should be light golden brown—not dark, not pale, but that perfect toasted color that tells you the surface cooked through without burning. Cook the second side for 1-1.5 minutes, which is slightly shorter than the first side because the pan is now fully heated and the pancake is partially cooked through already. You're not looking for deep browning here—just enough color to know it's set all the way through. If your pancakes are browning too fast (dark within 45 seconds), reduce your heat to medium-low for the next batch. If they're barely coloring after 2 minutes, increase slightly to medium-high. This adjustment is exactly why understanding your own stove matters more than following a timer blindly.
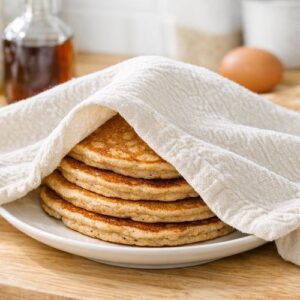
Step 6: Keep Warm and Repeat
- Transfer your finished pancakes to a plate and loosely cover them with a clean kitchen towel. The towel traps steam without creating condensation that would make them soggy. This keeps them warm while you cook the remaining batter, and it's a trick I learned from professional kitchens that home cooks often skip. If your pan needs it, wipe it down quickly with a dry paper towel and add another light brushing of oil before the next batch. Oil can accumulate and burn if you don't manage it between batches, so I always give the pan a quick clean. Repeat the process with remaining batter. You'll likely develop even better feel for the timing by batch two or three, as you're attuning to your specific stove's behavior.
Notes
- Room Temperature Matters More Than You Think - Cold eggs whip in air less effectively, and cold milk takes longer to hydrate the flour evenly. Room temperature ingredients come together in seconds, not minutes. Pull them out of the fridge while you prepare your pan.
- Don't Overmix the Batter - Once all your flour is incorporated, stop whisking. Overmixing develops gluten, which creates tough, chewy pancakes instead of tender ones. You want some small lumps remaining—these cook out and create a tender crumb.
- Rest Your Batter - Let the batter sit for 5-10 minutes after mixing. This gives the whole wheat flour time to fully absorb the liquid, resulting in more tender pancakes. I use this time to set the table or brew coffee.
- Use a Griddle if You Have One - A flat griddle heats more evenly than a skillet, so all your pancakes cook at the same rate. If you don't have a griddle, a well-seasoned cast iron skillet is your next best option for heat distribution.
- Fresh Whole Wheat Flour is Better - Whole wheat flour goes rancid faster than white flour because of the oils in the bran. Buy from sources with good turnover, and store yours in the freezer if you don't use it regularly. Fresh flour makes noticeably better-tasting pancakes.
- Temperature Adjustment is Normal - Every stove runs differently. Some of mine run hot, some cool. The first batch is always a test. If they're burning, adjust down. If they're pale, adjust up. This isn't failure; it's learning your equipment.
Nutrition
Calories: 278kcalCarbohydrates: 49gProtein: 12gFat: 5gSaturated Fat: 1gCholesterol: 82mgSodium: 195mgFiber: 8g
Tried this recipe?Let us know how it was!