When it comes to a culinary adventure, few dishes can match the delightful juxtaposition of savory and sweet you find in Walnut Shrimp. This dish, inspired by Chinese cuisine and enjoyed in various forms around the world, brings the best of both worlds to your …
When you’re thinking about what to serve with a tasty dish, consider pairing it with sides that complement its unique flavor. Yu choy, with its slight bitterness and delightful crunch, goes wonderfully with light proteins and vibrant grains. Imagine enjoying it alongside grilled chicken breast …
Fried chicken wings are a classic favorite, and what pairs well with them can elevate your meal to a whole new level. Depending on your mood or occasion, you can experiment with various sides to please your palate. Think crispy coleslaw – its crunch and tang contrast beautifully with the wings. Got a sweet tooth?
How about some honey-glazed cornbread? Its buttery goodness complements the savory notes of the chicken. For a lighter touch, consider a zesty cucumber salad, balancing the rich flavors with freshness. Last but not least, classic French fries can never go wrong. There’s something about that golden crispiness that sings alongside those flavorful wings.
Oh, fried chicken wings. If there’s an analogy for happiness, these crispy delights might just be it. There’s something special about reaching into a basket and pulling out that perfect piece. Growing up, takeout nights with wings became a ritual for my family.
Fast forward to today, I found myself craving that familiar taste. I decided to craft my very own takeout-style fried chicken wings. Spoiler alert: it’s a game-changer!
What Is Fried Chicken Wings Takeout Style?
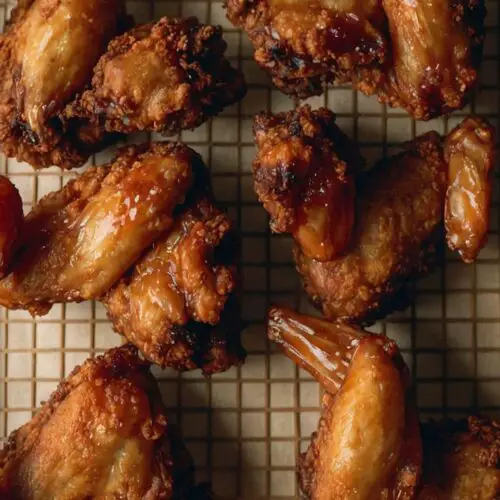
Fried chicken wings takeout style involves a process that results in ultra-crispy, richly seasoned wings that can transport you straight to your favorite local joint. They typically boast a beautiful golden-brown hue, a texture that’s crunchy on the outside, and juicy tenderness within.
It’s the magic of deep frying combined with aromatic flavors that leaves everyone wanting more. These wings are versatile; you can toss them in your favorite sauce or leave them plain as a canvas for dipping.
You will also like the following Appetizers recipes!
Here’s the kicker—this recipe is not just another run-of-the-mill wing dish. It’s crafted with intention. Here are four solid reasons why this recipe stands out:
1. Superior Flavor Profile The mix of soy sauce, Shaoxing rice wine, and five-spice powder creates a deep, rich flavor. Every bite is a delightful punch of umami that lingers in your mouth.
2. Perfectly Crispy Texture Achieving the perfect crunch requires a blend of cornstarch and flour. This combination ensures the wings fry beautifully, creating that coveted texture with each piece.
3. Simple Ingredients You don’t need a supermarket full of spices and sauces. Just a handful of accessible ingredients is required, making this recipe user-friendly for anyone in the kitchen.
4. Customizable Wings offer versatility like no other dish. You can coat them in sauce or enjoy them plain. This recipe lays a strong foundation, allowing room for creativity.
Ingredients You’ll Need To Make These Fried Chicken Wings Takeout Style
Before diving into the cooking, let’s gather our ingredients:
2 ½ pounds fresh whole chicken wings (about 10–12 pieces, rinsed and thoroughly patted dry)
1 large egg, lightly beaten
1 tablespoon light soy sauce
1 tablespoon Shaoxing rice wine
1 teaspoon toasted sesame oil
1 teaspoon minced fresh ginger
1 ½ teaspoons fine sea salt
¼ teaspoon ground white pepper
1/8 teaspoon freshly ground black pepper
½ teaspoon granulated sugar
½ teaspoon five-spice powder (optional)
1 tablespoon cornstarch
2 tablespoons plain all-purpose flour
Neutral oil, for deep frying
How To Make These Fried Chicken Wings?
Get your apron on; it’s time to make some wings!
Step 1: Prepare the Marinade
In a bowl, combine the beaten egg, soy sauce, Shaoxing rice wine, and sesame oil. Mix well until fully combined. Add in the minced ginger, sea salt, white pepper, black pepper, sugar, and optional five-spice powder. Stir until you have a smooth marinade.
Step 2: Marinate the Chicken Wings
Place your rinsed and dried chicken wings in a large bowl. Pour the marinade over the wings. Make sure every piece is coated. Let it sit for at least 30 minutes. For best results, marinate for a few hours or even overnight in the refrigerator.
Step 3: Prepare for Frying
After marination, combine the cornstarch and flour in a separate bowl. Remove the wings from the marinade, letting excess liquid drip off. Dredge each wing in the flour-cornstarch mixture, ensuring an even coating. Shake off any excess.
Step 4: Heat the Oil
In a deep frying pan or pot, heat about 2-3 inches of neutral oil to 350°F (175°C). You can check the temperature using a kitchen thermometer. If you don’t have one, drop a small bit of batter into the oil; if it sizzles, you’re good to go!
Step 5: Fry the Wings
Carefully place a few wings into the hot oil, making sure not to overcrowd the pan. Fry in batches if necessary. Cook for about 8-10 minutes, turning occasionally until they’re golden brown and crispy.
Step 6: Drain and Serve
Once cooked, remove the wings from the oil and drain on paper towels. This will help absorb excess oil and keep them crispy. Serve hot, and don’t forget the dipping sauce!
Tips for Perfect Fried Chicken Wings
Use Fresh Wings: Fresh wings yield the best flavor and texture compared to frozen ones.
Temperature Control: Keep the oil temperature steady. Too low, and wings can become greasy; too high, and they’ll burn outside while remaining raw inside.
Don’t Skip the Marinade: Allowing the wings to soak up the flavors deeply amplifies the taste. Be patient!
Fry in Batches: Avoid overcrowding the pan. This prevents temperature drops and ensures even cooking.
Experiment with Sauces: Try different sauces post-frying, like buffalo, BBQ, or honey garlic.
Nutritional Information
One serving (3 wings, estimated without sauce):
Calories: 260
Protein: 20g
Fat: 18g
Carbohydrates: 7g
Fiber: 0g
Sugars: 1g
(The values can vary based on frying methods and any sauces used.)
How to Store the Leftovers?
If you find yourself with extra wings, fear not! Allow them to cool down before transferring them to an airtight container. They can be stored in the fridge for up to three days. Just remember to reheat them in the oven or air fryer to regain that crispy goodness. Avoid the microwave if you want to keep that crunch!
What Are Some Recommended Side Dishes for Fried Chicken Wings Takeout Style?
Here are four side dish champions to complement those wings:
1. Coleslaw The creaminess and crunch of coleslaw provide a refreshing contrast. The tanginess cuts through the fried richness of wings, creating a satisfying combo. Add some sliced jalapeños for an exciting twist.
2. Potato Wedges Golden-brown wedges seasoned with herbs are the perfect companion. They soak up any extra sauce that might drip off the wings. Plus, who doesn’t love potatoes?
3. Garlic Bread You can’t go wrong with some toasted garlic bread next to fried chicken. The buttery, garlicky goodness adds a rich dimension to the meal.
4. Veggie Sticks with Dip Maintain a healthy balance with crunchy carrot and cucumber sticks. Pair them with a ranch or blue cheese dip for that classic wing experience.
Substitute Options for Ingredients
Sometimes life throws a curveball, and you might not have all the ingredients on hand. Here are some substitutes:
1. Shaoxing Rice Wine If you can’t find this ingredient, dry sherry or even white wine can stand in as an acceptable substitute.
2. Light Soy Sauce If you’re out of light soy sauce, you can use tamari for a gluten-free option or regular soy sauce, but adjust the salt in the recipe accordingly.
3. Cornstarch In a pinch, you can use all-purpose flour solely, but it won’t yield the same crispiness as a cornstarch-flour combo.
4. Five-Spice Powder Don’t fret if this isn’t in your spice rack; a mix of cinnamon, star anise, and black pepper can mimic a bit of that flavor profile.
Fried Chicken Wings Takeout Style
Fried chicken wings are a classic favorite, and what pairs well with them can elevate your meal to a whole new level. Depending on your mood or occasion, you can experiment with various sides to please your palate
In a bowl, combine the beaten egg, soy sauce, Shaoxing rice wine, and sesame oil. Mix well until fully combined. Add in the minced ginger, sea salt, white pepper, black pepper, sugar, and optional five-spice powder. Stir until you have a smooth marinade.
Step 2: Marinate the Chicken Wings
Place your rinsed and dried chicken wings in a large bowl. Pour the marinade over the wings. Make sure every piece is coated. Let it sit for at least 30 minutes. For best results, marinate for a few hours or even overnight in the refrigerator.
Step 3: Prepare for Frying
After marination, combine the cornstarch and flour in a separate bowl. Remove the wings from the marinade, letting excess liquid drip off. Dredge each wing in the flour-cornstarch mixture, ensuring an even coating. Shake off any excess.
Step 4: Heat the Oil
In a deep frying pan or pot, heat about 2-3 inches of neutral oil to 350°F (175°C). You can check the temperature using a kitchen thermometer. If you don’t have one, drop a small bit of batter into the oil; if it sizzles, you’re good to go!
Step 5: Fry the Wings
Carefully place a few wings into the hot oil, making sure not to overcrowd the pan. Fry in batches if necessary. Cook for about 8-10 minutes, turning occasionally until they’re golden brown and crispy.
Step 6: Drain and Serve
Once cooked, remove the wings from the oil and drain on paper towels. This will help absorb excess oil and keep them crispy. Serve hot, and don’t forget the dipping sauce!
Notes
Use Fresh Wings: Fresh wings yield the best flavor and texture compared to frozen ones.
Temperature Control: Keep the oil temperature steady. Too low, and wings can become greasy; too high, and they’ll burn outside while remaining raw inside.
Don’t Skip the Marinade: Allowing the wings to soak up the flavors deeply amplifies the taste. Be patient!
Fry in Batches: Avoid overcrowding the pan. This prevents temperature drops and ensures even cooking.
Experiment with Sauces: Try different sauces post-frying, like buffalo, BBQ, or honey garlic.
1. Can I bake these chicken wings instead of frying them?
Absolutely, you can bake them! Bake at 425°F (220°C) for about 35-45 minutes, flipping halfway through. You won’t get the same deep-fried texture, but they can still be deliciously crispy.
2. How do I get extra crispy wings?
After dredging, let wings sit for about 30 minutes before frying. This step helps the coating adhere and creates an extra crunch.
3. What sauces work well with fried chicken wings?
Some fan favorites include classic buffalo, honey BBQ, teriyaki, or sriracha lime. Choose based on your heat tolerance and flavor preference!
4. How long does it take to marinate the wings?
A minimum of 30 minutes is ideal, but for that extra flavor, try for several hours or overnight.
5. Can I use frozen wings for this recipe?
You can, but thaw them first to allow for an even marinade. Also, keep in mind they may require slightly longer cooking time.
Conclusion
This takeout-style fried chicken wing recipe captures the essence of comfort food perfectly. Gathering with friends or family around a plate of these crunchy delights takes me back to my childhood takeout nights, and I’m sure it will do the same for you. With simple ingredients and easy steps, this dish guarantees a burst of flavor.
The best part? Each bite transports you to a world where crispy texture and savory seasoning reign supreme. So go ahead, treat yourself and your loved ones. Dive into this recipe and let the deliciousness unfold. Happy frying!
Before delving into the delightful world of Enoki Mushrooms Garlic Scallion Sauce, let’s discuss what pairs well with this tasty dish. Picture this: a steaming bowl of jasmine rice or fluffy quinoa sitting next to your dish, soaking up the flavors beautifully. You can also …
Ah, Hunan Chicken! Just the name brings back memories of flavors and experiences from my culinary adventures. This dish has a reputation for its bold and seasoned kick. If you’ve ever craved something that dances on your taste buds, this is it. But before diving …
Before diving into the delightful world of Cantonese steamed fish, it’s essential to think about what goes well on the plate. This dish thrives with simple side options that elevate the dining experience. A fresh vegetable stir-fry is a fantastic addition, as its crunch and vibrant colors offer a lovely contrast to the delicately steamed fish.
A bowl of steamed jasmine rice acts as the perfect carb partner, absorbing the delectable sauce drizzled over the fish. Don’t forget a light soy sauce maybe accompanied by a sprinkle of sesame seeds, providing a flavorful finish. As a refreshing drink, a chilled green tea complements the meal and aids digestion with its soothing properties.
Cantonese steamed fish is more than just a dish; it’s a culinary tradition passed down through generations. Growing up in a household that cherished home-cooked meals, I often found my grandparents gathered around the dinner table, excitedly discussing the fresh catch from the local market, a clear signal that a fantastic meal was close. This dish embodies the delicate textures and bright flavors that define Cantonese cuisine, and it holds a special place in my heart.
In the bustling world of flavors, Cantonese steamed fish stands out by highlighting the fish’s natural taste rather than masking it. Whether you’re preparing for an intimate family dinner or a summer gathering, this dish is not only impressive but incredibly easy to pull together.
What is Cantonese Steamed Fish?
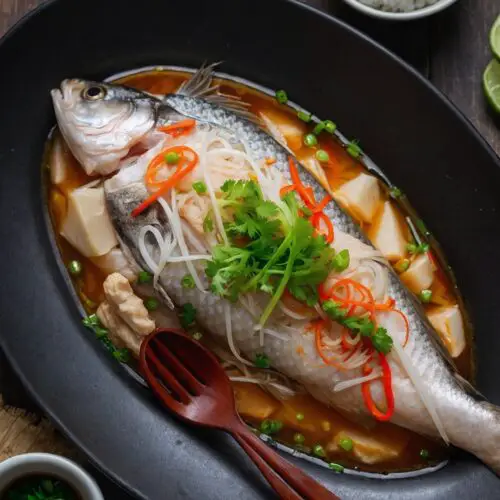
Cantonese steamed fish is a traditional dish that highlights freshly caught fish, usually either whole fish or fillets, steamed to perfection. This method of cooking preserves the moisture and enhances the natural taste of the fish. The dish typically includes ginger, garlic, and green onions for aromatics, while a drizzle of soy sauce brings the whole experience together.
This preparation celebrates freshness and simplicity, showcasing the ingredients without overwhelming garnishes or heavy sauces. In Cantonese dining, fish is also a symbol of prosperity. Therefore, serving this dish is considered auspicious during special occasions.
What is the Flavor Profile of This Dish?
The flavor profile of Cantonese steamed fish is light yet complex. When executed, the natural sweetness of the fish shines through. The ginger adds a pleasant warmth and a subtle spiciness, balancing the umami notes of soy sauce.
A hint of garlic infuses the dish with warmth, while the green onions provide a fresh, crisp finish. The sauce, often enhanced with a touch of sugar and Shaoxing wine, ties everything together, creating a harmonious blend of salty, sweet, and savory elements.
You will also like the following Lunch and Dinner recipes!
What Makes This Recipe Different From Other Cantonese Steamed Fish?
While there are numerous variations of steamed fish in Cantonese cooking, the simplicity and purity of flavors in this recipe set it apart. Unlike other recipes that may involve complex sauces or heavy marinades, this version allows the fish to take center stage.
The focus is on the quality of the fish itself, with minimal interference from seasoning. This recipe utilizes fresh ingredients sourced from local markets, ensuring that each bite captures the essence of freshness and culinary heritage.
Ingredients You’ll Need
For The Steaming:
1 whole fish (ask your fishmonger to scale and gut it)
1 small garlic clove, thinly sliced (optional, adds depth)
20 g / 0.44 oz fresh ginger, cut into thin matchstick strips
1 sprig green onions, sliced diagonally or julienned
For The Sauce:
5 tbsp cooking oil (1 tbsp for the sauce, 4 tbsp for frying aromatics)
Make sure the fish is clean and scaled. Rinse it under cold water. Pat it dry with paper towels. Using a sharp knife, make a few diagonal cuts along each side. This helps it cook evenly and allows the flavors to penetrate better.
Step 2: Marinate the Fish
Place the fish on a heatproof plate. Rub it lightly with salt and pepper. Scatter the ginger and garlic slices evenly over the fish’s surface and inside the cavity. If you have extra ginger or garlic, don’t hesitate to add more.
Step 3: Set up the Steamer
Prepare a steamer setup. You can use a bamboo or metal steamer. Fill a pot with water and bring it to a boil. Place your steaming apparatus over the pot, ensuring the fish sits above the water level.
Step 4: Steam the Fish
Once the water is boiling, carefully place the fish onto the steamer. Cover it with a lid and steam for about 12-15 minutes. The timing may vary depending on the size of the fish, so check for doneness. The fish should be opaque and flake easily with a fork.
Step 5: Prepare the Sauce
While the fish is steaming, heat a small frying pan over medium heat. Add 1 tablespoon of cooking oil. Once hot, add any remaining ginger or garlic slices, sautéing until fragrant. Be careful not to burn it.
In a bowl, mix the soy sauce, sugar, water, and Shaoxing wine. Stir until the sugar dissolves.
Step 6: Finish the Dish
After 12-15 minutes, remove the fish from the steamer. Drizzle the sauce mixture over the fish. Then, pour the sautéed ginger and garlic, including the oil, over the top. The hot oil will create a delightful aroma.
Step 7: Garnish
Finish with fresh green onions, either scattered on top or served on the side. Their bright color adds a lovely visual contrast.
Tips On Making Cantonese Steamed Fish
Use Fresh Fish: Always choose fresh fish; it’s the star of the dish. Ask your fishmonger for recommendations.
Temperature Matters: Ensure your steamer has plenty of hot steam. Starting with boiling water is crucial.
Don’t Overcrowd: If making multiple fish, steam them separately. Overcrowding leads to uneven cooking.
Feel Free with Ingredients: Don’t hesitate to add additional spices or herbs as per your taste. However, be cautious, as too much may overpower the fish.
Check Cook Time: If unsure, it’s better to leave it slightly undercooked than overcooked. Continue cooking in the residual heat if needed.
Nutrition Information
Serving Size: 1 serving
Calories: Approximately 250
Protein: 35g
Fat: 10g
Carbohydrates: 5g
Fiber: 0g
Sugar: 2g
Sodium: High due to soy sauce (use low-sodium as an option)
How Can I Store This Cantonese Steamed Fish?
You can store leftovers in an airtight container in the refrigerator for up to two days. Reheat gently in the microwave or steamer to avoid drying it out. Avoid freezing as the texture may change after thawing.
Substitute Options for Ingredients
Fresh Fish: If you can’t find whole fish, try using fillets like tilapia or cod. Freshness is key!
Shaoxing Wine: No Shaoxing wine? Use dry white wine or a splash of rice vinegar. Both will add acidity!
Soy Sauce: Light soy sauce can be substituted with tamari or coconut aminos for a gluten-free option. Flavor will vary!
Green Onions: If you don’t have green onions, fresh cilantro or parsley can work in a pinch. But beware of a different flavor profile!
Cantonese Steamed Fish
Before diving into the delightful world of Cantonese steamed fish, it’s essential to think about what goes well on the plate. This dish thrives with simple side options that elevate the dining experience.
20g/ 0.44 oz fresh gingercut into thin matchstick strips
1sprig green onionssliced diagonally or julienned
For The Sauce:
5tbspcooking oil1 tbsp for the sauce, 4 tbsp for frying aromatics
2tbsplight soy sauceadjust to taste
1 1/2tspgranulated sugarto taste
3tspwater
1tspShaoxing wine or dry sherryoptional, enhances flavor complexity
Instructions
Step 1: Prepare the Fish
Make sure the fish is clean and scaled. Rinse it under cold water. Pat it dry with paper towels. Using a sharp knife, make a few diagonal cuts along each side. This helps it cook evenly and allows the flavors to penetrate better.
Step 2: Marinate the Fish
Place the fish on a heatproof plate. Rub it lightly with salt and pepper. Scatter the ginger and garlic slices evenly over the fish’s surface and inside the cavity. If you have extra ginger or garlic, don’t hesitate to add more.
Step 3: Set up the Steamer
Prepare a steamer setup. You can use a bamboo or metal steamer. Fill a pot with water and bring it to a boil. Place your steaming apparatus over the pot, ensuring the fish sits above the water level.
Step 4: Steam the Fish
Once the water is boiling, carefully place the fish onto the steamer. Cover it with a lid and steam for about 12-15 minutes. The timing may vary depending on the size of the fish, so check for doneness. The fish should be opaque and flake easily with a fork.
Step 5: Prepare the Sauce
While the fish is steaming, heat a small frying pan over medium heat. Add 1 tablespoon of cooking oil. Once hot, add any remaining ginger or garlic slices, sautéing until fragrant. Be careful not to burn it.
In a bowl, mix the soy sauce, sugar, water, and Shaoxing wine. Stir until the sugar dissolves.
Step 6: Finish the Dish
After 12-15 minutes, remove the fish from the steamer. Drizzle the sauce mixture over the fish. Then, pour the sautéed ginger and garlic, including the oil, over the top. The hot oil will create a delightful aroma.
Step 7: Garnish
Finish with fresh green onions, either scattered on top or served on the side. Their bright color adds a lovely visual contrast.
Notes
Use Fresh Fish: Always choose fresh fish; it’s the star of the dish. Ask your fishmonger for recommendations.
Temperature Matters: Ensure your steamer has plenty of hot steam. Starting with boiling water is crucial.
Don’t Overcrowd: If making multiple fish, steam them separately. Overcrowding leads to uneven cooking.
Feel Free with Ingredients: Don’t hesitate to add additional spices or herbs as per your taste. However, be cautious, as too much may overpower the fish.
Check Cook Time: If unsure, it’s better to leave it slightly undercooked than overcooked. Continue cooking in the residual heat if needed.
Yes, but ensure it’s completely thawed and drained before cooking. Frozen fish can release water, which might affect the steaming process.
2. What kind of fish works best for this recipe?
Fish with firm flesh, such as snapper, grouper, or sea bass, works beautifully. Their flavors hold up well to steaming.
3. Can this recipe be adapted for other cuisines?
Definitely! This simple steaming technique can be applied to various fish dishes, just adjust the flavorings according to the cuisine you wish to emulate.
4. What are the best types of cooking oils to use?
Neutral oils like canola, vegetable, or peanut oil are ideal due to their high smoke point. Use less refined oils for better flavor.
5. Is Cantonese steamed fish suitable for meal prep?
Yes, it holds up well for meal prepping, but it’s best enjoyed fresh. Reheat gently to maintain flavor and texture.
Conclusion
Cantonese steamed fish is a dish steeped in tradition yet remains relevant in modern kitchens. It celebrates the freshness of the main ingredient while allowing for flavorful accents without overwhelming it. With a few simple ingredients and mindful preparation, you can create a dish that evokes memories and delights the palate.
Whenever I cook this dish, it brings me back to those spirited family dinners, surrounded by laughter and good food. It’s more than just a meal; it’s a genuine experience that is best shared. So gather your loved ones, prepare this steamed fish, and let it steal the spotlight on your dinner table. You won’t regret it!
Let me take you on a delicious adventure into the world of pineapple buns, a delightful treat that has stolen many hearts — and taste buds. If you’ve never come across these sweet, fluffy buns topped with a crumbly crust, you are in for a …
Stir fry has always held a special place in my heart. It’s not just about quick cooking; it’s about vibrant flavors, colorful veggies, and that satisfying crunch. Every time I whip up a stir fry, I feel like a culinary composer, combining ingredients into a …
Before diving into the depths of what makes Chinese hot pot a delightful choice for your dining experience at home, let’s consider what you can pair it with. Hot pot is not just about the ingredients boiled in broth; it’s an entire feast. Consider serving it with:
1. Steamed Rice: A staple that pairs perfectly with the flavor-packed broth. 2. Beverages: Flavorful teas, like jasmine or oolong, or even light wines, balance the meal. 3. Dipping Sauces: A variety of dips can elevate the experience. Think sesame sauce or homemade chili oil. 4. Side Dishes: Light snacks such as spring rolls or sesame balls add another layer.
These elements will help round out your meal and keep your guests satisfied.
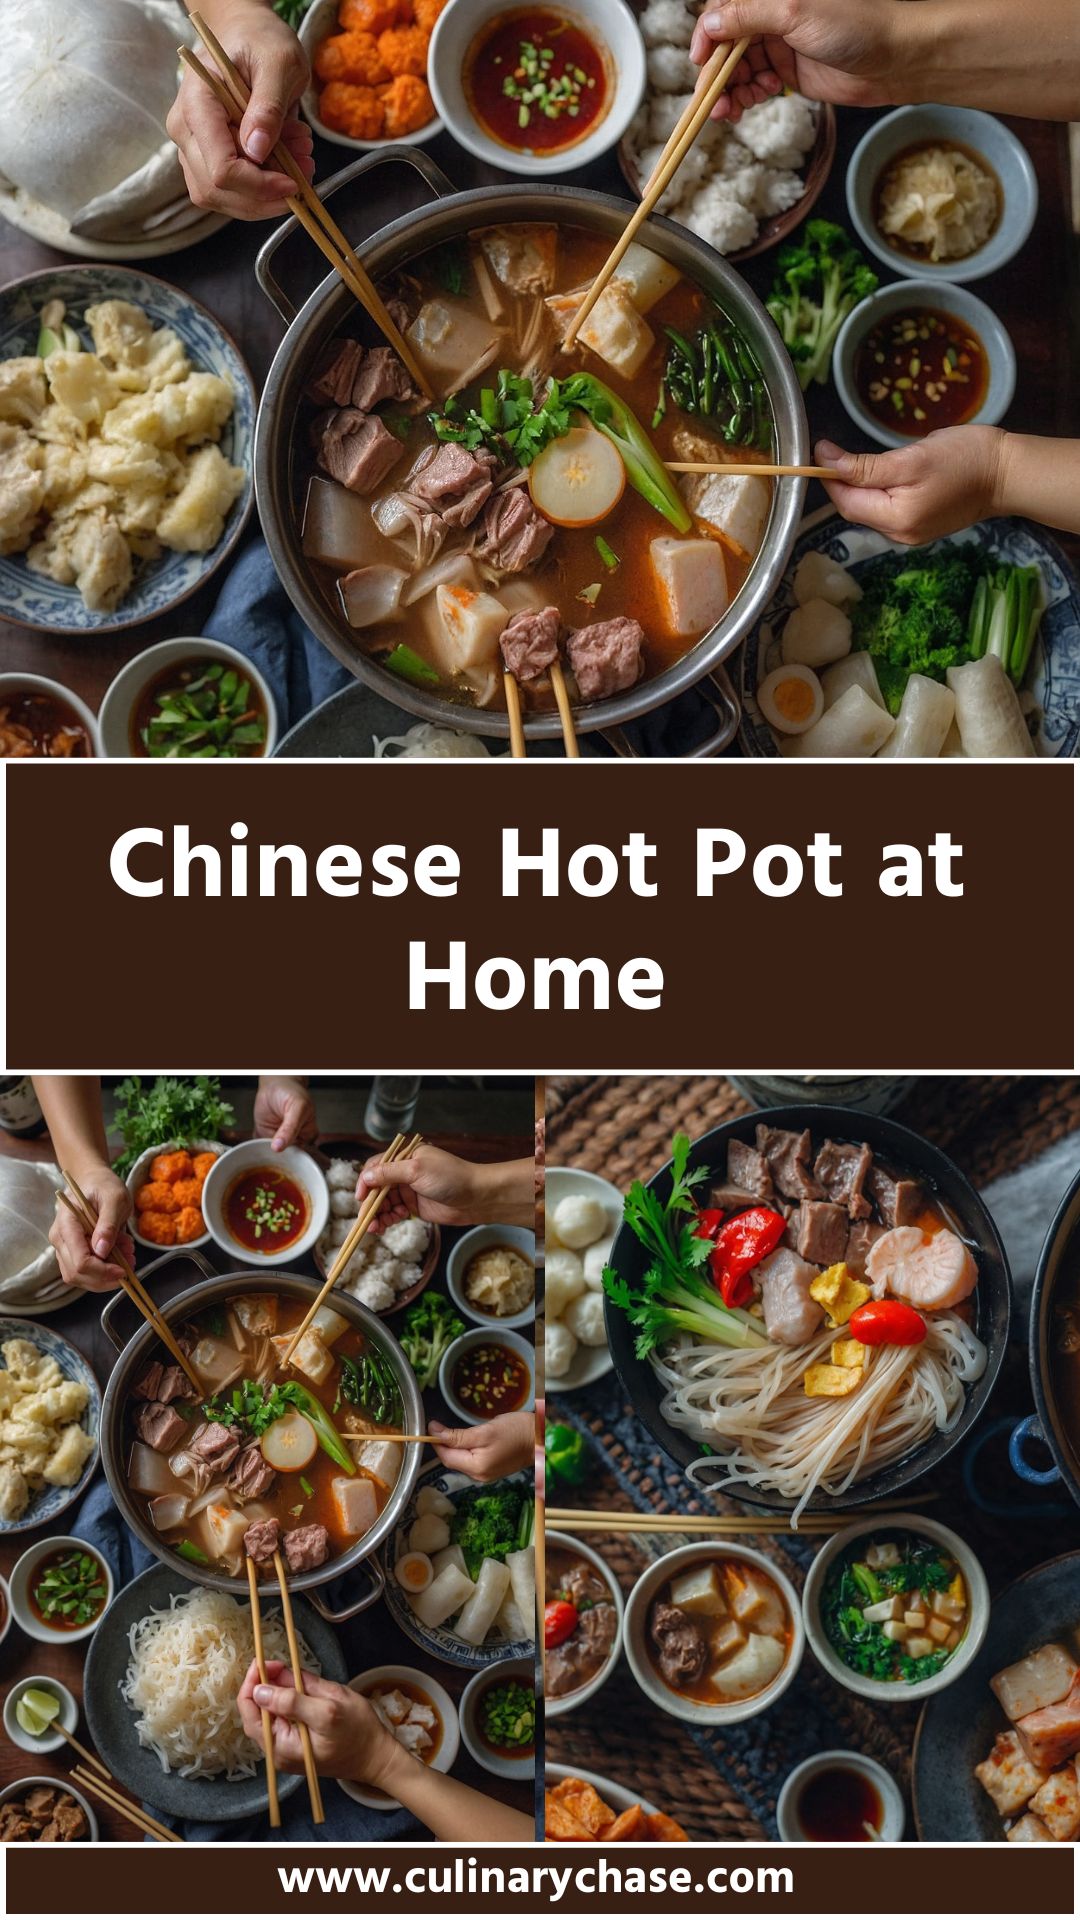
Hot pot fun! Imagine gathering around a simmering pot filled with delicious broth, surrounded by an array of fresh ingredients just waiting to be cooked. This communal dining experience has been a favorite for centuries in China. And guess what? You don’t need to venture out to a specialty restaurant to enjoy it. With some preparation and enthusiasm, you can bring this lively tradition into your home.
Cooking hot pot isn’t just about the meal; it’s about the joy of cooking at the table. Everyone engages, sharing flavors, and crafting their perfect bite. It’s a bit like a culinary adventure. So, let’s jump right into the essence of Chinese hot pot at home!
What is Chinese Hot Pot at Home?
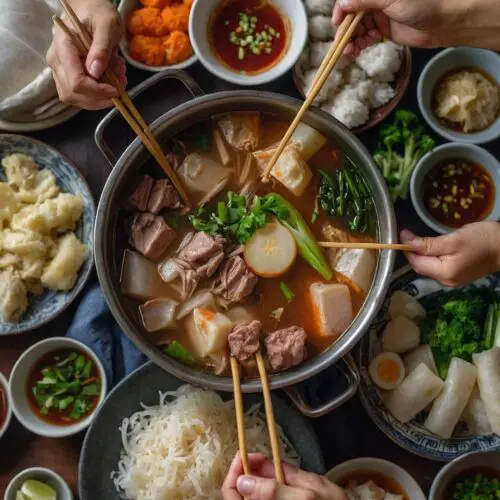
Chinese hot pot, known as “huo guo,” translates literally to “fire pot.” It is a cooking method where diners immerse various ingredients into a bubbling broth at the center of their table. It’s a social event filled with laughter, flavor exploration, and camaraderie. You select from a variety of ingredients such as thinly sliced meats, fresh vegetables, and delectable sauces. When these ingredients meet the hot broth, they transform into mouthwatering bites.
At home, this means setting the stage: a pot of broth, your favorite ingredients, and the company of good friends or family. It’s a DIY meal in the best sense!
You will also like the following Lunch and Dinner recipes!
The beauty of hot pot lies in its flexibility. It accommodates a broad range of dietary preferences and ingredient availability. Each person can customize their bowl in a way that appeals uniquely to them. Plus, the process is interactive and enjoyable! Here’s why this recipe is great:
– Customization: Choose your preferred proteins, veggies, and flavors. – Social Aspect: Everyone participates in cooking their meal. – Easy Preparation: No elaborate cooking techniques required—just chop, prepare, and boil! – Healthy Options Available: With fresh ingredients, it can be both delicious and nutritious.
What You’ll Need to Make This Dish?
To create the perfect hot pot, one needs the right ingredients. While every hot pot is unique, here’s a general list to get you started:
Proteins (Choose 2–3):
Thinly Sliced Beef: Brisket or ribeye is popular for its tenderness. Pork: Shoulder or belly adds richness. Chicken: Thighs are juicy and flavorful.
Leafy Greens:
Bok Choy: Adds a lovely crunch. Napa Cabbage: Soaks up broth flavors beautifully.
Mushrooms (Choose 1–2):
Shiitake: For its umami richness. Enoki: Delicate and great for texture.
Noodles (Choose 1–2):
Rice Vermicelli: Quick to cook and soaks up flavors. Thin Wheat Noodles: A classic choice in hot pots.
Additional Vegetables:
Lotus Root: Crunchy with a hint of sweetness. Daikon Radish: Absorbs flavors and adds a slight pepperiness.
Tofu & Bean Curd:
Firm Tofu: Maintains its structure while cooking. Fried Soy Puffs: Adds an interesting texture.
Flavor Boosters & Dipping Sauces:
Sesame Paste: Creamy and nutty. Chili Oil: For those who enjoy a kick.
How to Make Chinese Hot Pot at Home?
Creating hot pot at home is simple and fun. The most important elements are preparation and gathering your loved ones around the table.
To begin:
1. Choose Your Broth: You can go with a pre-made broth or prepare one from scratch—a simple chicken stock or spicy Sichuan broth works wonders. 2. Set Up Your Ingredients: Prepare a buffet-style layout of all your chosen proteins, vegetables, and sauces.
Now, let’s dive into the step-by-step directions for making a fantastic hot pot at home!
Step 1: Prepare the Broth
Choose your favorite broth. If you’re making it from scratch, bring chicken or vegetable stock to a boil. For an extra kick, add some ginger, garlic, and dried chili. Boil for 10-15 minutes for flavors to develop.
Step 2: Prepare the Ingredients
Chop all your proteins and vegetables. Thinly slice your meats against the grain for tenderness. Toss the veggies and mushrooms in a bowl for easy access during cooking.
Step 3: Set the Table
Place a portable burner in the center of your table. Set your prepared broth on it and bring it to a gentle simmer. Surround it with all your chopped ingredients, dipping sauces, and any extras you have.
Step 4: Cooking Time!
Gather everyone around the table. Use chopsticks or small slotted spoons to add ingredients to the broth. Cook proteins for about 1-3 minutes, veggies a bit less, depending on your desired tenderness.
Step 5: Dipping Sauces
While the ingredients cook in the broth, have your guests mix their dipping sauces. Provide options to encourage creativity!
Step 6: Enjoy!
Once everything is cooked, serve it up. Dip each delicious morsel into your chosen sauce and savor the flavors. Engage in conversation, laughter, and community as you share this delightful experience.
Tips
1. Slice Protein Thinly: Thin slices cook faster and absorb more flavor. 2. Don’t Overcrow the Pot: Add ingredients in small batches for even cooking. 3. Choose Quality Broth: A rich broth significantly enhances the overall taste. 4. Experiment with Sauces: Encourage guests to mix and match different flavors—they might discover a new favorite! 5. Plan for Leftovers: Prepare extra ingredients so everyone gets to enjoy their favorites.
How to Store Leftovers?
If you’ve got leftovers — which is often the case with hot pot — don’t fret! Here’s how to store them:
– Broth: Allow it to cool before transferring it to an airtight container. Store in the fridge for up to three days or freeze for longer storage. – Cooked Ingredients: Place any excess cooked meats and veggies in an airtight container. Consume within a few days for the best flavor.
Nutrition Information
Here’s a rough breakdown of the nutrition you might expect from a typical serving (just remember, exactly varies based on specific ingredients and portions):
– Calories: About 350-600, depending on the proteins and amounts used. – Protein: Approximately 25-40 grams. – Fat: Can range based on the type of meat selected. – Carbohydrates: Mostly coming from vegetables and noodles, usually around 40-70 grams.
How Would I Recommend Serving Chinese Hot Pot at Home?
Here are some fun suggestions for serving hot pot at home:
– Create a Themed Night: Choose a theme for your hot pot, like a spicy Sichuan version or a seafood-focused night. This makes planning easier and more fun! – Dipping Sauce Stations: Set up a sauce bar for guests to create their own signature sauces. Provide a mix of pre-made and fresh ingredients like herbs, oils, and pastes. – Interactive Desserts: Incorporate a fun dessert afterward; consider mini skewers of fruit or a simple sorbet to cleanse the palate. – Hot Pot Game Night: Combine hot pot with board games or trivia. It keeps the atmosphere lively and engaging! Eating becomes part of the entertainment.
What Alternatives Can You Use for the Ingredients if Not Available?
Sometimes you just can’t find the exact ingredients you’re looking for. Here are some great alternatives:
– For Thinly Sliced Beef: Pork or chicken work well if beef isn’t available. – Leafy Greens: Spinach or arugula can substitute for bok choy or napa cabbage quite effectively. – Mushrooms: If shiitake is hard to find, button mushrooms or even canned mushrooms can serve as a backup. – Tofu Options: If firm tofu isn’t available, tempeh or even chickpeas work as protein alternatives for a different flavor profile.
Chinese Hot Pot at Home
Before diving into the depths of what makes Chinese hot pot a delightful choice for your dining experience at home, let's consider what you can pair it with. Hot pot is not just about the ingredients boiled in broth
Choose your favorite broth. If you’re making it from scratch, bring chicken or vegetable stock to a boil. For an extra kick, add some ginger, garlic, and dried chili. Boil for 10-15 minutes for flavors to develop.
Step 2: Prepare the Ingredients
Chop all your proteins and vegetables. Thinly slice your meats against the grain for tenderness. Toss the veggies and mushrooms in a bowl for easy access during cooking.
Step 3: Set the Table
Place a portable burner in the center of your table. Set your prepared broth on it and bring it to a gentle simmer. Surround it with all your chopped ingredients, dipping sauces, and any extras you have.
Step 4: Cooking Time!
Gather everyone around the table. Use chopsticks or small slotted spoons to add ingredients to the broth. Cook proteins for about 1-3 minutes, veggies a bit less, depending on your desired tenderness.
Step 5: Dipping Sauces
While the ingredients cook in the broth, have your guests mix their dipping sauces. Provide options to encourage creativity!
Step 6: Enjoy!
Once everything is cooked, serve it up. Dip each delicious morsel into your chosen sauce and savor the flavors. Engage in conversation, laughter, and community as you share this delightful experience.
Notes
1. Slice Protein Thinly: Thin slices cook faster and absorb more flavor. 2. Don’t Overcrow the Pot: Add ingredients in small batches for even cooking. 3. Choose Quality Broth: A rich broth significantly enhances the overall taste. 4. Experiment with Sauces: Encourage guests to mix and match different flavors—they might discover a new favorite! 5. Plan for Leftovers: Prepare extra ingredients so everyone gets to enjoy their favorites
Yes! Pre-packaged broths, particularly those specifically designed for hot pot, can save time while still delivering great flavor.
2. Is hot pot suitable for vegans?
Absolutely! You can feature just vegetables, tofu, and vegetable stock. Many people enjoy a plant-based hot pot experience.
3. How can I make my broth spicier?
To amp up the heat, add fresh chilies, chili paste, or hot sauce. Sichuan peppercorns are also a great addition if you want to add some unique flavors.
4. Can I make hot pot in a slow cooker?
Yes, a slow cooker can work wonderfully! Just make sure it gets hot enough to cook ingredients on the spot.
5. How do I know when my proteins are cooked?
For thinly sliced meats, they typically take 1-3 minutes in simmering broth. Chicken should be cooked until no longer pink, while seafood is usually opaque when done.
6. Can I have hot pot any time of the year?
Of course! While it’s popular in colder months, hot pot can be a refreshing dish during summer too. Just keep the broths light!
Conclusion
Making Chinese hot pot at home is an adventure. It combines cooking, sharing, and enjoying food in a way that engages everyone at the table. With a few ingredients and a little planning, you can create a meal that not only satisfies but also brings your friends and family closer together. So, roll up your sleeves, gather your ingredients, and get ready for a flavorful journey! Happy hot poting!
Before diving into the delightful world of classic beef fried rice, let’s chat about what pairs well with this dish. A fresh green salad or a side of steamed broccoli adds a nice crunch and balances the savory flavors of the fried rice. You might …