Let me take you on a delicious adventure into the world of pineapple buns, a delightful treat that has stolen many hearts — and taste buds. If you’ve never come across these sweet, fluffy buns topped with a crumbly crust, you are in for a …
Stir fry has always held a special place in my heart. It’s not just about quick cooking; it’s about vibrant flavors, colorful veggies, and that satisfying crunch. Every time I whip up a stir fry, I feel like a culinary composer, combining ingredients into a …
Before diving into the depths of what makes Chinese hot pot a delightful choice for your dining experience at home, let’s consider what you can pair it with. Hot pot is not just about the ingredients boiled in broth; it’s an entire feast. Consider serving it with:
1. Steamed Rice: A staple that pairs perfectly with the flavor-packed broth. 2. Beverages: Flavorful teas, like jasmine or oolong, or even light wines, balance the meal. 3. Dipping Sauces: A variety of dips can elevate the experience. Think sesame sauce or homemade chili oil. 4. Side Dishes: Light snacks such as spring rolls or sesame balls add another layer.
These elements will help round out your meal and keep your guests satisfied.
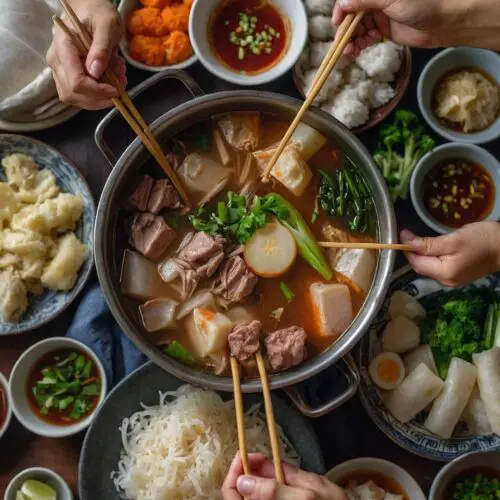
Hot pot fun! Imagine gathering around a simmering pot filled with delicious broth, surrounded by an array of fresh ingredients just waiting to be cooked. This communal dining experience has been a favorite for centuries in China. And guess what? You don’t need to venture out to a specialty restaurant to enjoy it. With some preparation and enthusiasm, you can bring this lively tradition into your home.
Cooking hot pot isn’t just about the meal; it’s about the joy of cooking at the table. Everyone engages, sharing flavors, and crafting their perfect bite. It’s a bit like a culinary adventure. So, let’s jump right into the essence of Chinese hot pot at home!
What is Chinese Hot Pot at Home?
Chinese hot pot, known as “huo guo,” translates literally to “fire pot.” It is a cooking method where diners immerse various ingredients into a bubbling broth at the center of their table. It’s a social event filled with laughter, flavor exploration, and camaraderie. You select from a variety of ingredients such as thinly sliced meats, fresh vegetables, and delectable sauces. When these ingredients meet the hot broth, they transform into mouthwatering bites.
At home, this means setting the stage: a pot of broth, your favorite ingredients, and the company of good friends or family. It’s a DIY meal in the best sense!
You will also like the following Lunch and Dinner recipes!
The beauty of hot pot lies in its flexibility. It accommodates a broad range of dietary preferences and ingredient availability. Each person can customize their bowl in a way that appeals uniquely to them. Plus, the process is interactive and enjoyable! Here’s why this recipe is great:
– Customization: Choose your preferred proteins, veggies, and flavors. – Social Aspect: Everyone participates in cooking their meal. – Easy Preparation: No elaborate cooking techniques required—just chop, prepare, and boil! – Healthy Options Available: With fresh ingredients, it can be both delicious and nutritious.
What You’ll Need to Make This Dish?
To create the perfect hot pot, one needs the right ingredients. While every hot pot is unique, here’s a general list to get you started:
Proteins (Choose 2–3):
Thinly Sliced Beef: Brisket or ribeye is popular for its tenderness. Pork: Shoulder or belly adds richness. Chicken: Thighs are juicy and flavorful.
Leafy Greens:
Bok Choy: Adds a lovely crunch. Napa Cabbage: Soaks up broth flavors beautifully.
Mushrooms (Choose 1–2):
Shiitake: For its umami richness. Enoki: Delicate and great for texture.
Noodles (Choose 1–2):
Rice Vermicelli: Quick to cook and soaks up flavors. Thin Wheat Noodles: A classic choice in hot pots.
Additional Vegetables:
Lotus Root: Crunchy with a hint of sweetness. Daikon Radish: Absorbs flavors and adds a slight pepperiness.
Tofu & Bean Curd:
Firm Tofu: Maintains its structure while cooking. Fried Soy Puffs: Adds an interesting texture.
Flavor Boosters & Dipping Sauces:
Sesame Paste: Creamy and nutty. Chili Oil: For those who enjoy a kick.
How to Make Chinese Hot Pot at Home?
Creating hot pot at home is simple and fun. The most important elements are preparation and gathering your loved ones around the table.
To begin:
1. Choose Your Broth: You can go with a pre-made broth or prepare one from scratch—a simple chicken stock or spicy Sichuan broth works wonders. 2. Set Up Your Ingredients: Prepare a buffet-style layout of all your chosen proteins, vegetables, and sauces.
Now, let’s dive into the step-by-step directions for making a fantastic hot pot at home!
Step 1: Prepare the Broth
Choose your favorite broth. If you’re making it from scratch, bring chicken or vegetable stock to a boil. For an extra kick, add some ginger, garlic, and dried chili. Boil for 10-15 minutes for flavors to develop.
Step 2: Prepare the Ingredients
Chop all your proteins and vegetables. Thinly slice your meats against the grain for tenderness. Toss the veggies and mushrooms in a bowl for easy access during cooking.
Step 3: Set the Table
Place a portable burner in the center of your table. Set your prepared broth on it and bring it to a gentle simmer. Surround it with all your chopped ingredients, dipping sauces, and any extras you have.
Step 4: Cooking Time!
Gather everyone around the table. Use chopsticks or small slotted spoons to add ingredients to the broth. Cook proteins for about 1-3 minutes, veggies a bit less, depending on your desired tenderness.
Step 5: Dipping Sauces
While the ingredients cook in the broth, have your guests mix their dipping sauces. Provide options to encourage creativity!
Step 6: Enjoy!
Once everything is cooked, serve it up. Dip each delicious morsel into your chosen sauce and savor the flavors. Engage in conversation, laughter, and community as you share this delightful experience.
Tips
1. Slice Protein Thinly: Thin slices cook faster and absorb more flavor. 2. Don’t Overcrow the Pot: Add ingredients in small batches for even cooking. 3. Choose Quality Broth: A rich broth significantly enhances the overall taste. 4. Experiment with Sauces: Encourage guests to mix and match different flavors—they might discover a new favorite! 5. Plan for Leftovers: Prepare extra ingredients so everyone gets to enjoy their favorites.
How to Store Leftovers?
If you’ve got leftovers — which is often the case with hot pot — don’t fret! Here’s how to store them:
– Broth: Allow it to cool before transferring it to an airtight container. Store in the fridge for up to three days or freeze for longer storage. – Cooked Ingredients: Place any excess cooked meats and veggies in an airtight container. Consume within a few days for the best flavor.
Nutrition Information
Here’s a rough breakdown of the nutrition you might expect from a typical serving (just remember, exactly varies based on specific ingredients and portions):
– Calories: About 350-600, depending on the proteins and amounts used. – Protein: Approximately 25-40 grams. – Fat: Can range based on the type of meat selected. – Carbohydrates: Mostly coming from vegetables and noodles, usually around 40-70 grams.
How Would I Recommend Serving Chinese Hot Pot at Home?
Here are some fun suggestions for serving hot pot at home:
– Create a Themed Night: Choose a theme for your hot pot, like a spicy Sichuan version or a seafood-focused night. This makes planning easier and more fun! – Dipping Sauce Stations: Set up a sauce bar for guests to create their own signature sauces. Provide a mix of pre-made and fresh ingredients like herbs, oils, and pastes. – Interactive Desserts: Incorporate a fun dessert afterward; consider mini skewers of fruit or a simple sorbet to cleanse the palate. – Hot Pot Game Night: Combine hot pot with board games or trivia. It keeps the atmosphere lively and engaging! Eating becomes part of the entertainment.
What Alternatives Can You Use for the Ingredients if Not Available?
Sometimes you just can’t find the exact ingredients you’re looking for. Here are some great alternatives:
– For Thinly Sliced Beef: Pork or chicken work well if beef isn’t available. – Leafy Greens: Spinach or arugula can substitute for bok choy or napa cabbage quite effectively. – Mushrooms: If shiitake is hard to find, button mushrooms or even canned mushrooms can serve as a backup. – Tofu Options: If firm tofu isn’t available, tempeh or even chickpeas work as protein alternatives for a different flavor profile.
Chinese Hot Pot at Home
Before diving into the depths of what makes Chinese hot pot a delightful choice for your dining experience at home, let's consider what you can pair it with. Hot pot is not just about the ingredients boiled in broth
Choose your favorite broth. If you’re making it from scratch, bring chicken or vegetable stock to a boil. For an extra kick, add some ginger, garlic, and dried chili. Boil for 10-15 minutes for flavors to develop.
Step 2: Prepare the Ingredients
Chop all your proteins and vegetables. Thinly slice your meats against the grain for tenderness. Toss the veggies and mushrooms in a bowl for easy access during cooking.
Step 3: Set the Table
Place a portable burner in the center of your table. Set your prepared broth on it and bring it to a gentle simmer. Surround it with all your chopped ingredients, dipping sauces, and any extras you have.
Step 4: Cooking Time!
Gather everyone around the table. Use chopsticks or small slotted spoons to add ingredients to the broth. Cook proteins for about 1-3 minutes, veggies a bit less, depending on your desired tenderness.
Step 5: Dipping Sauces
While the ingredients cook in the broth, have your guests mix their dipping sauces. Provide options to encourage creativity!
Step 6: Enjoy!
Once everything is cooked, serve it up. Dip each delicious morsel into your chosen sauce and savor the flavors. Engage in conversation, laughter, and community as you share this delightful experience.
Notes
1. Slice Protein Thinly: Thin slices cook faster and absorb more flavor. 2. Don’t Overcrow the Pot: Add ingredients in small batches for even cooking. 3. Choose Quality Broth: A rich broth significantly enhances the overall taste. 4. Experiment with Sauces: Encourage guests to mix and match different flavors—they might discover a new favorite! 5. Plan for Leftovers: Prepare extra ingredients so everyone gets to enjoy their favorites
Yes! Pre-packaged broths, particularly those specifically designed for hot pot, can save time while still delivering great flavor.
2. Is hot pot suitable for vegans?
Absolutely! You can feature just vegetables, tofu, and vegetable stock. Many people enjoy a plant-based hot pot experience.
3. How can I make my broth spicier?
To amp up the heat, add fresh chilies, chili paste, or hot sauce. Sichuan peppercorns are also a great addition if you want to add some unique flavors.
4. Can I make hot pot in a slow cooker?
Yes, a slow cooker can work wonderfully! Just make sure it gets hot enough to cook ingredients on the spot.
5. How do I know when my proteins are cooked?
For thinly sliced meats, they typically take 1-3 minutes in simmering broth. Chicken should be cooked until no longer pink, while seafood is usually opaque when done.
6. Can I have hot pot any time of the year?
Of course! While it’s popular in colder months, hot pot can be a refreshing dish during summer too. Just keep the broths light!
Conclusion
Making Chinese hot pot at home is an adventure. It combines cooking, sharing, and enjoying food in a way that engages everyone at the table. With a few ingredients and a little planning, you can create a meal that not only satisfies but also brings your friends and family closer together. So, roll up your sleeves, gather your ingredients, and get ready for a flavorful journey! Happy hot poting!
Before diving into the delightful world of classic beef fried rice, let’s chat about what pairs well with this dish. A fresh green salad or a side of steamed broccoli adds a nice crunch and balances the savory flavors of the fried rice. You might …
As a food enthusiast, I can’t help but revel in the delightful simplicity of salt and pepper shrimp. But let’s face it, any dish shines brighter with the right pairings. Imagine savoring these crispy morsels alongside a chilled glass of white wine, preferably a zesty …
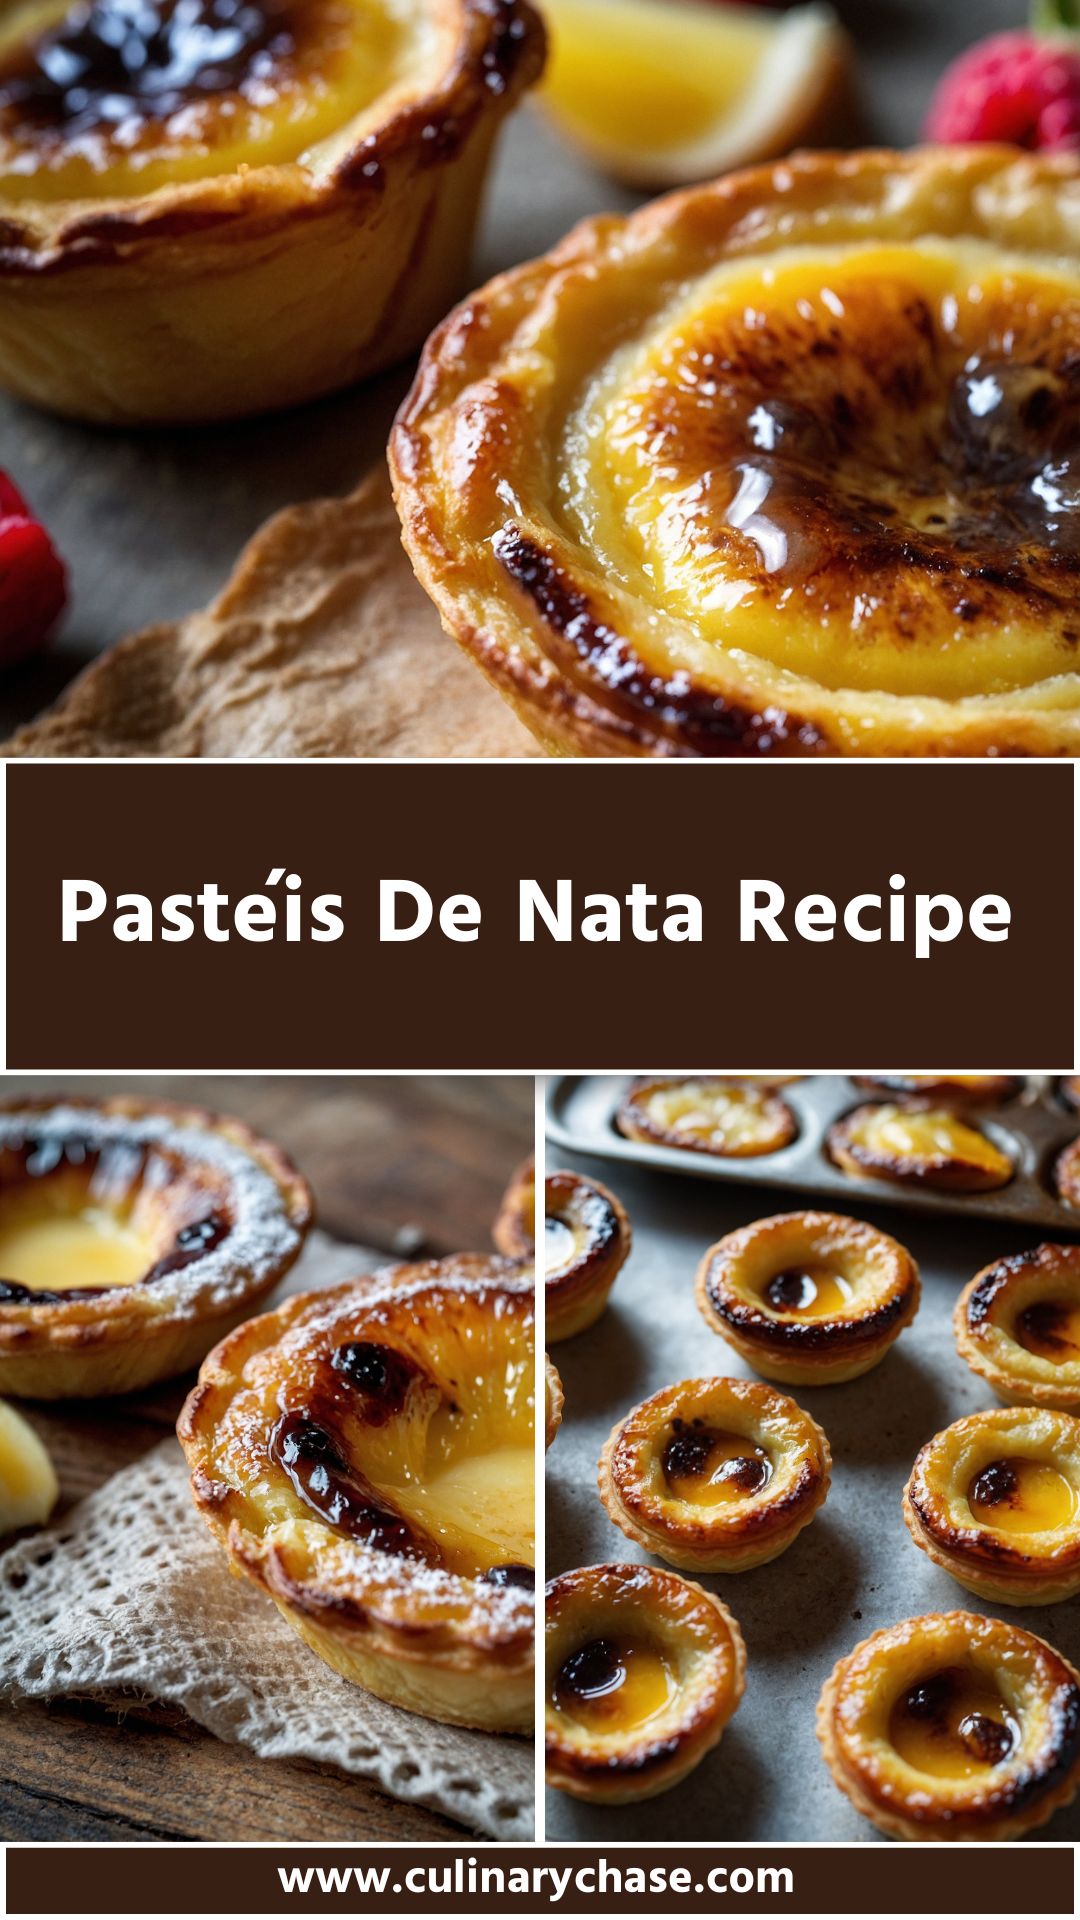
From the moment I had my first bite of a Pastéis de Nata, I knew I was in for an adventure. The creamy custard, nestled in a flaky crust, packed a punch that made my tastebuds sing. With origins deep in Portugal’s culinary history, these little tarts have a tale of tradition, love, and the pursuit of perfection. Let’s take a delightful journey together as we explore everything you need to know about these scrumptious pastries.
What is Pastéis de Nata?
Pastéis de Nata, often referred to as Portuguese custard tarts, are small, round pastries with a rich custard filling. They are typically baked in a mini tart shell, resulting in a crispy exterior that contrasts beautifully with the smooth custard within. The joy of biting into one is unparalleled; you experience the crunch before being enveloped by the creaminess of the filling, which has hints of vanilla and a dusting of cinnamon on top.
A Brief History
These tarts trace their roots back to the 18th century in Lisbon. Originally, they were created by Catholic monks at the Jerónimos Monastery, who made use of excess egg yolks. The monks sold these treats to support the monastery. Over the years, many bakeries across Portugal honed the recipe, with the most famous being Pastéis de Belém, which continues to draw tourists with its secret formula.
If you’ve never tasted Pastéis de Nata, prepare for a treat. Once you take your first bite, you might fall in love instantly. They’re not just desserts; they’re experiences. Imagine sitting at a quaint café in Lisbon, sunlight spilling onto the cobblestones, as you enjoy one with a sprinkle of cinnamon. The combination of flaky pastry and creamy custard is like a warm hug on a plate.
Not only are these tarts delicious, but they’re also surprisingly easy to make. With a few simple ingredients and steps, anyone can recreate this Portuguese delight at home. Whether it’s for a special occasion or just a Tuesday, these pastries will add a touch of magic to your day.
The Ingredients
Before we dive into the steps of making these heavenly tarts, let’s gather our ingredients. Here’s what you’ll need for both the pastry and the custard:
For the Pastry:
1 pound sheet of puff pastry: This can be store-bought or homemade if you’re feeling adventurous.
For the Custard:
1 1/4 cups whole milk: Full-fat is best for creaminess. 1 1/4 cups granulated white sugar: This balances the eggs and adds sweetness. 1/4 cup plain all-purpose flour: To thicken the custard. 6 large egg yolks: These are essential for the richness. 2/3 cup filtered water: Keeps the custard from getting too thick. 1 large cinnamon stick: For that comforting aroma. Peel of one large lemon: Cut into broad strips for a bright flavor. 1 teaspoon premium pure vanilla extract: A must for the custard’s depth. 1 tablespoon freshly squeezed lemon juice: Just a touch for brightness. 1/2 teaspoon freshly grated nutmeg: A warm, subtle spice that enhances the flavor.
Step-by-Step Instructions
Making Pastéis de Nata is a rewarding process. Let’s break it down step by step.
Step 1: Preheat the Oven
Start by preheating your oven to 450°F (230°C). High heat is crucial for getting that enticingly crispy crust.
Step 2: Prepare the Puff Pastry
If you’re using store-bought puff pastry, discard it from the package and let it come to room temperature. If you’re brave enough to make your own, roll it out into a thin layer. Cut out circles that are about 4 inches in diameter, which will fit neatly into your muffin tin. Press these circles into the tin to form the tart shells.
Step 3: Prepare the Custard Mixture
In a medium saucepan, combine the milk, sugar, flour, and water. Whisk these ingredients together until smooth. Add the cinnamon stick, lemon peel, and nutmeg. Turn on the heat to medium and bring the mixture to a gentle simmer, stirring continuously.
Step 4: Add Egg Yolks
Once the mixture is simmering and well combined, remove it from the heat. In a separate bowl, whisk the egg yolks together. Gradually add a small amount of the hot mixture to the yolks, stirring constantly. This step is critical; it prevents the eggs from scrambling. Once tempered, pour the egg mixture back into the saucepan, stirring until fully combined.
Step 5: Strain the Custard
To ensure a silky texture, strain the custard through a fine sieve into a clean bowl. Discard the solids. This step might feel tedious, but trust me, it’s worth it.
Step 6: Fill the Tart Shells
Pour the cooled custard into each pastry shell, filling them about three-quarters full. You want some space for the custard to puff up while baking.
Step 7: Bake
Place the muffin tin in the preheated oven. Bake for about 15-20 minutes or until the tops are golden brown and slightly charred in spots. Keep an eye on them; every oven is different, and you want that perfect balance between crispy and soft.
Step 8: Cool and Enjoy
Once they’re done, take them out of the oven and let them cool in the tin for about 10 minutes. Then carefully remove them and transfer them to a wire rack to cool completely. They are best enjoyed warm or at room temperature.
Tips & Tricks
To make your Pastéis de Nata even more delightful, consider these handy tips:
Work with Cold Pastry: If you opt for store-bought pastry, keep it cold until you’re ready to use it. This helps maintain layers. Don’t Overfill: Leave some room at the top of each pastry shell to prevent spills during baking. Check for Doneness: Look for a slight char on the custard’s surface—this adds flavor. Experiment with Flavor: Try substituting lemon peel with orange peel for a different citrus twist. Store Wisely: If you have extras, store them in an airtight container at room temperature, but best eaten fresh.
Nutrition Information
Here’s a rough estimate of the nutrition information per Pastéis de Nata, assuming the recipe makes about 12 tarts:
Remember, nutritional values can vary based on exact ingredients used and portion sizes.
Can I Store Pastéis de Nata?
Pastéis de Nata are best enjoyed fresh, but if you have leftovers (which is rare!), you can store them. Keep them in an airtight container at room temperature for up to 2 days. For longer storage, freeze them individually, then place in a freezer-safe bag. Reheat gently in the oven to enjoy later.
What Can I Serve with Pastéis de Nata?
These custard tarts are perfect on their own or paired with simple accompaniments. Here are some ideas:
Espresso or Coffee: A strong brew complements the sweetness beautifully. Fruit Salad: Fresh fruits add a refreshing contrast to the richness of the tarts. Ice Cream: A scoop of vanilla or cinnamon ice cream for an indulgent dessert. Whipped Cream: Lightly sweetened whipped cream on the side adds a nice touch. Port Wine: If you’re feeling adventurous, a glass of Port can elevate your tasting experience.
Variations
Want to mix things up? Here are some delightful variations to experiment with:
Chocolate Pastéis de Nata: Add cocoa powder to the custard base or top with a drizzle of chocolate sauce. Berry Infused Custard: Blend in your favorite berries into the custard for a fruity twist. Matcha Custard Tarts: Replace some of the flour with matcha powder for a unique flavor and color. Savory Spinach and Cheese Pastries: Use the pastry base but fill it with spinach, feta, and a sprinkle of nutmeg. Almond Paste Tarts: Add marzipan to the custard for a richer, nutty flavor profile.
The Magic of Pastéis de Nata Recipe
From the moment I had my first bite of a Pastéis de Nata, I knew I was in for an adventure. The creamy custard, nestled in a flaky crust, packed a punch that made my tastebuds sing
Start by preheating your oven to 450°F (230°C). High heat is crucial for getting that enticingly crispy crust.
Step 2: Prepare the Puff Pastry
If you’re using store-bought puff pastry, discard it from the package and let it come to room temperature. If you’re brave enough to make your own, roll it out into a thin layer. Cut out circles that are about 4 inches in diameter, which will fit neatly into your muffin tin. Press these circles into the tin to form the tart shells.
Step 3: Prepare the Custard Mixture
In a medium saucepan, combine the milk, sugar, flour, and water. Whisk these ingredients together until smooth. Add the cinnamon stick, lemon peel, and nutmeg. Turn on the heat to medium and bring the mixture to a gentle simmer, stirring continuously.
Step 4: Add Egg Yolks
Once the mixture is simmering and well combined, remove it from the heat. In a separate bowl, whisk the egg yolks together. Gradually add a small amount of the hot mixture to the yolks, stirring constantly. This step is critical; it prevents the eggs from scrambling. Once tempered, pour the egg mixture back into the saucepan, stirring until fully combined.
Step 5: Strain the Custard
To ensure a silky texture, strain the custard through a fine sieve into a clean bowl. Discard the solids. This step might feel tedious, but trust me, it’s worth it.
Step 6: Fill the Tart Shells
Pour the cooled custard into each pastry shell, filling them about three-quarters full. You want some space for the custard to puff up while baking.
Step 7: Bake
Place the muffin tin in the preheated oven. Bake for about 15-20 minutes or until the tops are golden brown and slightly charred in spots. Keep an eye on them; every oven is different, and you want that perfect balance between crispy and soft.
Step 8: Cool and Enjoy
Once they’re done, take them out of the oven and let them cool in the tin for about 10 minutes. Then carefully remove them and transfer them to a wire rack to cool completely. They are best enjoyed warm or at room temperature.
Notes
Work with Cold Pastry: If you opt for store-bought pastry, keep it cold until you’re ready to use it. This helps maintain layers.
Don’t Overfill: Leave some room at the top of each pastry shell to prevent spills during baking.
Check for Doneness: Look for a slight char on the custard’s surface—this adds flavor.
Experiment with Flavor: Try substituting lemon peel with orange peel for a different citrus twist.
Store Wisely: If you have extras, store them in an airtight container at room temperature, but best eaten fresh.
Absolutely! If puff pastry isn’t your thing, you can try phyllo dough for a thinner, flakier option. Just note that the texture will differ.
What happens if my custard is too thick?
If your custard thickens too much while cooking, you can whisk in a little more milk to create a smoother consistency.
Can I make the custard ahead of time?
Yes, you can prepare the custard a day ahead. Just make sure to cover it with plastic wrap directly on the surface to prevent a skin from forming.
Are these tarts gluten-free?
Traditional Pastéis de Nata are not gluten-free due to the puff pastry. However, you can try gluten-free pastry options available in stores.
How can I make the tarts vegan?
You can experiment with vegan pastry and create an egg-free custard using silken tofu blended with plant-based milk and thickened with cornstarch.
Conclusion
Pastéis de Nata is more than just a pastry; it’s a piece of history and culture. Every bite connects you to centuries of tradition. Making these tarts at home may seem daunting, but it’s genuinely rewarding. Each step opens up a world of flavors and textures that dance in harmony. Whether you enjoy them solo with a cup of coffee or serve them at your next gathering, these custard tarts are sure to impress.
So grab your apron, roll up your sleeves, and let your kitchen become the stage for these delightful creations. Your friends and family will thank you, and who knows? You might just start a new tradition of your own!
If you’re wondering what can accompany steamed eggs on your dining table, you’re in for a treat! Steamed eggs are versatile and pair wonderfully with various side dishes. Traditionally, they find a great match with rice for a satisfying meal. Adding sautéed vegetables or pickled …
Before diving into the delicious world of chicken larb, let’s talk about what makes a great sidekick for this dish. Chicken larb, with its bright flavors and vibrant textures, pairs wonderfully with various accompaniments. Here are a few ideas that will elevate your dining experience: …
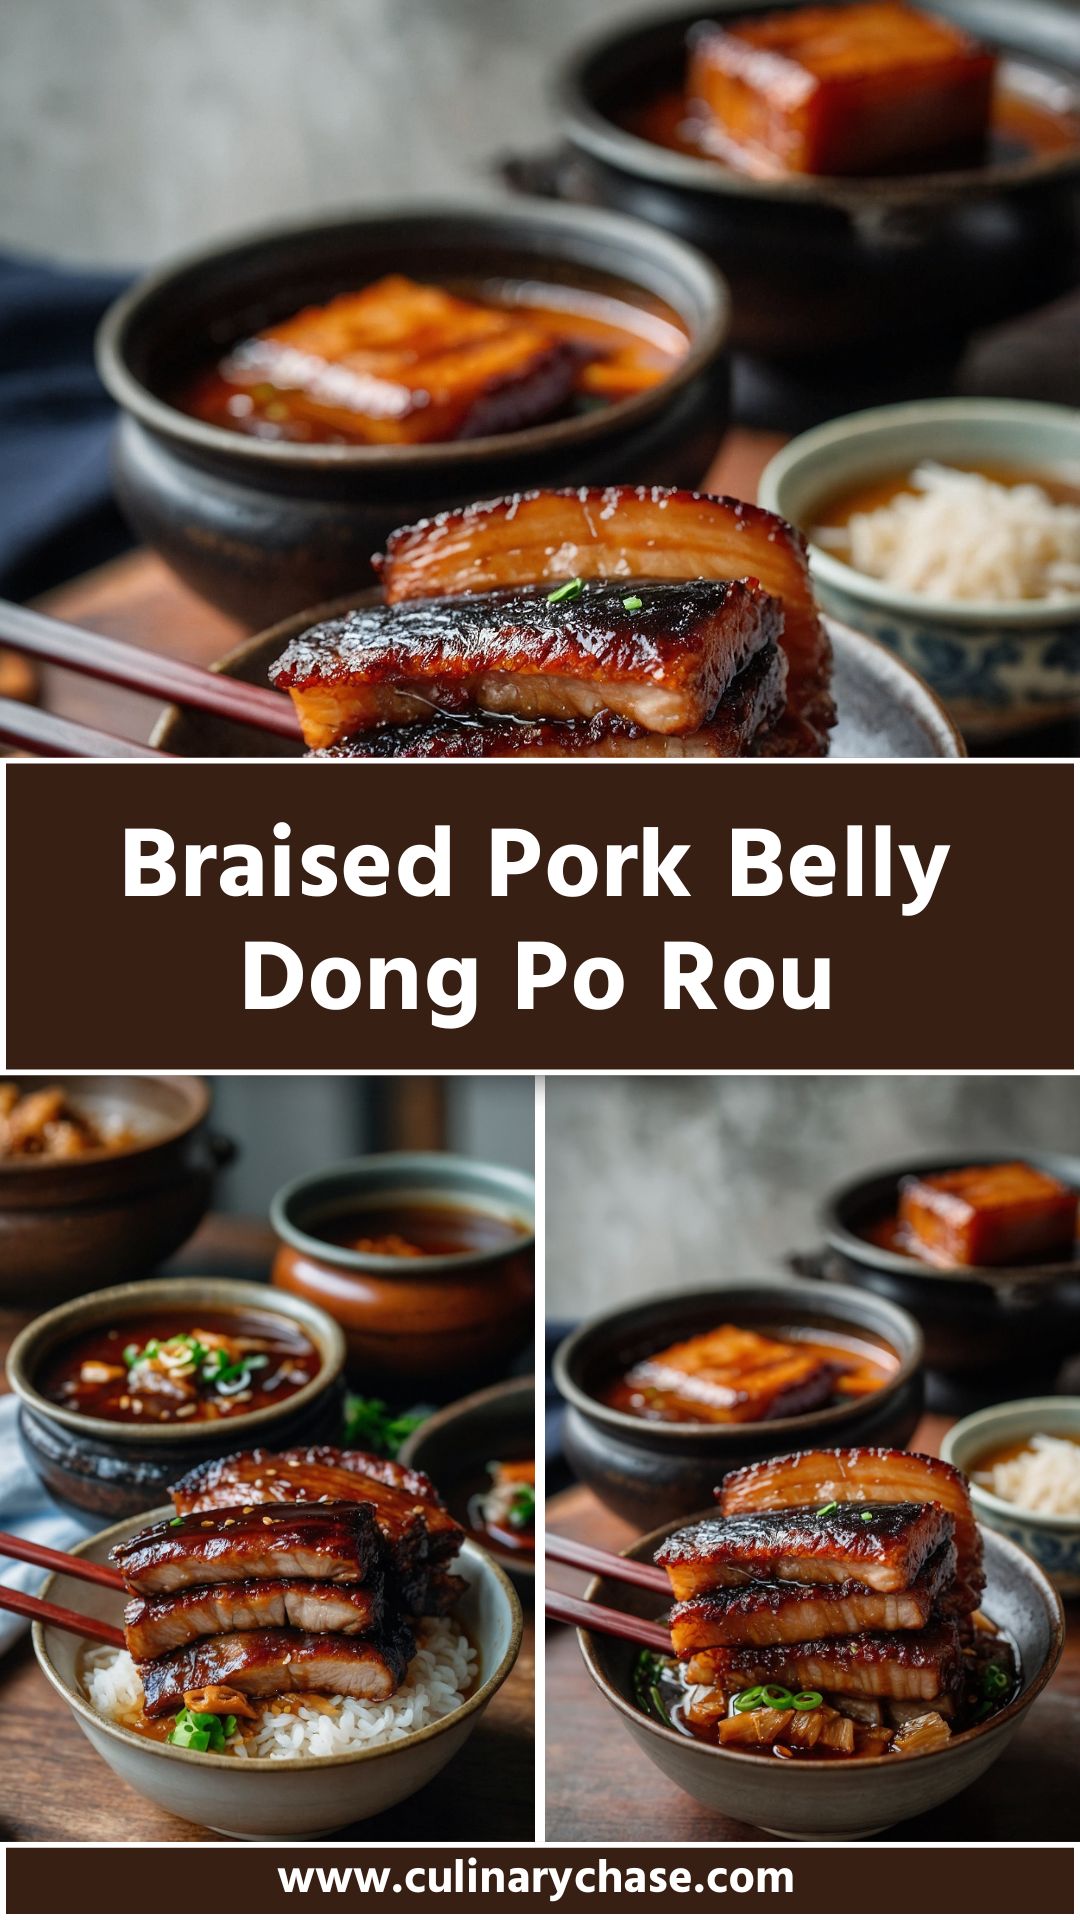
Before diving into the details of this delectable dish, let’s talk about what you can pair with Braised Pork Belly Dong Po Rou to create a memorable meal. This dish is rich and has a balance of savory, sweet, and umami flavors, making it perfect with a variety of accompaniments.
Steamed Jasmine Rice: This classic pairing is simple but transforms your plate. The rice soaks up the luscious sauce from the pork belly, allowing you to enjoy every drop.
Sautéed Greens: Consider garlic sautéed bok choy or Chinese broccoli. The slight bitterness of the greens complements the richness of the pork.
Pickled Vegetables: A side of pickled cucumbers or radishes adds a refreshing crunch. The tanginess helps cut through the fatty pork belly.
Soft Boiled Eggs: These can be marinated in soy sauce, giving them a slightly salty flavor that elevates the meal even further.
Spicy Tofu: Crispy tofu tossed in a spicy sauce brings an additional protein element and contrasts well with the pork’s texture.
Let’s embark on a culinary journey to savor the traditional flavors of Braised Pork Belly Dong Po Rou. This dish isn’t just food; it’s a celebration steeped in history and cultural significance. Originating from the Eastern regions of China, Dong Po Rou is named after the famous poet Su Dongpo. He savored this dish in his time, and today, countless people indulge in its rich history and taste.
Reflecting on my adventures in cooking, I remember the first time I attempted this dish. As I carefully sliced the pork belly and marinated it in a perfect harmony of soy sauce, Shaoxing wine, and spices, I felt an excitement that I now want to share with you. The pleasure of savoring the outcome—rich, satisfying, and aromatic—was a delightful experience!
What is Braised Pork Belly Dong Po Rou?
Braised Pork Belly Dong Po Rou is an iconic Chinese dish. It features tender, melt-in-your-mouth pork belly, simmered to perfection in a treasure trove of flavors. The method of cooking typically involves slow braising, allowing the rich flavors to meld over time. The dish isn’t just about taste; it’s an art that encapsulates centuries-old culinary techniques.
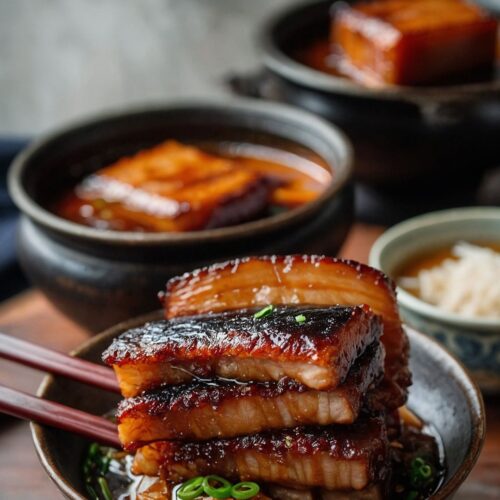
Pork belly is cut into thick slices, often seared before being braised with ingredients like soy sauce, cooking wine, ginger, and aromatic spices, which enhance the savory notes. The rock sugar balances the dish by adding a soft sweetness, cutting through the fattiness of the pork belly. The result is a glossy, dark brown that invites anyone to take a bite.
You will also like the following Side Dishes recipes!
Why You’ll Love This Braised Pork Belly Dong Po Rou
Now, let’s delve into why Dong Po Rou will capture your heart—and your stomach.
Rich Flavor Profile: The marriage of salty, sweet, and umami flavors creates a complex taste sensation you won’t forget. Each bite unfolds layers of flavors that dance on the palate.
Texture: The pork belly becomes incredibly tender, contrasting the rich fat with a bit of chewiness. It’s a delightful balance that keeps you coming back for more.
Cultural Significance: Each serving of Dong Po Rou tells a story. Understanding its historical roots adds a rich depth to your dining experience. Enjoying this dish is like taking a bite out of history.
Comfort Food: There’s something inherently comforting about slow-cooked meals. Dong Po Rou brings warmth on cold days and is perfect for gatherings with family and friends.
Versatile: You can pair it with various sides, turning it into a splendid feast. Its ability to shine regardless of the accompaniment is part of its charm.
The Ingredients You Will Need To Make Braised Pork Belly Dong Po Rou
To bring this delightful dish to your table, you’ll need a few essential ingredients. Let’s gather everything you need:
2 pounds pork belly slab (the star of the dish)
2 ½ tablespoons dark soy sauce (adds depth and color)
2/3 cup light soy sauce (for a salty punch)
2 cups Shaoxing cooking wine (imparts a complex flavor)
4 – 5 oz. rock sugar (adjust for your sweetness preference)
3 bunches green onions (washed and halved)
8 thin slices fresh ginger (adds warmth)
2 star anise pods (for floral notes)
1 cinnamon stick (introduces subtle sweetness)
Directions
Let’s get into the fun part—cooking! Follow these steps for success.
Step 1: Prepare the Pork Belly
Start by selecting a good-quality pork belly. Look for meat and fat in balanced proportions. Cut the pork belly into thick slices, about 1.5 inches each. This thickness allows the meat to retain moisture while cooking.
Step 2: Sear the Pork Belly
In a large pot, heat a splash of oil over medium heat. Place the slices of pork belly in the pot, skin-side down. Cook until slightly caramelized and golden brown, around 3-4 minutes. Then flip the slices to sear the other side. Searing adds flavor and color, creating a lovely crust.
Step 3: Add Aromatics
With the pork belly nicely browned, remove it from the pot and set it aside. In the same pot, add ginger, green onions, star anise, and cinnamon. Sauté for a minute until fragrant. This step enhances the aroma of the dish and lays the foundation for the infusion of flavors.
Step 4: Build the Braising Liquids
Pour in your Shaoxing cooking wine, scraping the bottom of the pot to deglaze. Add the dark soy sauce and light soy sauce. Stir in the rock sugar, ensuring it dissolves completely. This combination creates a tantalizing sauce that envelops the pork belly.
Step 5: Braise the Pork Belly
Now, place the previously seared pork belly back into the pot. Ensure the pork is covered in the sauce. Bring the mixture to a gentle simmer, then reduce the heat to low. Cover the pot and allow it to braise for at least two hours. The long cooking time transforms the meat into something incredibly tender.
Step 6: Final Touches
Check on the pork from time to time, adding water if necessary to ensure it doesn’t dry out. Once it’s fork-tender, remove it from the pot. You can strain the sauce if you prefer a smoother texture. For extra shine, consider simmering the sauce until slightly thickened before serving.
Notes
Here are five tips to ensure your Dong Po Rou turns out perfectly:
Quality of meat: Always opt for high-quality pork belly. Look for a good balance of fat and meat for the best texture and flavor.
Marinate longer: If you have time, marinate the pork belly overnight for a deeper infusion of flavors.
Adjust sweetness: Taste the sauce and adjust the sweetness to your liking; some prefer it sweeter, while others may want it less so.
Use fresh ingredients: Fresh ginger and green onions significantly enhance the overall flavor of your dish. Don’t skimp on freshness.
Control heat: Keep the braising temperature low and steady. Slow cooking is key to achieving the tender texture you desire.
Storage Tips
Leftovers from this rich dish can last up to three days in the fridge. To store, cover the braised pork belly in an airtight container. You can also freeze the braised pork belly for up to three months. When ready to enjoy again, simply thaw and reheat gently on the stovetop in its sauce to maintain moisture.
Nutrition Information
Here’s a rough overview of the nutritional content per serving (assuming six servings):
Calories: 450
Protein: 25g
Fat: 35g
Carbohydrates: 15g
Fiber: 1g
Sodium: 800mg
Serving Suggestions
When it comes to serving this dish, consider these ideas:
Over rice: Serve the pork belly over a mound of perfectly steamed rice. The rice will soak in the delectable sauce.
Garnished with cilantro: Fresh cilantro as a garnish adds a burst of herbal freshness that brightens the dish.
Alongside a stir-fry: Pair with your favorite vegetable stir-fry for a complete meal.
Accompanied by soup: It pairs wonderfully with a light soup, creating a well-rounded dining experience.
In a sandwich: Layer pieces in a soft bao or sandwich for a fusion twist.
What Other Substitutes Can I Use in Braised Pork Belly Dong Po Rou?
If you don’t have pork belly or simply want to switch it up, consider these substitutes:
Pork shoulder: A great alternative, pork shoulder offers a similar fat-to-meat ratio, although it might take longer to cook.
Chicken thighs: They will absorb the flavors well and will be quicker to cook, making for a lighter dish.
Firm tofu: For a vegetarian option, firm tofu can be easily braised in the same sauce. It’s hearty and richly flavorful.
Duck breast: This will offer a different flavor. The richness of the duck pairs beautifully with the sweet and savory sauce.
Beef brisket: If you prefer beef, brisket can work although the taste profile will change slightly.
Braised Pork Belly Dong Po Rou
Before diving into the details of this delectable dish, let’s talk about what you can pair with Braised Pork Belly Dong Po Rou to create a memorable meal.
2cupsShaoxing cooking wineimparts a complex flavor
4– 5 oz. rock sugaradjust for your sweetness preference
3bunches green onionswashed and halved
8thin slices fresh gingeradds warmth
2star anise podsfor floral notes
1cinnamon stickintroduces subtle sweetness
Instructions
Step 1: Prepare the Pork Belly
Start by selecting a good-quality pork belly. Look for meat and fat in balanced proportions. Cut the pork belly into thick slices, about 1.5 inches each. This thickness allows the meat to retain moisture while cooking.
Step 2: Sear the Pork Belly
In a large pot, heat a splash of oil over medium heat. Place the slices of pork belly in the pot, skin-side down. Cook until slightly caramelized and golden brown, around 3-4 minutes. Then flip the slices to sear the other side. Searing adds flavor and color, creating a lovely crust.
Step 3: Add Aromatics
With the pork belly nicely browned, remove it from the pot and set it aside. In the same pot, add ginger, green onions, star anise, and cinnamon. Sauté for a minute until fragrant. This step enhances the aroma of the dish and lays the foundation for the infusion of flavors.
Step 4: Build the Braising Liquids
Pour in your Shaoxing cooking wine, scraping the bottom of the pot to deglaze. Add the dark soy sauce and light soy sauce. Stir in the rock sugar, ensuring it dissolves completely. This combination creates a tantalizing sauce that envelops the pork belly.
Step 5: Braise the Pork Belly
Now, place the previously seared pork belly back into the pot. Ensure the pork is covered in the sauce. Bring the mixture to a gentle simmer, then reduce the heat to low. Cover the pot and allow it to braise for at least two hours. The long cooking time transforms the meat into something incredibly tender.
Step 6: Final Touches
Check on the pork from time to time, adding water if necessary to ensure it doesn’t dry out. Once it’s fork-tender, remove it from the pot. You can strain the sauce if you prefer a smoother texture. For extra shine, consider simmering the sauce until slightly thickened before serving.
Notes
Quality of meat: Always opt for high-quality pork belly. Look for a good balance of fat and meat for the best texture and flavor.
Marinate longer: If you have time, marinate the pork belly overnight for a deeper infusion of flavors.
Adjust sweetness: Taste the sauce and adjust the sweetness to your liking; some prefer it sweeter, while others may want it less so.
Use fresh ingredients: Fresh ginger and green onions significantly enhance the overall flavor of your dish. Don’t skimp on freshness.
Control heat: Keep the braising temperature low and steady. Slow cooking is key to achieving the tender texture you desire.
Absolutely! Dong Po Rou is even better the next day. Make it ahead, refrigerate it, and gently reheat it before serving.
What is the best way to serve Dong Po Rou?
Serve it with rice and garnished with fresh herbs. This provides a good contrast to the rich flavors.
Can I adjust the level of sweetness?
Yes, the amount of rock sugar can be modified based on your preferences. Taste as you go!
How do I make it spicier?
You can add a pinch of chili flakes or some sliced fresh chili while sautéing the aromatics for a kick.
Is there a vegetarian version?
Yes! Using firm tofu or seitan as a base with a similar braising sauce offers a hearty vegetarian option.
Can I use other types of alcohol?
While Shaoxing wine is ideal, any dry white wine can substitute in a pinch but may alter the flavor slightly.
Conclusion
After embarking on this flavorful journey through Braised Pork Belly Dong Po Rou, I hope you feel inspired to try your hand at this dish. It showcases the beauty of traditional Chinese cooking, simple yet devastatingly delicious. Whether you’re serving it at a family gathering or enjoying a cozy dinner at home, this dish never fails to impress.
As you simmer and savor, remember the joy of sharing food with loved ones. Each bite is a moment, a memory just waiting to happen. Happy cooking!
If you’re diving into the delightful world of kimchi ramen, you might wonder what to serve alongside it. Think light, crunchy flavors that complement the rich and spicy notes of the ramen. Here are some ideas: I remember the first time I tasted kimchi ramen. …