
Air Fry Pork Loin Recipe
There's something magical about a perfectly cooked pork loin — that tender, juicy center with a flavorful crust that makes you feel like you've ordered from a fine dining kitchen. The beauty of this air fryer approach is that you get that restaurant-quality result in under 30 minutes, with minimal cleanup. I love serving this alongside fresh pineapple salsa for brightness, or creamy mashed potatoes to soak up those incredible pan juices.
Ingredients
- 1 teaspoon ground mustard powder brings earthy depth
- ½ teaspoon onion powder enhances savory notes
- Kosher salt for final seasoning, if needed
- ½ teaspoon freshly ground black pepper coarse is ideal
- 2 tablespoon brown sugar packed, for caramelization
- ¼ teaspoon garlic powder just enough for background flavor
- 1 tablespoon smoked paprika adds color and subtle smokiness
- ½ tablespoon extra-virgin olive oil to help spices adhere
- 1.5 pound pork tenderloin center-cut section, about 1.25 to 1.75 pounds
- 1.5 teaspoon sea salt fine grain works best for even distribution
- ¼ teaspoon cayenne powder optional, for those who enjoy gentle heat
Instructions
Step 1: Prepare Your Spice Blend
- In a shallow bowl, combine the brown sugar, smoked paprika, sea salt, ground mustard, onion powder, black pepper, garlic powder, and cayenne if you're using it. Stir them together with a fork, breaking up any lumps in the brown sugar. This matters because lumps won't distribute evenly, leaving you with pockets of concentrated sweetness and bare spots on your meat. I like to smell the mixture at this point — it's a tiny ritual that reminds me why I love cooking. That aroma tells you whether your spices are fresh and alive. If something smells flat or muted, that's your signal to replace it before your next cook.

Step 2: Prepare the Pork Loin
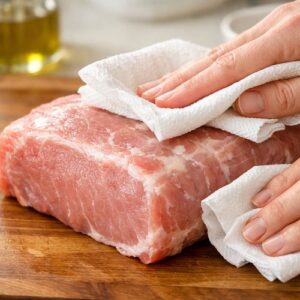
- Pat your pork loin completely dry with paper towels. Any surface moisture will create steam rather than allowing for browning, so this step is crucial. Look over the meat carefully and trim any excess fat or silver skin (that thin, tough membrane that doesn't cook well). You want to remove the obvious bits without being obsessive — a little fat adds flavor and keeps things juicy. Once trimmed, drizzle the olive oil over the surface and use your hands to coat it evenly. The oil acts as an adhesive for the spice rub, helping it stick rather than falling off during cooking. This is one of those small techniques that separates a well-executed dish from one that's just okay.
Step 3: Apply the Spice Crust
- Now comes the satisfying part — coating your loin with the spice mixture. I use my hands rather than a brush because I want tactile control. Pour the spice blend onto a plate, then roll and massage the pork through it, using your fingers to press it onto every surface. Make sure you get the ends, the sides, everywhere. You want a generous, visible crust that will caramelize beautifully. Don't be timid here. The spices are your flavor insurance — they're what make this special. A light dusting isn't enough. Be generous, and trust the process.

Step 4: Preheat Your Air Fryer
- Set your air fryer to 400°F and let it preheat for 5 minutes. This step matters more than people realize. A properly preheated air fryer is hot and ready to sear the exterior of your meat immediately, which triggers that Maillard reaction I mentioned earlier. If you skip this or cut it short, your crust won't develop that beautiful golden-brown color and depth of flavor. While it's preheating, take a moment to set up your workspace — get a cutting board ready, gather any serving dishes, and set your timer. Good prep work makes the actual cooking feel calm and intentional rather than rushed.

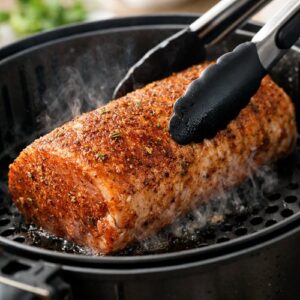
Step 5: Cook the Pork Loin
- Carefully place your spiced pork loin into the preheated air fryer basket. It should sizzle slightly as it hits the hot surface — that's the sound of flavor development happening. Set the temperature to 400°F for 20-22 minutes. Every air fryer is slightly different, so start checking at the 18-minute mark. You're looking for an internal temperature of 145°F measured at the thickest part. This is the USDA safe minimum for pork, and at this temperature, the meat is still moist with just a hint of pink in the very center. If you prefer your pork more thoroughly cooked, take it to 160°F, though I find that can sometimes result in a slightly drier texture. Use an instant-read thermometer — it's one of the most valuable tools in your kitchen. It removes guesswork and gives you confidence that you're hitting the mark every single time.
Step 6: Rest and Serve
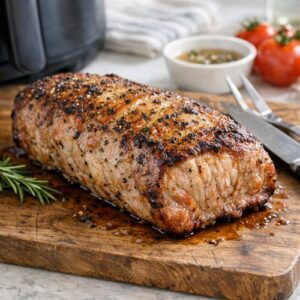
- This step is non-negotiable: when the pork emerges from the air fryer, place it on a cutting board and let it rest for 5 minutes. I know it's tempting to slice immediately, but here's what's happening during that rest: the muscle fibers are relaxing and reabsorbing the juices that were driven toward the center during cooking. If you cut too early, all those flavorful juices run out onto the board instead of staying in your meat. While it rests, look at what's accumulated on the air fryer basket — those caramelized bits and juices are liquid gold. Carefully pour them into a small bowl; you'll drizzle them over the sliced pork before serving. It adds moisture, flavor, and elegance to the finished dish. Slice the pork against the grain (perpendicular to the direction the muscle fibers run) into ½-inch thick pieces. This makes each bite tender rather than stringy. Arrange on a serving platter, pour those reserved juices over the top, and you're ready to serve something special.
Notes
- Choose the right cut carefully — Pork tenderloin and pork loin are sometimes confused in grocery stores, though they're different cuts. Tenderloin is smaller, more uniform, and cooks more evenly. It's my preferred choice for this recipe because it reaches the target temperature consistently. If you use a larger loin, you may need slightly longer cooking time.
- Room temperature meat cooks more evenly — Remove your pork from the refrigerator about 15-20 minutes before cooking. Cold meat straight from the fridge will have a cold center, and by the time the middle reaches 145°F, the exterior can overcook slightly. Room temperature meat cooks through more evenly, giving you that perfect edge-to-center consistency.
- Don't skip the resting period — I mentioned this in the steps, but it's important enough to emphasize. Those 5 minutes of rest are when the magic of moisture retention happens. The difference between a slice of pork that's juicy and flavorful versus one that's dry is often just those few minutes of patience.
- Make the spice blend ahead — You can mix your dry spices the night before and store them in an airtight container. This way, when you're ready to cook, you can focus on the pork itself. It's a small hack that makes weeknight cooking feel less overwhelming.
- Invest in a good meat thermometer — This is your insurance policy against overcooking. An instant-read thermometer costs about $20-30 and will serve you for years. It's one of the best investments you can make in your cooking confidence.
- Let your air fryer basket breathe — Don't overcrowd it. The pork needs space for hot air to circulate around all sides. If your air fryer is small and your pork barely fits, you're in the right zone. If you have to squeeze it in, your basket is too full.
Tried this recipe?Let us know how it was!