Lo Mein pairs wonderfully with crispy egg rolls that add a crunchy texture to the tender noodles. Their flavorful filling provides a satisfying contrast, making each bite more exciting. Light and refreshing spring rolls are another great choice. Packed with colorful veggies, they complement the …
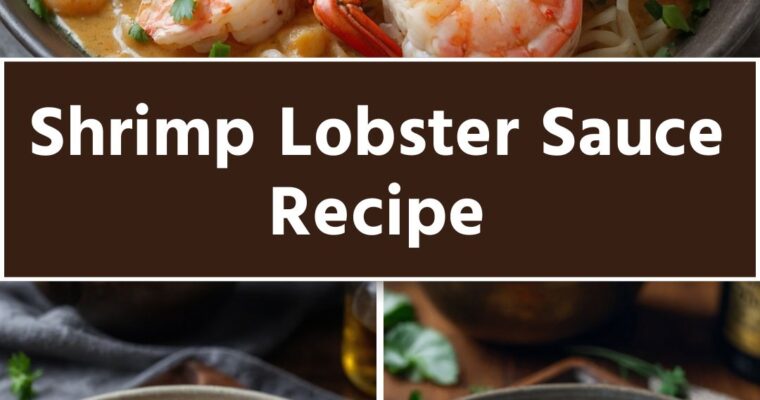
Before diving into the delicious depths of Shrimp Lobster Sauce, let’s talk about what pairs well with this dish. A flavorful sauce deserves a worthy vessel and companions that can enhance its profile. A steaming bowl of long-grain white rice soaking in every drop of …
Hot and sour soup pairs wonderfully with crispy spring rolls, adding a satisfying crunch to complement its tangy warmth. Steamed dumplings bring juicy heartiness that balances the soup’s spicy kick perfectly.
Noodles, whether rice or glass, soak up the flavorful broth, enhancing the meal’s depth. A simple bowl of jasmine or brown rice offers a mellow contrast to the spice.
For a refreshing touch, a chilled cucumber or carrot salad adds cool crunch that offsets the heat, rounding out a balanced, delicious dining experience.
Let’s imagine a chilly evening, the kind when you just want something warm and comforting. Hot sour soup is that dish that warms your soul with every spoonful.
With its tantalizing mix of heat and tanginess, it awakens your senses, making every bite an adventure. But there’s more: this soup isn’t just delicious; it’s versatile and packed with nutrients.
As a registered dietitian and food enthusiast, I’ve explored countless recipes and variations, perfecting my version over time. Get ready to learn what’s all the fuss about this not-so-humble soup.
What is Hot Sour Soup?
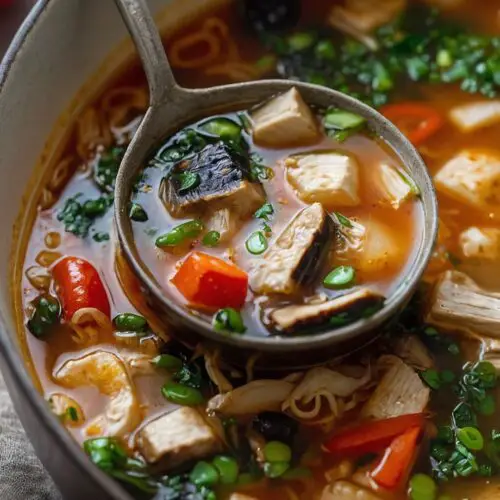
Hot sour soup is a popular dish in many Asian cuisines, particularly Chinese. It features a unique balance of flavors — a delightful zing from vinegar and a hint of heat from pepper or chili paste.
Usually, you’ll find ingredients like mushrooms, tofu, bamboo shoots, and a delightful mix of spices. The beauty of hot sour soup lies in its ability to adapt to personal tastes while keeping its core flavors intact.
Mostly served as an appetizer, it boasts a comforting warmth.
Whenever I whip up a batch, it brings back memories of sitting in bustling restaurants, the spicy warmth cutting through the cool air. It’s delightful not just for its flavor, but for the feelings it evokes.
You will also like the following Lunch And Dinner recipes!
Let’s delve into what makes hot sour soup not just a meal, but an experience.
1. Flavor Explosion: It delivers a harmonious balance of heat, acidity, and umami. The first sip will open your palate and warm your heart.
2. Nutrient-Rich: Bursting with vegetables, tofu, and spices, this soup is as nourishing as it is satisfying. You get protein, vitamins, and minerals all in one bowl.
3. Flexibility: You can tweak the ingredients based on what you have on hand. Remember, that’s the hallmark of home cooking — it’s all about what you enjoy.
4. Quick to Prepare: With a few simple steps, you can have a steaming pot of soup ready in about 30 minutes. It’s perfect for busy weeknights.
5. Crowd-Pleaser: Whether you’re hosting a dinner party or having a family meal, hot sour soup tends to be a hit. Everyone loves slurping down a bowl of it.
The Ingredients You Will Need To Make Hot Sour Soup
To make this flavorful concoction, gather the following ingredients:
8 cups low-sodium chicken stock or vegetable stock
1 (8-ounce) can sliced bamboo shoots, well drained
2 teaspoons ground fresh ginger or powdered ginger
1/4 cup seasoned rice vinegar, adjust to taste
1 teaspoon spicy chili-garlic paste
1/4 cup reduced-sodium soy sauce
8 ounces extra-firm tofu, diced into 1/2-inch cubes
2 large eggs, lightly beaten
4 scallions, finely chopped
1 tablespoon finely grated fresh lemongrass
1 teaspoon toasted sesame oil
1/2 teaspoon freshly ground white pepper
1/4 cup cornstarch
1 teaspoon toasted sesame seeds
These ingredients come together for a beautiful mix of texture and taste.
Directions
Step 1: Prepare Your Ingredients
Start by slicing the shiitake mushrooms and dicing the tofu. Make sure to drain the bamboo shoots well. Having everything prepped makes the cooking process smoother.
Step 2: Sauté the Veggies
In a large pot, heat a splash of oil over medium heat. Add the sliced shiitake mushrooms and sauté them until they release their juices. This usually takes about five minutes. The mushrooms should become tender and fragrant.
Step 3: Add the Broth
Pour the low-sodium chicken or vegetable stock into the pot. Bring the mixture to a gentle simmer.
Step 4: Add Bamboo Shoots and Flavors
Stir in the drained bamboo shoots. Then add your ginger, rice vinegar, chili-garlic paste, and soy sauce. This is where the flavor magic begins to happen. Allow it to cook for about three to four minutes, letting the flavors meld together.
Step 5: Introduce the Tofu
Now it’s time to add the tofu cubes. Gently stir them into the mixture to prevent breaking them apart.
Step 6: Thicken the Soup (Optional)
If you want a thicker soup, mix the cornstarch with a little bit of water in a separate bowl to create a slurry. Gradually add it to the soup while stirring. This will add a lovely body to the liquid.
Step 7: Incorporate the Egg
Next, drizzle the lightly beaten eggs into the pot while stirring the soup gently. This will create beautiful strands of egg throughout the broth.
Step 8: Final Flavors
Stir in the scallions, lemongrass, sesame oil, and white pepper. Allow it to cook for another couple of minutes. Your kitchen will be filled with an incredible aroma.
Step 9: Serve and Garnish
Ladle the hot sour soup into bowls and sprinkle with toasted sesame seeds. A bit of fresh scallion on top adds a nice touch too. Enjoy the warmth that comes with each spoonful.
Notes
Here are some tips to enhance your hot sour soup experience:
Adjust the Acidity: Seasoned rice vinegar varies in strength. Start with less and add more if you want a tangier soup.
Heat Level: The chili-garlic paste can be adjusted according to your heat tolerance. Avoid it if you’re sensitive to spice, or replace it with a milder alternative.
Preserving Flavor: If you make a big batch, add the eggs while cooking only what you plan to consume to keep them fresh.
Veg Variety: Feel free to add or swap in other vegetables like bok choy, snow peas, or broccoli.
Serving Size: This recipe serves about four, but doubling it is easy for a larger crowd. Just ensure your pot is big enough!
Storage Tips
For any leftovers, store the soup in an airtight container in the fridge. Ideally, consume within three days for the best taste.
When reheating, a quick simmer on the stovetop usually does the trick. As a side note, the texture might change slightly due to the eggs, but the flavors will still sing!
Nutrition Information
Hot Sour Soup Recipe Nutrition Facts
Serving Suggestions
Enjoy hot sour soup on its own or with some great side dishes. Here are five serving suggestions:
1. Serve with a Side of Spring Rolls: The crunch and flavor of spring rolls enhance the texture contrast.
2. Pair with Dumplings: Stuffed with meats or veggies, they complement each other beautifully.
3. Add Glass Noodles: Toss cooked glass noodles right into the soup for a heartier meal that absorbs flavors.
4. Enjoy with Rice: A bowl of steamed jasmine rice serves as a perfect base to soak up the rich broth.
5. Accompany with a Salad: Bright greens in a simple vinaigrette can balance the richness of the soup.
What Other Substitutes Can I Use in Hot Sour Soup?
Sometimes you may not have specific ingredients. No problem! Here’s what you can substitute:
1. Mushrooms:Button or cremini mushrooms work fine in a pinch. They won’t have the same earthiness, but they’ll still add flavor.
2. Tofu:Tempeh is a great alternative if you want a nuttier flavor and firmer texture.
3. Bamboo Shoots:Water chestnuts can replace bamboo shoots, providing a similar crunch and sweetness.
4. Soy Sauce: Need a gluten-free version? Tamari is a good option that offers the same umami flavor.
5. Chicken Stock: Use vegetable broth or mushroom broth for a vegan-friendly version.
Hot Sour Soup Recipe
Hot and sour soup pairs wonderfully with crispy spring rolls, adding a satisfying crunch to complement its tangy warmth. Steamed dumplings bring juicy heartiness that balances the soup’s spicy kick perfectly.
Start by slicing the shiitake mushrooms and dicing the tofu. Make sure to drain the bamboo shoots well. Having everything prepped makes the cooking process smoother.
Step 2: Sauté the Veggies
In a large pot, heat a splash of oil over medium heat. Add the sliced shiitake mushrooms and sauté them until they release their juices. This usually takes about five minutes. The mushrooms should become tender and fragrant.
Step 3: Add the Broth
Pour the low-sodium chicken or vegetable stock into the pot. Bring the mixture to a gentle simmer.
Step 4: Add Bamboo Shoots and Flavors
Stir in the drained bamboo shoots. Then add your ginger, rice vinegar, chili-garlic paste, and soy sauce. This is where the flavor magic begins to happen. Allow it to cook for about three to four minutes, letting the flavors meld together.
Step 5: Introduce the Tofu
Now it’s time to add the tofu cubes. Gently stir them into the mixture to prevent breaking them apart.
Step 6: Thicken the Soup (Optional)
If you want a thicker soup, mix the cornstarch with a little bit of water in a separate bowl to create a slurry. Gradually add it to the soup while stirring. This will add a lovely body to the liquid.
Step 7: Incorporate the Egg
Next, drizzle the lightly beaten eggs into the pot while stirring the soup gently. This will create beautiful strands of egg throughout the broth.
Step 8: Final Flavors
Stir in the scallions, lemongrass, sesame oil, and white pepper. Allow it to cook for another couple of minutes. Your kitchen will be filled with an incredible aroma.
Step 9: Serve and Garnish
Ladle the hot sour soup into bowls and sprinkle with toasted sesame seeds. A bit of fresh scallion on top adds a nice touch too. Enjoy the warmth that comes with each spoonful.
Notes
Adjust the Acidity: Seasoned rice vinegar varies in strength. Start with less and add more if you want a tangier soup.
Heat Level: The chili-garlic paste can be adjusted according to your heat tolerance. Avoid it if you’re sensitive to spice, or replace it with a milder alternative.
Preserving Flavor: If you make a big batch, add the eggs while cooking only what you plan to consume to keep them fresh.
Veg Variety: Feel free to add or swap in other vegetables like bok choy, snow peas, or broccoli.
Serving Size: This recipe serves about four, but doubling it is easy for a larger crowd. Just ensure your pot is big enough!
Yes! Simply use vegetable stock and omit the eggs. You can still get the creamy texture with the tofu.
2. How spicy is hot sour soup?
The spice level can vary. Start small with the chili-garlic paste, and adjust according to your taste preference.
3. Is hot sour soup gluten-free?
It can be made gluten-free by using tamari instead of regular soy sauce. Always check labels for gluten-free options.
4. Can I freeze hot sour soup?
While you can freeze it, the texture may change once thawed. It’s better consumed fresh, but if you must freeze, omit the eggs before freezing.
5. What else can I add to the soup?
Feel free to experiment with shredded carrots, zucchini, or even kale for extra nutrients and flavors.
6. How long does hot sour soup keep?
Keep it in an airtight container in the fridge for up to three days. Reheat gently to preserve the soup’s quality.
Conclusion
Hot sour soup is truly a delight. It wraps you in warmth and offers a flavor adventure in every spoonful.
By following this guide, I’m confident you’ll master this recipe in no time. Plus, it’s a great conversation starter at the dinner table! Whether you enjoy it alone or share it with loved ones, this soup is sure to bring a smile.
Let me take you on a flavorful journey, one that lands you in the cozy realm of crispy, juicy buffallo wings. A crowded living room packed with friends, laughter echoing, and finger-licking goodness dominating the table. Wings are the undisputed star of any gathering, and …
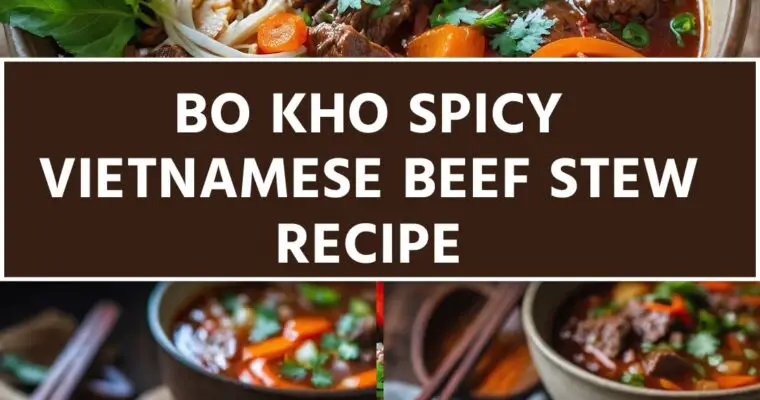
Before diving into the rich flavors of bo kho, let’s explore what works wonderfully alongside this delightful Vietnamese beef stew. A steaming bowl should generally be accompanied by wide rice noodles or egg noodles. They absorb the stew’s essence, making for a cohesive dining experience. …
I have an appetite for great flavors and culinary stories. Whenever I think about a reliable centerpiece for a meal, Young Chow fried rice always springs to mind. Perfectly seasoned and packed with a variety of textures, this dish can elevate any occasion.
But let’s be honest: you can’t just whip up fried rice on a whim without thinking about the right complementary dishes.
Pairing Young Chow fried rice with something light, like simple stir-fried veggies or sweet and sour chicken, makes for a well-rounded meal. However, it’s the fried rice that often steals the show.
What is Young Chow Fried Rice?
Young Chow fried rice, also known as Yang Chow fried rice, originated from southern China, specifically the Yangtze River Delta region. It’s not just any fried rice; it combines various ingredients like shrimp, ham, and roast pork with perfectly cooked rice, resulting in a delicious medley.
The cooking techniques might sound simple, but the balance of flavors in Young Chow fried rice is simply fantastic. In my experience, it’s a dish that showcases the essence of Chinese cooking: a harmony of taste, texture, and technique.
You will also like the following Lunch and Dinner recipes!
Before diving into the cooking process, let’s gather our ingredients. This is where the magic begins.
2 large eggs, lightly beaten
3 tablespoons vegetable oil
1 teaspoon minced garlic
4 ounces fresh peeled shrimp
1 medium yellow onion, finely chopped
1/2 cup diced Virginia ham
1/2 cup diced Chinese-style roast pork
5 cups steamed rice
3/4 cup thawed green peas
1 teaspoon toasted sesame oil
1 1/2 teaspoons kosher salt
1/4 teaspoon granulated sugar
1 teaspoon Shaoxing cooking wine
2 scallions, thinly sliced
2 cups shredded romaine or iceberg lettuce
1/8 teaspoon freshly cracked white pepper
How to Make Young Chow Fried Rice?
Creating Young Chow fried rice is straightforward and satisfying. However, like any great recipe, it requires some attention to detail and timing. Let’s break it down step by step.
Step 1: Prepare Your Ingredients
Start by making sure everything is prepped and ready to go. Dice the ham and roast pork, chop the onion, and measure out your peas. Having everything at your fingertips makes the cooking process smoother.
Trust me; you don’t want to scramble around looking for ingredients while the oil is getting hot!
Step 2: Heat the Oil and Cook the Eggs
In a large skillet or a wok, heat the vegetable oil over medium-high heat. Add the beaten eggs and scramble them until just set.
This should only take about a minute or so. Once they’re cooked, transfer the eggs to a plate and set them aside.
Step 3: Sauté the Aromatics
In the same skillet, add a bit more oil if needed and toss in the minced garlic. Stir for about 30 seconds until it gets fragrant (but beware of burning!). Then, throw in the chopped onion and sauté until it turns translucent.
Step 4: Add Proteins
Next, add the shrimp, diced ham, and roast pork to the skillet. Sauté them for 3 to 4 minutes until the shrimp turns pink and everything heats through. This step adds layers of flavor thanks to the varying tastes of the meats.
Step 5: Incorporate the Rice
Now comes the fun part! Add the steamed rice to the pan. Make sure to break up any clumps as you stir. It’s important that your rice is day-old; it helps achieve that perfect fried texture without being mushy.
Step 6: Season the Dish
Once the rice is well mixed with the meat and veggies, it’s time to season. Add in the soy sauce, toasted sesame oil, salt, sugar, Shaoxing wine, and white pepper. Stir for a couple of minutes until everything is evenly coated in the sauce.
Step 7: Add the Finishing Touches
Finally, toss in the peas, scrambled eggs, and scallions. Stir everything to combine, ensuring that the peas heat through and the flavors meld together.
Don’t forget to add the shredded lettuce right at the end; its freshness balances the entire dish. Give it a final stir and voilà—you’ve made Young Chow fried rice!
Notes
Here are a few helpful tips I’ve learned over the years:
Use Day-Old Rice: Freshly cooked rice tends to be too sticky and won’t fry as well. Day-old rice dries out a bit, which is perfect for frying.
High Heat for Crispiness: Using a hot skillet or wok helps to achieve a nice crisp to the rice.
Don’t Overcrowd the Pan: If you’re making a large batch, consider cooking in smaller portions. Too much in the pan can lead to steaming rather than frying.
Customize to Your Taste: Feel free to add your favorite proteins or veggies. Everything from chicken to tofu can work well.
Garnish for Extra Flavor: A sprinkle of sesame seeds or additional scallions on top provides a lovely finish.
Storage Tips
If you have leftovers, they can be stored in an airtight container in the refrigerator for up to 3 days. To reheat, a quick time in the microwave works, but I always recommend a stir-fry in the skillet for the best results. This helps revive that fried texture.
Nutrition Information
Young Chow Fried Rice Recipe Nutrition Facts
Serving Suggestions
Here are some ideas to make your meal truly spectacular:
Stir-Fried Veggies: Incorporating seasonal vegetables, lightly sautéed with soy sauce, makes a great side dish.
Sweet and Sour Chicken: The tanginess from the chicken complements the rice well.
Spring Rolls: These crispy bites offer a delightful crunch and are a classic pairing.
Hot and Sour Soup: The heat and tang of soup offers refreshment against the rice’s richness.
Steamed Dumplings: Soft and filled with flavors, they serve as a fantastic companion to the fried rice.
What Other Substitutes Can I Use in Young Chow Fried Rice?
If you want to mix it up or don’t have certain ingredients on hand, consider these great substitutes:
Chicken: Diced chicken breast can easily replace the shrimp or any other protein you prefer.
Tofu: For a vegetarian option, tofu will soak up the flavors wonderfully and add protein.
Quinoa: This is a great gluten-free alternative to rice. Cook it as per the package instructions before adding it to your stir-fry.
Cauliflower Rice: A low-carb alternative, it offers a similar texture and pairs beautifully with the other ingredients.
Zucchini Noodles: Spiralized zucchini can be a fun and nutritious substitute, providing an entirely different texture.
Young Chow Fried Rice Recipe
I have an appetite for great flavors and culinary stories. Whenever I think about a reliable centerpiece for a meal, Young Chow fried rice always springs to mind.
Start by making sure everything is prepped and ready to go. Dice the ham and roast pork, chop the onion, and measure out your peas. Having everything at your fingertips makes the cooking process smoother.
Trust me; you don’t want to scramble around looking for ingredients while the oil is getting hot!
Step 2: Heat the Oil and Cook the Eggs
In a large skillet or a wok, heat the vegetable oil over medium-high heat. Add the beaten eggs and scramble them until just set.
This should only take about a minute or so. Once they’re cooked, transfer the eggs to a plate and set them aside.
Step 3: Sauté the Aromatics
In the same skillet, add a bit more oil if needed and toss in the minced garlic. Stir for about 30 seconds until it gets fragrant (but beware of burning!). Then, throw in the chopped onion and sauté until it turns translucent.
Step 4: Add Proteins
Next, add the shrimp, diced ham, and roast pork to the skillet. Sauté them for 3 to 4 minutes until the shrimp turns pink and everything heats through. This step adds layers of flavor thanks to the varying tastes of the meats.
Step 5: Incorporate the Rice
Now comes the fun part! Add the steamed rice to the pan. Make sure to break up any clumps as you stir. It’s important that your rice is day-old; it helps achieve that perfect fried texture without being mushy.
Step 6: Season the Dish
Once the rice is well mixed with the meat and veggies, it’s time to season. Add in the soy sauce, toasted sesame oil, salt, sugar, Shaoxing wine, and white pepper. Stir for a couple of minutes until everything is evenly coated in the sauce.
Step 7: Add the Finishing Touches
Finally, toss in the peas, scrambled eggs, and scallions. Stir everything to combine, ensuring that the peas heat through and the flavors meld together.
Don’t forget to add the shredded lettuce right at the end; its freshness balances the entire dish. Give it a final stir and voilà—you’ve made Young Chow fried rice!
Notes
Use Day-Old Rice: Freshly cooked rice tends to be too sticky and won’t fry as well. Day-old rice dries out a bit, which is perfect for frying.
High Heat for Crispiness: Using a hot skillet or wok helps to achieve a nice crisp to the rice.
Don’t Overcrowd the Pan: If you’re making a large batch, consider cooking in smaller portions. Too much in the pan can lead to steaming rather than frying.
Customize to Your Taste: Feel free to add your favorite proteins or veggies. Everything from chicken to tofu can work well.
Garnish for Extra Flavor: A sprinkle of sesame seeds or additional scallions on top provides a lovely finish.
Absolutely! Just be sure to thaw them properly before cooking to ensure they cook evenly. Absolutely!
What’s the best rice to use?
Long-grain rice tends to work best due to its firmer texture, but jasmine or basmati can also provide wonderful flavors.
How do I prevent soggy fried rice?
The key is to use dry, day-old rice. If cooked rice is still moist, spread it out on a baking sheet to cool and dry before frying.
Can I make this dish vegetarian?
Yes! Just skip the meats and add extra vegetables along with tofu for protein.
Is Young Chow fried rice spicy?
It typically isn’t spicy, but you can add chili oil or red pepper flakes if you prefer a kick.
Conclusion
Making Young Chow fried rice offers more than just a meal; it creates an experience in your kitchen. Each step invites you into a flavorful journey, culminating in a dish that pleases any palate.
With its adaptability and delightful taste, it’s a recipe sure to impress family and friends. Whether you’re a seasoned chef or a beginner, I guarantee this dish will become a favorite in your culinary repertoire. Bon appétit!
Moo Shu Chicken pairs wonderfully with steamed jasmine rice, whose delicate texture balances the dish’s bold flavors. Hot and sour soup adds a classic, tangy complement that enhances the stir-fry experience. A crisp cucumber salad refreshes the palate with its tangy bite, while crunchy spring …
When I first encountered Pad Kra Pao, it was like discovering a hidden gem in the bustling streets of Thailand. The sizzling sounds of garlic hitting the pan, the rich aromas filling the air, and that first bite of spiced chicken or tofu topped with …
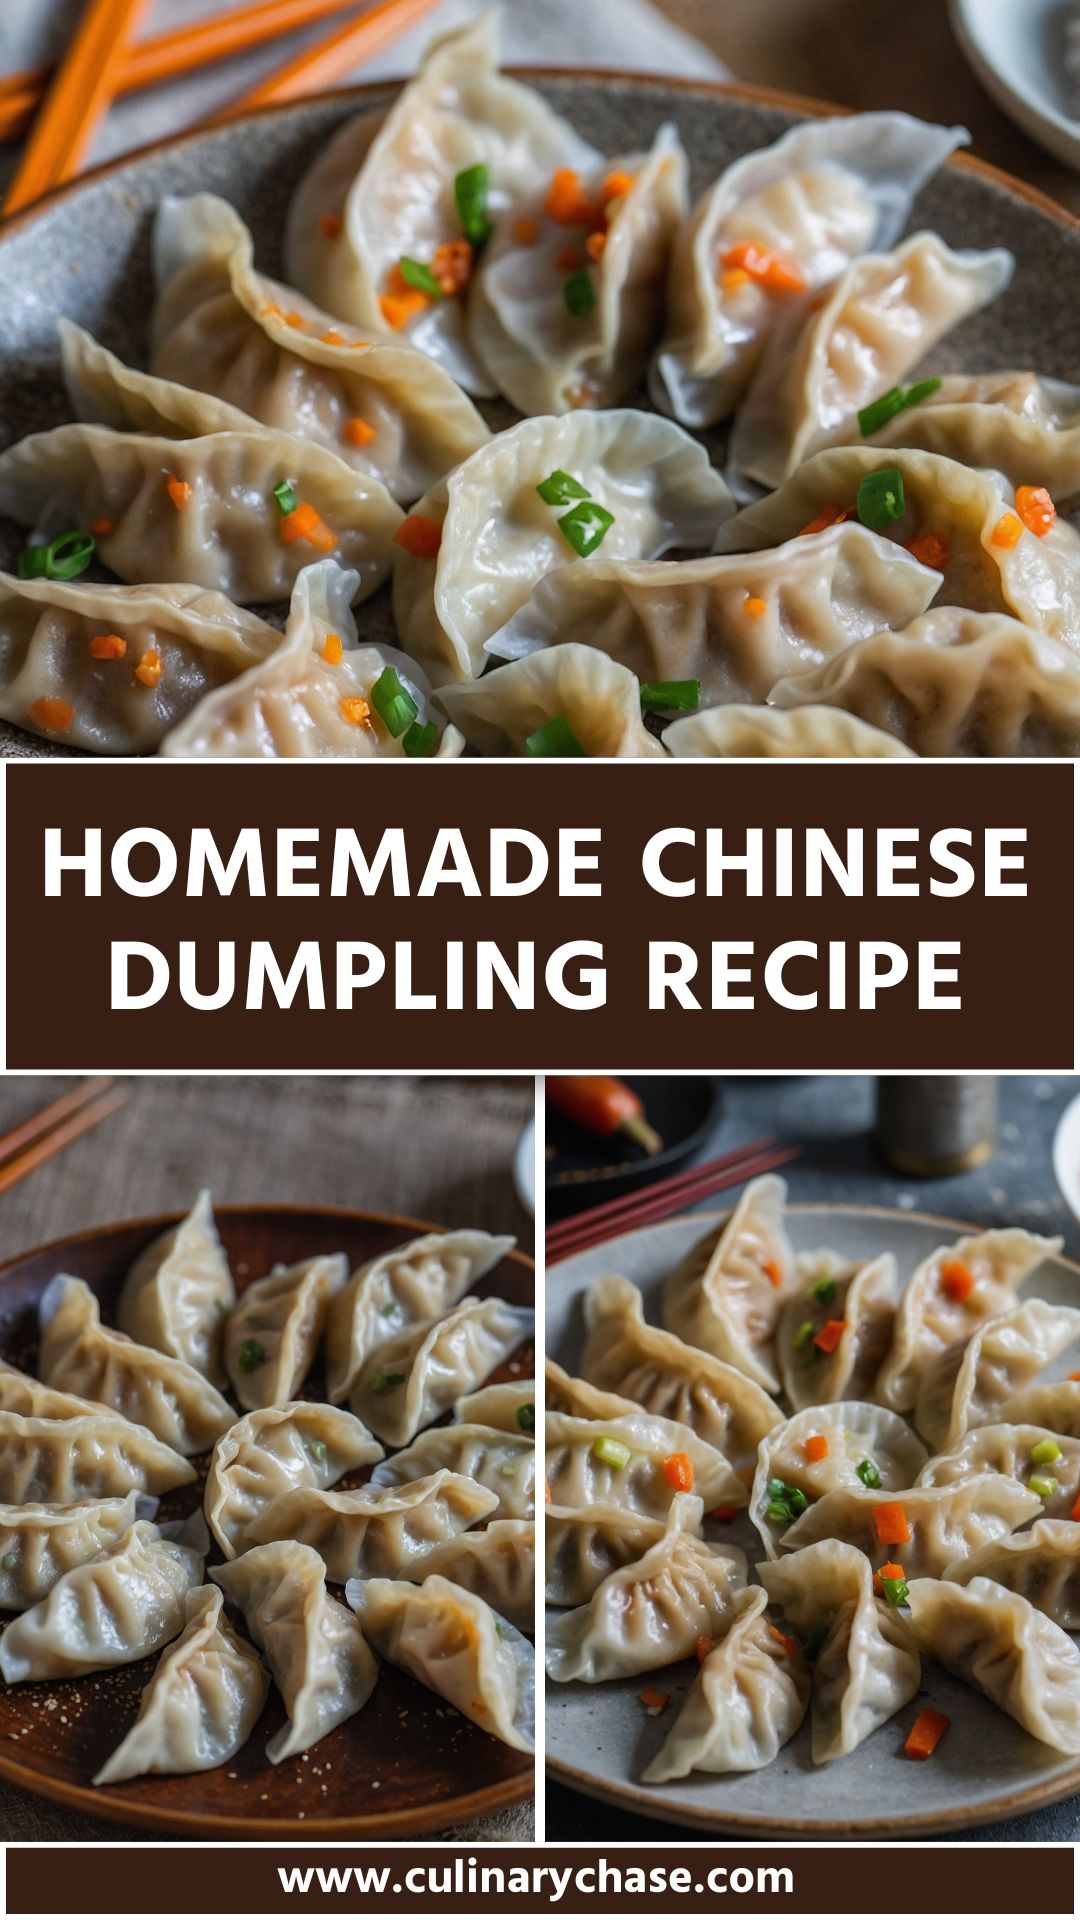
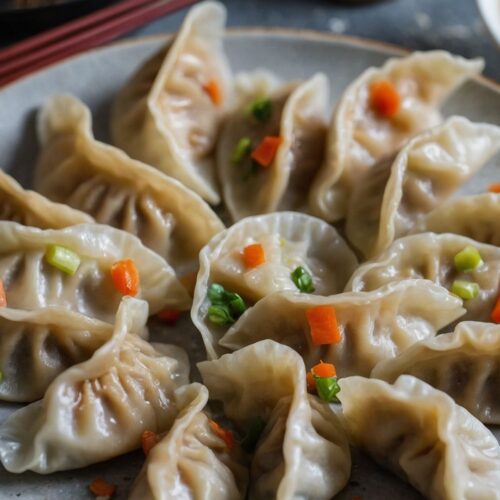
When it comes to enjoying homemade Chinese dumplings, pair them with a refreshing dipping sauce or a light broth. A simple soy sauce mixed with a dash of rice vinegar and a sprinkle of sesame seeds creates a classic dip.
Alternatively, a bowl of warm broth with herbs can complement the dumplings beautifully. You might even consider serving some steamed vegetables on the side to add freshness.
The Magic of Homemade Dumplings
Let’s dive into why making your own dumplings is such a rewarding experience! There’s something special about preparing food from scratch.
It’s not just about ingredients and measurements; it’s about the memories, the flavors, and the moments you share with loved ones. I’ve always found that cooking, especially something as versatile as dumplings, allows us to connect with culture and each other.
I’ve personally experimented with dumplings many times. Every time I make them, I discover new combinations and flavors. With a personal touch, these dumplings can adapt to your tastes while still paying homage to tradition.
Using fresh ingredients not only elevates flavor but also nourishes the body, making this recipe a staple in my kitchen.
You will also like the following Appetizers And Side Dishes recipes!
In a large mixing bowl, combine the minced pork, grated ginger, Shaoxing rice wine, cornstarch, sea salt, garlic, black pepper, half of the chicken broth, scallions, soy sauce, beaten egg, and sesame oil. Mix thoroughly until the ingredients are well integrated.
The consistency is crucial—too wet and the filling will ooze, too dry and it won’t stick. With my experience, it should feel just right—soft but not liquid.
Step 2: Assemble the Dumplings
Take a wonton wrapper and place a small spoonful of the filling in the center. Don’t overfill! Moisten the edges of the wrapper with a tiny bit of water.
Fold the wrapper over to create a triangle, making sure to press out any air. Then, crimp the edges to seal the dumpling tightly. Here’s a tip: practice makes perfect! It took me a few tries to get the folding technique just right.
Step 3: Cook the Dumplings
You can choose to steam, boil, or pan-fry your dumplings. I have a soft spot for pan-frying because it gives the dumpling a lovely crispy bottom. Heat a tablespoon of peanut oil in a non-stick skillet over medium heat.
Once hot, add the dumplings in a single layer. Let them cook until the bottoms are golden brown, about 3-4 minutes.
Next, pour in the remaining chicken broth to the pan. Cover it immediately to let them steam for about 5-7 minutes. This technique offers the best of both worlds: crispy on the bottom, tender on top.
Step 4: Serve and Enjoy
Using a spatula, carefully lift the dumplings from the pan. Place them on a serving platter. I love to sprinkle chopped scallions on top for a vibrant finish. Don’t forget the dipping sauce!
Recipe Notes
Every ingredient in this recipe has its charm and purpose.
Peanut oil adds flavor and helps for high-heat cooking.
Minced pork hits the mark for richness—ground chicken or mushrooms can be a lighter swap.
Fresh ginger and garlic are aromatic powerhouses, essential in Asian cooking.
Wonton wrappers provide convenience, but if you’re feeling adventurous, making your own dough is a fun challenge.
Sesame oil shouldn’t be skimped on; it lends an irresistible depth.
Recipe Variations
Feeling creative? There are so many delicious twists you can play with in this recipe:
Veggie Dumplings: Replace the pork with finely chopped mushrooms and carrots for a vegetarian option.
Spicy Dumplings: Add chili oil or chopped fresh chilies to the filling for a kick.
Herby Dumplings: Incorporate cilantro or basil for an extra layer of flavor.
Seafood Dumplings: Use shrimp or crab meat instead of pork for a seafood variation.
Sweet Dumplings: For dessert, fill the dumpling wrappers with sweetened red bean paste or fruit.
Nutrition Facts
Homemade Chinese Dumpling Recipe Nutrition Facts
Homemade Chinese Dumpling Recipe
When it comes to enjoying homemade Chinese dumplings, pair them with a refreshing dipping sauce or a light broth. A simple soy sauce mixed with a dash of rice vinegar and a sprinkle of sesame seeds creates a classic dip
In a large mixing bowl, combine the minced pork, grated ginger, Shaoxing rice wine, cornstarch, sea salt, garlic, black pepper, half of the chicken broth, scallions, soy sauce, beaten egg, and sesame oil. Mix thoroughly until the ingredients are well integrated.
The consistency is crucial—too wet and the filling will ooze, too dry and it won’t stick. With my experience, it should feel just right—soft but not liquid.
Step 2: Assemble the Dumplings
Take a wonton wrapper and place a small spoonful of the filling in the center. Don’t overfill! Moisten the edges of the wrapper with a tiny bit of water.
Fold the wrapper over to create a triangle, making sure to press out any air. Then, crimp the edges to seal the dumpling tightly. Here’s a tip: practice makes perfect! It took me a few tries to get the folding technique just right.
Step 3: Cook the Dumplings
You can choose to steam, boil, or pan-fry your dumplings. I have a soft spot for pan-frying because it gives the dumpling a lovely crispy bottom. Heat a tablespoon of peanut oil in a non-stick skillet over medium heat.
Once hot, add the dumplings in a single layer. Let them cook until the bottoms are golden brown, about 3-4 minutes.
Next, pour in the remaining chicken broth to the pan. Cover it immediately to let them steam for about 5-7 minutes. This technique offers the best of both worlds: crispy on the bottom, tender on top.
Step 4: Serve and Enjoy
Using a spatula, carefully lift the dumplings from the pan. Place them on a serving platter. I love to sprinkle chopped scallions on top for a vibrant finish. Don’t forget the dipping sauce!
Notes
Peanut oil adds flavor and helps for high-heat cooking.
Minced pork hits the mark for richness—ground chicken or mushrooms can be a lighter swap.
Fresh ginger and garlic are aromatic powerhouses, essential in Asian cooking.
Wonton wrappers provide convenience, but if you’re feeling adventurous, making your own dough is a fun challenge.
Sesame oil shouldn’t be skimped on; it lends an irresistible depth.
Absolutely! Place uncooked dumplings in a single layer on a baking sheet until they are frozen solid. Transfer to a freezer-safe bag. You can cook them straight from the freezer directly without thawing.
2. How do I know when dumplings are cooked?
Dumplings are ready when they become translucent and float to the surface (for boiling) or when they turn golden brown on the bottom (for pan-frying). You can also cut one open to check the filling.
3. What should I serve with dumplings?
Dumplings pair beautifully with broths, dipping sauces, and even fried rice or stir-fried veggies. A side of pickled vegetables adds a crunchy contrast.
4. Can I make dumpling wrappers from scratch?
Yes! Mixing flour and water can create dough for wrappers. Roll it thinly and cut it into circles. It might take practice, but homemade wrappers provide a delightful chewy texture.
5. What if I want a gluten-free dough?
Use gluten-free flour blends designed for baking. There are also ready-made gluten-free wonton wrappers available at some stores.
6. How long do cooked dumplings last in the fridge?
Cooked dumplings can stay fresh in the fridge for about 3-4 days. Reheat them in a skillet with a splash of water to steam gently.
Conclusion
Taking the plunge to make homemade Chinese dumplings can seem intimidating at first, but the rewards are plentiful.
Each bite is filled with flavor, tradition, and a sense of accomplishment. Whether enjoyed alone or with family and friends, they are a comfort food that brings everyone together.
So, roll up your sleeves, gather those ingredients, and have fun creating these delicious little pockets of joy. You will find that the process is just as delicious as the outcome. Happy dumping!
When it comes to enjoying healthy yum yum sauce, the possibilities are endless! I’ve paired this delightful sauce with grilled proteins like chicken and shrimp. It’s equally wonderful on rice bowls, fresh salads, or veggies. Not to forget, dipping fresh spring rolls or crunchy veggies …