When it comes to enjoying Panda Express Super Greens, the first question that pops up is what to pair with this vibrant dish. For a well-rounded meal, consider pairing it with Orange Chicken. The sweet and tangy flavors of the chicken contrast nicely with the …
Imagine this: you’ve just bitten into a steaming hot Chinese BBQ pork bun, known as cha siu bao. The sweet and savory filling bursts forth, mingling with the soft, fluffy dough. But what could make this experience even better? Some fantastic side dishes or beverages! …
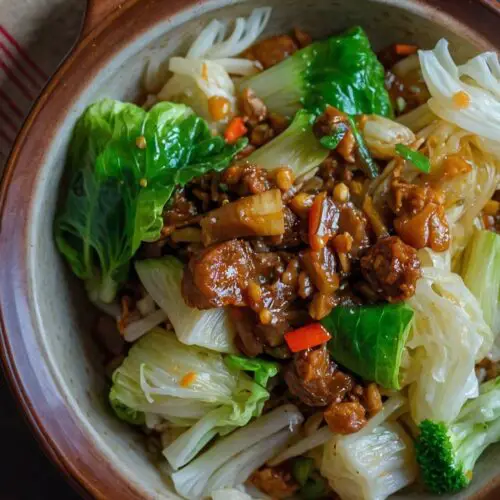
Before diving into the delicious world of Chinese cabbage stir fry, let’s explore what dishes complement it perfectly. You can serve this stir fry alongside some fragrant jasmine rice to soak up all that flavorful sauce.
If you’re looking for protein, grilled chicken marinated in soy sauce or sesame oil pairs beautifully with the stir fry. For a vegetarian option, try serving it with tofu glazed in a hoisin sauce for that extra umami kick.
You might also consider pairing it with a light miso soup, which sets a serene mood for the meal. For those who enjoy a bit of crunch, some crispy spring rolls can add an exciting texture contrast. Finally, a tangy cucumber salad with rice vinegar can cleanse the palate and enhance your feast.
If you’re looking for a go-to recipe that’s both satisfying and straightforward, let me introduce you to my Chinese cabbage stir fry. This dish is not just another recipe; it’s a colorful, vibrant way to sneak in vegetables while treating your taste buds to a delightful experience.
With its crunchy texture and bold flavor profile, this stir fry is bound to be a winner on your dinner table. Let me take you on a culinary journey that combines personal anecdotes, tips, and lots of love for healthy eating.
What is Chinese Cabbage Stir Fry?
Chinese cabbage stir fry is a quick, easily prepared dish that highlights the delicate flavors of cabbage, complemented by savory spices and proteins.
Known for its crisp leaves and sweet flavor, Chinese cabbage is often used in Asian cuisine, particularly in stir fries and salads. The beauty of this dish lies not only in its taste but also in its versatility. You can customize it based on what’s in your pantry or your family’s preferences.
You will also like the following Side Dishes recipes!
If you’ve ever been hesitant about making stir fry, let me inspire you. This Chinese cabbage stir fry requires minimal prep time, comes together in one pan, and delivers a refreshing crunch in every bite. You will love it for a variety of reasons:
Simplicity: It uses ingredients you might already have in your kitchen, making it an easy last-minute solution for dinner.
Nutrition: Packed with vitamins A, C, and K, Chinese cabbage is a powerhouse, contributing to your daily nutrient intake.
Flavor Fusion: This dish marries traditional Asian flavors, like soy sauce and sesame oil, making it delicious and fulfilling.
Customizable: Whether you prefer meat, seafood, or a meatless dish, this stir fry accommodates all tastes. Feel free to switch up the proteins or add more veggies.
Versatile Use: Serve it as a side or a main dish over rice, and it fits snugly into any meal plan.
You’ll quickly find that this dish can transform dinner from mundane to extraordinary.
The Ingredients You Will Need to Make Chinese Cabbage Stir Fry
Gathering your ingredients is the first step. Here’s what you’ll need to whip up this delightful dish:
2 tablespoons cooking oil: This serves as the base for your stir fry.
6 oz. pork belly, pork loin, or chicken, thinly sliced: Choose your protein for flavor and texture.
5 dried red chilies, deseeded and roughly chopped: For that spicy kick.
5 garlic cloves, smashed and halved: Garlic adds a robust aroma.
1 ½ lb. Chinese cabbage, hand-shredded into bite-sized pieces, washed, and well dried: This is your star ingredient.
1 tablespoon light soy sauce: For that essential saltiness.
2 teaspoons Shaoxing cooking wine: This fragrant addition introduces depth and complexity.
½ teaspoon Chinese black vinegar: Adds a unique tang and balances the flavors.
½ teaspoon granulated sugar: To round out the flavors without overpowering them.
2 scallions, cut into 2-inch pieces: Adds a fresh crunch.
1 teaspoon freshly grated ginger: For a zesty warmth.
1 teaspoon toasted sesame oil: Enhances the dish with a rich nuttiness.
With these ingredients in your kitchen, you’re ready to create a culinary masterpiece.
Directions
Step 1: Preparation
Start by slicing your chosen protein and setting it aside. Thin slices ensure even cooking. Next, prepare your vegetables—shred the cabbage and wash it thoroughly. Drying the leaves is crucial, as excess water can create steam rather than stir-frying.
Step 2: Get the Oil Hot
Heat a wok or large skillet over medium-high heat. Add the cooking oil and let it heat up until shimmering. The right temperature will give your vegetables the perfect sear.
Step 3: Sautéing the Aromatics
Once the oil is hot, add the garlic and dried red chilies. Stir-fry for about 30 seconds until they release their fragrance. Be cautious not to burn the garlic; it can turn bitter quickly.
Step 4: Add the Protein
Introduce your prepped protein to the pan. Stir-fry until it’s browned and cooked through, about 3-5 minutes. The sizzling sound is music to my ears. It signals that we’re on the right track!
Step 5: Incorporate the Cabbage
Now, toss in the shredded cabbage. Stir it around, allowing it to wilt slightly while keeping some of that crunchy texture. This takes roughly 2-3 minutes.
Step 6: Seasoning
Pour in the light soy sauce and Shaoxing cooking wine. Drizzle the black vinegar and sprinkle the sugar. Toss everything together to ensure the cabbage is coated evenly. At this stage, the kitchen will be filled with enticing aromas.
Step 7: Final Touches
Add the scallions and ginger. Cook for another minute, just enough to let the flavors meld without losing that vibrant color.
Step 8: Drizzle with Sesame Oil
Finally, remove the wok from heat and drizzle the toasted sesame oil over the stir fry. This step adds an irresistible finish. Serve immediately and enjoy the fruits of your labor.
Notes
Tip 1: Prep Ahead: Chop your vegetables the day before. This saves time and allows you to have a quicker cooking experience.
Tip 2: Protein Choices: Experiment with proteins using tofu for a vegan option. It absorbs flavors beautifully and keeps the dish hearty.
Tip 3: Vary the Veggies: Add bell peppers, carrots, or broccoli. It keeps the dish colorful and enhances nutrition.
Tip 4: Spice Level: Adjust the number of chilies based on your heat tolerance. There’s no shame in dialing it back!
Tip 5: Stir-fry in Batches: If you’re cooking for a crowd, consider working in batches. It prevents overcrowding in the pan, leading to better cooking results.
Storage Tips
Store any leftovers in an airtight container in the refrigerator for up to three days. To reheat, warm in a skillet over medium heat until heated through. If you find the cabbage has wilted more than desired, a splash of water can help revive the dish, restoring some crunch and flavor.
Nutrition Information
This dish not only satisfies your taste buds but also supports your health. Each serving is low in calories and high in essential vitamins. Here’s a rough breakdown per serving based on the ingredients listed:
Calories: Approximately 230
Protein: 26g
Carbohydrates: 8g
Fat: 10g
Fiber: 4g
This dish is low in carbs and high in fiber, making it great for any diet plan.
Serving Suggestions
To make this dish truly shine, consider these serving suggestions:
Over Rice: Serve it over fluffy jasmine rice for a filling meal that soaks up the juices.
With Noodles: Toss it with egg noodles for a heartier option.
As a Wrap: Use it as a filling for lettuce wraps. The crispiness pairs well with the sautéed flavors.
With Steamed Dumplings: Add a side of steamed dumplings for an extra touch of flair.
Chilled: Enjoy it cold the next day as a refreshing salad. The flavors will meld beautifully overnight.
What Other Substitutes Can I Use in Chinese Cabbage Stir Fry?
If you’re out of Chinese cabbage, don’t fret! Here are other substitutes:
Napa Cabbage: This is an excellent alternative. It has a similar texture and flavor profile, making it a seamless replacement.
Savoy Cabbage: This variety has crinkly leaves and offers a slightly sweeter flavor while holding up well in stir-fries.
Green Cabbage: It’s widely available and can work nicely in stir-fries. Just remember, it might take a bit longer to cook.
Bok Choy: These leafy greens add a delightful crunch and have a great flavor that complements other stir-fry ingredients.
Broccoli or Cauliflower: These vegetables can add both a unique flavor and texture. However, they do require a little more cooking time.
Chinese Cabbage Stir Fry
Before diving into the delicious world of Chinese cabbage stir fry, let’s explore what dishes complement it perfectly.
2tablespoonscooking oil: This serves as the base for your stir fry.
6oz.pork bellypork loin, or chicken, thinly sliced: Choose your protein for flavor and texture.
5dried red chiliesdeseeded and roughly chopped: For that spicy kick.
5garlic clovessmashed and halved: Garlic adds a robust aroma.
1 ½lb.Chinese cabbagehand-shredded into bite-sized pieces, washed, and well dried: This is your star ingredient.
1tablespoonlight soy sauce: For that essential saltiness.
2teaspoonsShaoxing cooking wine: This fragrant addition introduces depth and complexity.
½teaspoonChinese black vinegar: Adds a unique tang and balances the flavors.
½teaspoongranulated sugar: To round out the flavors without overpowering them.
2scallionscut into 2-inch pieces: Adds a fresh crunch.
1teaspoonfreshly grated ginger: For a zesty warmth.
1teaspoontoasted sesame oil: Enhances the dish with a rich nuttiness.
Instructions
Step 1: Preparation
Start by slicing your chosen protein and setting it aside. Thin slices ensure even cooking. Next, prepare your vegetables—shred the cabbage and wash it thoroughly. Drying the leaves is crucial, as excess water can create steam rather than stir-frying.
Step 2: Get the Oil Hot
Heat a wok or large skillet over medium-high heat. Add the cooking oil and let it heat up until shimmering. The right temperature will give your vegetables the perfect sear.
Step 3: Sautéing the Aromatics
Once the oil is hot, add the garlic and dried red chilies. Stir-fry for about 30 seconds until they release their fragrance. Be cautious not to burn the garlic; it can turn bitter quickly.
Step 4: Add the Protein
Introduce your prepped protein to the pan. Stir-fry until it’s browned and cooked through, about 3-5 minutes. The sizzling sound is music to my ears. It signals that we’re on the right track!
Step 5: Incorporate the Cabbage
Now, toss in the shredded cabbage. Stir it around, allowing it to wilt slightly while keeping some of that crunchy texture. This takes roughly 2-3 minutes.
Step 6: Seasoning
Pour in the light soy sauce and Shaoxing cooking wine. Drizzle the black vinegar and sprinkle the sugar. Toss everything together to ensure the cabbage is coated evenly. At this stage, the kitchen will be filled with enticing aromas.
Step 7: Final Touches
Add the scallions and ginger. Cook for another minute, just enough to let the flavors meld without losing that vibrant colr.o
Step 8: Drizzle with Sesame Oil
Finally, remove the wok from heat and drizzle the toasted sesame oil over the stir fry. This step adds an irresistible finish. Serve immediately and enjoy the fruits of your labor.
Notes
Tip 1: Prep Ahead: Chop your vegetables the day before. This saves time and allows you to have a quicker cooking experience.
Tip 2: Protein Choices: Experiment with proteins using tofu for a vegan option. It absorbs flavors beautifully and keeps the dish hearty.
Tip 3: Vary the Veggies: Add bell peppers, carrots, or broccoli. It keeps the dish colorful and enhances nutrition.
Tip 4: Spice Level: Adjust the number of chilies based on your heat tolerance. There’s no shame in dialing it back!
Tip 5: Stir-fry in Batches: If you’re cooking for a crowd, consider working in batches. It prevents overcrowding in the pan, leading to better cooking results.
Absolutely! Simply replace any animal protein with tofu or tempeh and ensure that the sauces you are using are vegan friendly.
2. Can I freeze Chinese cabbage stir fry?
Yes, but keep in mind that the texture of the cabbage can change upon thawing. If you plan to freeze it, try to undercook the cabbage slightly for better results when reheating.
3. What is Shaoxing wine and can I substitute it?
Shaoxing wine is a type of Chinese rice wine used frequently in cooking. If you don’t have it, you can substitute it with dry sherry or even a bit of white wine, though the flavor might vary slightly
4. Is there a gluten-free option for this dish?
Yes! Use tamari sauce in place of soy sauce to maintain the gluten-free status of the dish. Ensure your cooking wine is gluten-free as well.
5. How do I achieve that “wok hei” flavor?
“Wok hei,” meaning “breath of the wok,” is the flavor that comes from high heat. To achieve this, use a well-seasoned carbon steel wok and ensure the oil is hot before adding ingredients. Stir-fry quickly and in small batches
6. Can I add nuts to the stir fry?
Definitely! Cashews or peanuts can be added for an extra crunch. Just toss them in at the end of cooking to keep them crunchy.
Conclusion
Creating a delicious Chinese cabbage stir fry is both enjoyable and accessible. With its simple preparation and bold flavors, it serves as a fantastic meal option any day of the week. Remember, the beauty of this dish lies in its flexibility.
Feel free to experiment with various proteins and vegetables to find your perfect combination. Healthful eating doesn’t have to be boring, and this stir fry is proof of that. So, fire up your wok and get cooking! Your taste buds will thank you.
Before we dive into the art of making vegetable dumplings, let’s talk about what complements this delightful dish. If you ask me, nothing quite enhances a dumpling experience like a good dipping sauce. A light soy sauce with a hint of rice vinegar often does …
When I first encountered Thai basil chicken pad krapow, I was captivated by its vibrant flavors and enticing aroma. Every bite of this dish tells a story, one that’s rooted deeply in Thai culinary tradition. Often served over jasmine rice or with a fried egg, …
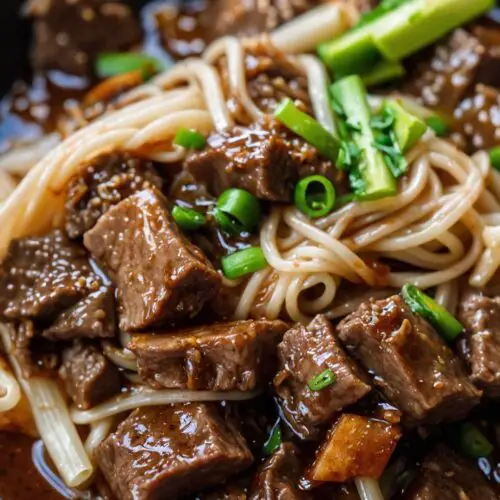
Ah, beef chow fun noodles – a dish that conjures up images of bustling street markets where the sizzle of woks competes with the laughter of patrons. While I think about diving into this delightful meal, I can’t help but think of accompaniments. Consider pairing this dish with a vibrant cucumber salad dressed in rice vinegar, or some crispy spring rolls for an appetizer that balances flavors perfectly.
Now, let’s not forget the importance of a drink. An ice-cold jasmine tea beautifully rounds out this meal. Its lightness complements the richness of the beef. Or, if you’re feeling adventurous, a nice IPA could work as well, offering a hoppy counterbalance to the savory noodles.
Let me take you on a journey of taste and texture. This dish is more than just a meal; it’s an experience. Imagine the wide, flat rice noodles soaking up the flavors of savory beef and stir-fried veggies. The moment you take a bite, your taste buds explode as the high heat of the wok gives each ingredient its own character.
In our fast-paced society, there’s a craving for comfort food that also delivers that much-needed nutrition. Beef chow fun meets this need head-on. The combination of chewy noodles, tender beef, and fresh veggies makes for a wholesome feel-good dish.
What Are Beef Chow Fun Noodles?
Beef chow fun, also known as “beef chow foon,” is a classic Cantonese dish characterized by its wide rice noodles that are stir-fried with beef, bean sprouts, and scallions. The dish is often seasoned with soy sauce and other savory ingredients that pack a punch. Originating from southern China, particularly Guangdong province, it has made its way across the globe, gracing tables from food stalls in Hong Kong to elegant restaurants in North America.
What makes this dish so appealing? It’s all in the preparation. The noodles are typically stir-fried in a hot wok, creating a wonderful smokiness – a technique called “wok hei,” or “breath of the wok.” The beef becomes tender, and the vegetables remain crisp, creating a balanced medley that is as pleasing to the eye as it is to the palate.
You will also like the following Lunch and Dinner recipes!
There’s something undeniably satisfying about a plate of beef chow fun noodles. Here’s why it’s worth your time and taste buds.
1. Versatility: This dish can adapt. You can make it spicy or keep it mild. Toss in any of your favorite veggies or swap out proteins while still maintaining that authentic taste.
2. Flavor Profile: The umami flavor from soy sauce and oyster sauce creates a depth that is hard to resist. When coupled with the freshness of ginger and scallions, the flavors balance beautifully.
3. Texture Combo: Between the soft noodles, the crispness of the bean sprouts, and the tender beef, this dish has it all. Each mouthful provides a different sensation, keeping you engaged with every bite.
4. Quick Preparation: Ideal for busy weekdays! In less than 30 minutes, you can whip up a dish that rivals any takeout.
5. Family-Friendly: Pickiest eaters will enjoy the chewy noodles mixed with flavorful beef, making it an excellent choice for family dinners.
The Ingredients You Will Need To Make Beef Chow Fun Noodles
Ready to dive in? Gathering the right ingredients is crucial for creating that spectacular beef chow fun. Here’s what you need:
Beef Marinade
1 tablespoon light soy sauce
½ teaspoon white pepper powder
1 tablespoon cornstarch (for coating)
¼ teaspoon baking soda (for tenderizing)
12 oz flank steak, sliced into ¼-inch thin strips
1 tablespoon neutral cooking oil (avocado, canola, or vegetable oil)
1 teaspoon dark soy sauce
Stir-Fry Sauce
½ tablespoon granulated sugar
2 tablespoons light soy sauce, plus an extra tablespoon reserved for the noodles
½ teaspoon freshly grated ginger
1 tablespoon Shaoxing wine (Chinese cooking wine)
1 tablespoon oyster sauce
½ tablespoon dark soy sauce, plus 2 teaspoons set aside for noodles
1 teaspoon rice vinegar
1 teaspoon toasted sesame oil
Noodles & Vegetables
4 scallions, cut into 2-inch segments
2 garlic cloves, minced finely
16 oz rice noodles (fresh or dried; if dried, use 12 oz and soak until pliable)
½ yellow onion, thinly sliced
1 cup fresh bean sprouts
4 tablespoons neutral oil (avocado, canola, or vegetable), divided for cooking steps
Directions
Now that we have our ingredients sorted out, let’s cook up a storm! Here’s a step-by-step guide to making the dish that is sure to impress your friends and family.
Step 1: Marinate the Beef
Start by preparing the flank steak. Combine 1 tablespoon of light soy sauce, ½ teaspoon of white pepper powder, 1 tablespoon of cornstarch, and ¼ teaspoon of baking soda to create a marinade.
Add the sliced beef to the mixture and toss until well-coated. This helps tenderize the meat. Let it sit for around 15 minutes while you prep the other ingredients.
Step 2: Prepare the Noodles
If you are using dried rice noodles, soak them in warm water for about 30 minutes, or until pliable. Drain and set aside. If you have fresh noodles, you can skip this step and just separate them.
Step 3: Make the Stir-Fry Sauce
In a separate bowl, mix your stir-fry sauce ingredients. Combine ½ tablespoon of granulated sugar, 2 tablespoons of light soy sauce, ½ teaspoon of freshly grated ginger, 1 tablespoon of Shaoxing wine, 1 tablespoon of oyster sauce, and 1 teaspoon of rice vinegar. To finish it off, stir in 1 teaspoon of toasted sesame oil. Taste it; if you like more sweetness or saltiness, adjust to your preference.
Step 4: Heat the Wok
Heat your wok or a large skillet over high heat. Once hot, add a tablespoon of cooking oil. Make sure the oil is shimmering before moving on to the next steps to prevent sticking.
Step 5: Stir-Fry the Beef
Add your marinated beef to the hot wok. Stir-fry for about 2 to 3 minutes until the beef is browned and just cooked through. Remove the beef from the wok and set it aside.
Step 6: Stir-Fry the Vegetables
In the same wok, add more oil if necessary. Toss in the minced garlic, sliced onion, and scallions. Stir-fry for about a minute until fragrant. Next, add in the bean sprouts and stir for another minute.
Step 7: Combine Everything
Add the beef back into the wok along with the soaked noodles. Pour in the stir-fry sauce and the additional tablespoon of light soy sauce set aside earlier. Toss everything together gently to coat the noodles and mix the flavors thoroughly. Cook for another 2 to 3 minutes, allowing the noodles to heat through.
Step 8: Serve
Once everything is well mixed and heated, remove from heat. Your beef chow fun noodles are ready. Serve immediately and enjoy the fresh, savory flavors!
Notes
Here are a few tips to elevate your beef chow fun noodles:
Choose the Right Beef: Flank steak is ideal for stir-frying due to its tenderness when sliced thinly. You can also use sirloin or ribeye, but make sure to slice against the grain.
Don’t Overcrowd the Wok: If making a larger batch, consider cooking in batches. Overcrowding prevents proper searing and can result in a soggy dish.
High Heat is Key: Ensure your wok is hot enough to develop that flavor infusion. A hot wok means better texture and taste!
Add Seasonal Vegetables: Feel free to include bell peppers, broccoli, or snap peas! Using seasonal veggies provides freshness and variation to the dish.
Prepare Ahead: Marinate the beef and prepare the sauce in advance. This way, dinner is a breeze to throw together on a busy evening.
Storage Tips
Leftovers? They’re just as good the next day! Store any leftovers in an airtight container in the refrigerator for up to 3 days. If you plan to store them longer, opt for freezing. Beef chow fun noodles can be frozen for about 1 to 2 months. However, remember that noodles can lose their texture when thawed.
To reheat, just place in a pan on medium heat with a splash of water or broth to avoid dryness.
Nutrition Information
A typical serving of beef chow fun noodles is hearty and balanced. While individual nutrition may vary based on ingredient choices, a standard serving contains:
Serving Suggestions
When serving beef chow fun, here are some creative suggestions to truly turn it into a feast:
1. Top with Fresh Cilantro: Sprinkle with fresh cilantro before serving for a burst of flavor and color.
2. Add Chili Oil: For those who enjoy heat, a drizzle of chili oil adds a nice spice that elevates the dish.
3. Serve with Lime: A wedge of lime allows guests to brighten up the dish, adding acidity that contrasts nicely with the savory flavors.
4. Pair with Chilled Sake: A glass of chilled sake can complement the profile of the dish, making your dining experience feel authentically Asian.
5. Offer a Side of Broccoli: Create a balanced meal by serving broccoli spears on the side, adding a nutritious touch.
What Other Substitutes Can I Use in Beef Chow Fun Noodles?
If you’re looking to switch things up, here are several substitutes that can either replace or complement the beef in this dish:
1. Chicken Breast: Use sliced chicken for a lighter protein option. Just marinate and cook the same way.
2. Tofu: For a vegetarian version, replace beef with firm tofu. Press and marinate for same infused flavors, then stir-fry until golden.
3. Shrimp: Substitute beef with shrimp for a seafood twist. Cook them quickly till they turn pink, ensuring they don’t become tough.
4. Pork: Thinly sliced pork tenderloin or shoulder can create a different yet delightful flavor profile, ideal for pork lovers.
5. Vegetables Only: Going completely plant-based? Use a mix of your favorite vegetables, like bell peppers, zucchini, and snap peas, to create a hearty yet meat-free meal.
Beef Chow Fun Noodles Recipe
Ah, beef chow fun noodles – a dish that conjures up images of bustling street markets where the sizzle of woks competes with the laughter of patrons.
1tablespoonneutral cooking oilavocado, canola, or vegetable oil
1teaspoondark soy sauce
Stir-Fry Sauce
½tablespoongranulated sugar
2tablespoonslight soy sauceplus an extra tablespoon reserved for the noodles
½teaspoonfreshly grated ginger
1tablespoonShaoxing wineChinese cooking wine
1tablespoonoyster sauce
½tablespoondark soy sauceplus 2 teaspoons set aside for noodles
1teaspoonrice vinegar
1teaspoontoasted sesame oil
Noodles & Vegetables
4scallionscut into 2-inch segments
2garlic clovesminced finely
16ozrice noodlesfresh or dried; if dried, use 12 oz and soak until pliable
½yellow onionthinly sliced
1cupfresh bean sprouts
4tablespoonsneutral oilavocado, canola, or vegetable, divided for cooking steps
Instructions
Step 1: Marinate the Beef
Start by preparing the flank steak. Combine 1 tablespoon of light soy sauce, ½ teaspoon of white pepper powder, 1 tablespoon of cornstarch, and ¼ teaspoon of baking soda to create a marinade.
Add the sliced beef to the mixture and toss until well-coated. This helps tenderize the meat. Let it sit for around 15 minutes while you prep the other ingredients.
Step 2: Prepare the Noodles
If you are using dried rice noodles, soak them in warm water for about 30 minutes, or until pliable. Drain and set aside. If you have fresh noodles, you can skip this step and just separate them.
Step 3: Make the Stir-Fry Sauce
In a separate bowl, mix your stir-fry sauce ingredients. Combine ½ tablespoon of granulated sugar, 2 tablespoons of light soy sauce, ½ teaspoon of freshly grated ginger, 1 tablespoon of Shaoxing wine, 1 tablespoon of oyster sauce, and 1 teaspoon of rice vinegar. To finish it off, stir in 1 teaspoon of toasted sesame oil. Taste it; if you like more sweetness or saltiness, adjust to your preference.
Step 4: Heat the Wok
Heat your wok or a large skillet over high heat. Once hot, add a tablespoon of cooking oil. Make sure the oil is shimmering before moving on to the next steps to prevent sticking.
Step 5: Stir-Fry the Beef
Add your marinated beef to the hot wok. Stir-fry for about 2 to 3 minutes until the beef is browned and just cooked through. Remove the beef from the wok and set it aside.
Step 6: Stir-Fry the Vegetables
In the same wok, add more oil if necessary. Toss in the minced garlic, sliced onion, and scallions. Stir-fry for about a minute until fragrant. Next, add in the bean sprouts and stir for another minute.
Step 7: Combine Everything
Add the beef back into the wok along with the soaked noodles. Pour in the stir-fry sauce and the additional tablespoon of light soy sauce set aside earlier. Toss everything together gently to coat the noodles and mix the flavors thoroughly. Cook for another 2 to 3 minutes, allowing the noodles to heat through.
Step 8: Serve
Once everything is well mixed and heated, remove from heat. Your beef chow fun noodles are ready. Serve immediately and enjoy the fresh, savory flavors!
Notes
Choose the Right Beef: Flank steak is ideal for stir-frying due to its tenderness when sliced thinly. You can also use sirloin or ribeye, but make sure to slice against the grain.
Don’t Overcrowd the Wok: If making a larger batch, consider cooking in batches. Overcrowding prevents proper searing and can result in a soggy dish.
High Heat is Key: Ensure your wok is hot enough to develop that flavor infusion. A hot wok means better texture and taste!
Add Seasonal Vegetables: Feel free to include bell peppers, broccoli, or snap peas! Using seasonal veggies provides freshness and variation to the dish.
Prepare Ahead: Marinate the beef and prepare the sauce in advance. This way, dinner is a breeze to throw together on a busy evening.
Yes! Dried rice noodles work perfectly; just soak them until they’re pliable before cooking.
2. What does “wok hei” mean, and how can I achieve it?
“Wok hei” is the unique flavor resulting from high-heat cooking in a wok. To achieve it, ensure your wok is hot enough and don’t overcrowd it during cooking.
3. How can I make beef chow fun gluten-free?
Use gluten-free soy sauce alternatives and corn starch to coat the beef. Select rice noodles that are certified gluten-free.
4. What’s the best way to store leftovers?
Store in an airtight container in the refrigerator for 3 days, or freeze for up to 2 months.
5. Can I add more vegetables?
Absolutely! Feel free to add bell peppers, mushrooms, or whatever veggies you enjoy! Just remember to adjust cooking times as needed.
6. How spicy is this dish?
The base recipe is not particularly spicy but can be easily adjusted by adding chili oil or fresh chilies as toppings.
Conclusion
Beef chow fun noodles are a wonderful dish that’s not only satisfying but also easy to prepare. The combination of chewy noodles, tender beef, and fresh vegetables is enough to win anyone over. With the convenience of quick cooking and versatile ingredients, this dish stands out in any culinary repertoire.
Give it a try, perhaps for a family dinner or a casual gathering. Watch as your guests indulge in a delightful blend of flavors and textures, creating memories with every shared bite. Trust me, making this dish at home is simpler than navigating that takeout menu.
Enjoy your culinary adventure, and remember that the heart of any dish lies in the love and passion you put into it! Let’s savor every bite of these delicious beef chow fun noodles together.
There’s something about homemade Chinese egg noodles that makes my heart flutter. Beyond their delightful chewiness and versatility, these noodles can pair with a variety of dishes. From stir-fries to soupy creations, they harmonize beautifully with flavors ranging from sweet to savory and everything in …
Before diving into the delightful details of making nian gao, let’s take a moment to think about what pairs beautifully with this dish. Nian gao, with its chewy texture and subtle sweetness, goes well with savory dishes. Think about a stir-fried vegetable medley with garlic …
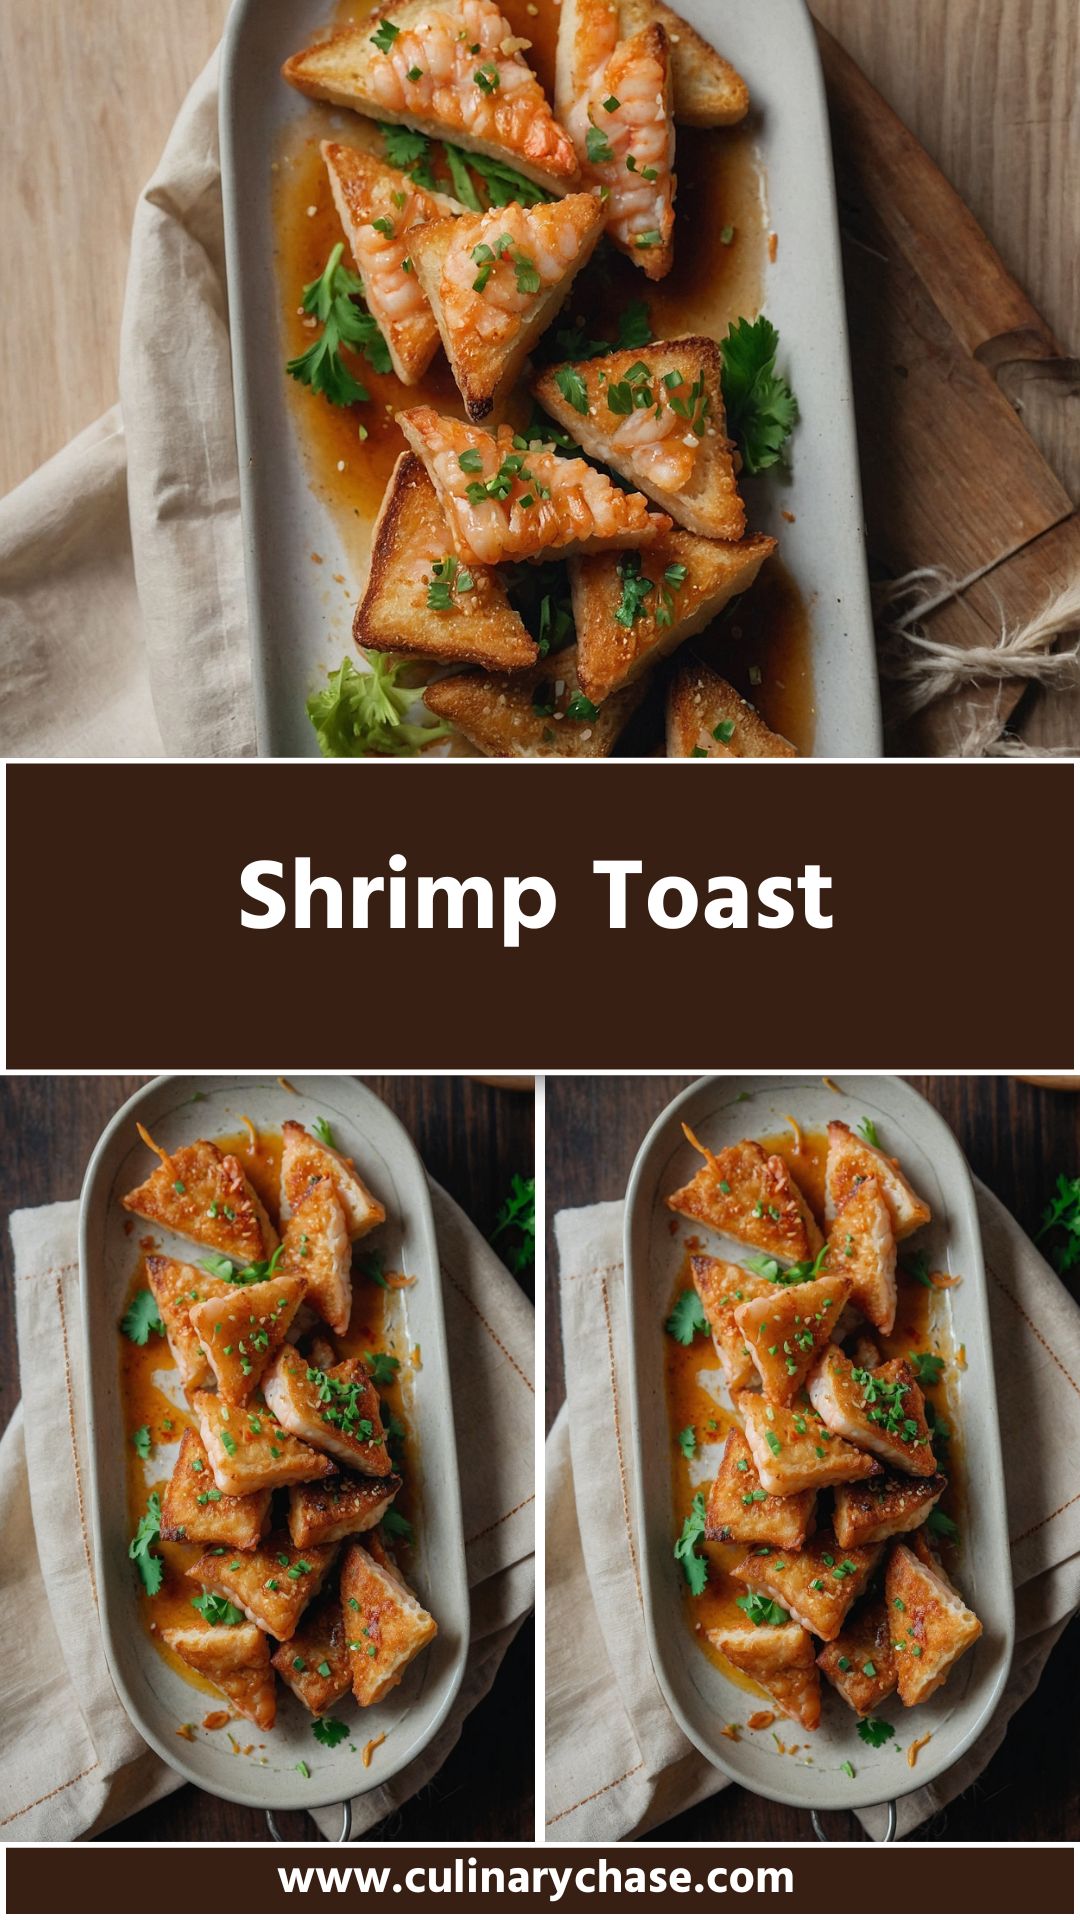
Imagine enjoying crispy, golden shrimp toast paired with a zesty dipping sauce. This dish is best complemented with a side of sweet chili sauce or a homemade soy-vinegar dip.
A fresh cucumber salad can provide a nice crunch for added texture. Pairing it with a light, sparkling beverage can elevate the experience even further. Think of cucumber-infused sparkling water or a crisp white wine, which balances the savory flavors beautifully.
Now that we’ve set the scene, let’s plunge into the delicious world of shrimp toast.
Shrimp toast is an unassuming dish that brings flavor and texture together in every bite. It’s a beloved appetizer in many Asian cuisines. The surprise? Its roots extend beyond mere street food.
The crunch of toasted bread layered with a savory shrimp paste delights the taste buds. Growing up, I remember that first bite of shrimp toast at a family gathering, the crunch echoing in my ears, as golden flavors danced on my palate. That initial experience propelled my love for this intricate yet simple dish.
Join me on this culinary adventure as we dive into shrimp toast—from the ingredients to the preparation, and even some expert tips.
What is Shrimp Toast?
Shrimp toast is exactly what it sounds like: a slice of bread topped with a savory shrimp blend, then deep-fried to perfection. The blend typically includes shrimp, eggs, and seasonings, resulting in a richly flavorful spread.
Originating from Chinese cuisine, shrimp toast has made its way onto menus worldwide. And its appeal lies in its simplicity and satisfying crunch.
You will also like the following Appetizers recipes!
Take a moment to imagine the tasting experience. You bite into the crispy crust, which contrasts beautifully with the soft, succulent shrimp mixture underneath. Hints of garlic, ginger, and soy sauce infuse every morsel with an authentic Asian flavor.
The sesame seeds add a delightful nuttiness, while the freshness of scallions and cilantro brightens the dish with each bite. It’s savory, slightly sweet, and utterly irresistible.
Why You’ll Love This
You’ll love shrimp toast because it’s more than just a dish. It’s a testament to creativity in the kitchen. This appetizer allows for flexibility, adapting to whatever you have on hand.
It’s perfect for gatherings, effortlessly impressing your friends and family with your culinary skills. Plus, it’s simple enough that novices can enjoy making it while still delivering those fabulous restaurant-quality flavors.
Ingredients
Let’s break down the components needed to create this dish:
½ pound shrimp (225g, peeled and deveined)
4 slices of white sandwich bread
½ teaspoon salt
2 teaspoons cornstarch
2 scallions (finely chopped)
½ teaspoon sugar
1 egg white
1 ounce pork fat (30g, optional)
2 tablespoons toasted sesame seeds
¼ cup chopped cilantro
1 teaspoon ginger (grated)
¼ teaspoon sesame oil
Vegetable oil for frying
1 teaspoon soy sauce
1 small garlic clove, finely minced
Step by Step Directions
Step 1: Prepare the Ingredients
Start by prepping your shrimp. Ensure they are peeled, deveined, and roughly chopped. Utilizing fresh shrimp can elevate the dish, but frozen works in a pinch—just thaw them thoroughly. Finely chop the scallions and cilantro, and set aside.
Step 2: Create the Shrimp Mixture
In a bowl, combine the chopped shrimp, scallions, cilantro, ginger, garlic, salt, sugar, egg white, cornstarch, sesame oil, and optional pork fat. Mix well. The fat lends a richness to the mixture, but it’s not necessary if you want a lighter option.
Step 3: Assemble the Toasts
Take each slice of bread and spread a generous layer of the shrimp mixture on top. You want a thick layer—aim for about ¼ inch. This will ensure that you taste the shrimp goodness in every bite. Sprinkle sesame seeds over the shrimp layer for an added crunch.
Step 4: Heat the Oil
In a deep frying pan or skillet, heat about ½ inch of vegetable oil over medium heat. To test if the oil is ready, drop in a small piece of bread—if it sizzles, you’re good to go.
Step 5: Fry the Toasts
Carefully place the shrimp toast, shrimp-side down, into the hot oil. Fry for about 2-3 minutes on each side until they turn golden brown. You may need to do this in batches to avoid overcrowding.
Step 6: Drain and Serve
Once cooked, transfer the shrimp toast to a plate lined with paper towels to drain excess oil. Serve hot with your choice of dipping sauce.
Tips on Making Shrimp Toast
Use Fresh Ingredients: Fresh shrimp and herbs make a world of difference.
Don’t Skip the Cornstarch: This keeps the shrimp mixture together and gives it a nice texture.
Oil Temperature Matters: Too cool and the toasts will absorb oil; too hot, and they’ll burn. Aim for a steady medium heat.
Customize Toppings: Experiment with toppings; finely chopped water chestnuts can add crunch, and a dash of chili paste adds heat.
Experiment with Breads: While white sandwich bread is traditional, croissant dough or whole-grain options can offer unique textures and flavors.
Nutrition Information
Here’s a basic breakdown per serving of shrimp toast (two slices):
Calories: 320
Protein: 18g
Fat: 15g
Carbohydrates: 30g
Fiber: 1g
Sugar: 1g
Sodium: 500mg
How Do You Store This Shrimp Toast?
Shrimp toast is best enjoyed fresh, but you can store leftovers in an airtight container in the fridge for up to two days. When ready to eat, reheat them in an oven to regain that crispness. Avoid microwaving as it makes the toast soggy.
What Other Substitutes Can You Use in Shrimp Toast?
Crab Meat: Substitute shrimp with lump crab meat for a seafood twist.
Tofu: Use firm tofu for a vegetarian option. Make sure to crumble it well.
Mushrooms: Finely chopped shiitake or button mushrooms can add depth and umami.
Chicken: Ground chicken can work, especially with some extra seasoning.
Fish Paste: For an unconventional twist, try a fish paste mixture for intense seafood flavor.
Each of these options allows you to mix and match according to your preferences or dietary needs.
Shrimp Toast
Imagine enjoying crispy, golden shrimp toast paired with a zesty dipping sauce. This dish is best complemented with a side of sweet chili sauce or a homemade soy-vinegar dip.
Start by prepping your shrimp. Ensure they are peeled, deveined, and roughly chopped. Utilizing fresh shrimp can elevate the dish, but frozen works in a pinch—just thaw them thoroughly. Finely chop the scallions and cilantro, and set aside.
Step 2: Create the Shrimp Mixture
In a bowl, combine the chopped shrimp, scallions, cilantro, ginger, garlic, salt, sugar, egg white, cornstarch, sesame oil, and optional pork fat. Mix well. The fat lends a richness to the mixture, but it’s not necessary if you want a lighter option.
Step 3: Assemble the Toasts
Take each slice of bread and spread a generous layer of the shrimp mixture on top. You want a thick layer—aim for about ¼ inch. This will ensure that you taste the shrimp goodness in every bite. Sprinkle sesame seeds over the shrimp layer for an added crunch.
Step 4: Heat the Oil
In a deep frying pan or skillet, heat about ½ inch of vegetable oil over medium heat. To test if the oil is ready, drop in a small piece of bread—if it sizzles, you’re good to go.
Step 5: Fry the Toasts
Carefully place the shrimp toast, shrimp-side down, into the hot oil. Fry for about 2-3 minutes on each side until they turn golden brown. You may need to do this in batches to avoid overcrowding.
Step 6: Drain and Serve
Once cooked, transfer the shrimp toast to a plate lined with paper towels to drain excess oil. Serve hot with your choice of dipping sauce.
Notes
Use Fresh Ingredients: Fresh shrimp and herbs make a world of difference.
Don’t Skip the Cornstarch: This keeps the shrimp mixture together and gives it a nice texture.
Oil Temperature Matters: Too cool and the toasts will absorb oil; too hot, and they’ll burn. Aim for a steady medium heat.
Customize Toppings: Experiment with toppings; finely chopped water chestnuts can add crunch, and a dash of chili paste adds heat.
Experiment with Breads: While white sandwich bread is traditional, croissant dough or whole-grain options can offer unique textures and flavors.
Yes, you can freeze un-fried shrimp toast. Prepare them, then lay flat on a baking sheet to freeze. Once solid, transfer to a zip-top bag. When ready to eat, fry directly from frozen—just adjust the cooking time.
2. Can I bake shrimp toast instead of frying?
Baking is a healthier option. Brush lightly with oil and bake at 400°F (200°C) for about 15-20 minutes or until golden brown, flipping halfway through.
3. Is shrimp toast gluten-free?
It is not gluten-free if made with traditional white bread. However, you can easily swap in gluten-free bread to make a gluten-free version.
4. What can I serve with shrimp toast?
Pair shrimp toast with fresh salad, steamed vegetables, or soup. They also go well with cocktails or light beers.
5. Can I make shrimp toast in advance?
While the mixture can be prepared ahead of time, it’s best to fry them just before serving to maintain the crispy texture.
6. How safe is it to eat shrimp toast?
As with all seafood dishes, ensure shrimp is sourced fresh and cooked thoroughly to avoid any foodborne illnesses.
Conclusion
Shrimp toast is more than just a delightful appetizer; it’s a bridge connecting us to shared culinary experiences and memorable gatherings. The balance of flavor, texture, and the sheer joy of cooking it makes it a favorite of mine. From dipping sauces to perfect pairings, the possibilities are endless with shrimp toast.
So, the next time you’re looking to impress guests or simply indulge in a unique snack, remember this beloved dish. Give shrimp toast a try, and you might find yourself making it a regular staple in your kitchen. Happy cooking!
Before I dive into the delicious world of twice-cooked pork, let’s discuss what pairs beautifully with this iconic dish. Imagine sitting down to enjoy twice-cooked pork with a fragrant bowl of steamed jasmine rice. The warmth of the rice complements the savory flavors of the …