When pondering what to pair with Authentic Mongolian Beef, consider a range of options. Fluffy white rice is the classic choice. It soaks up the rich sauce and balances the dish beautifully. If you’re feeling adventurous, try serving it with steamed jasmine rice. The floral …
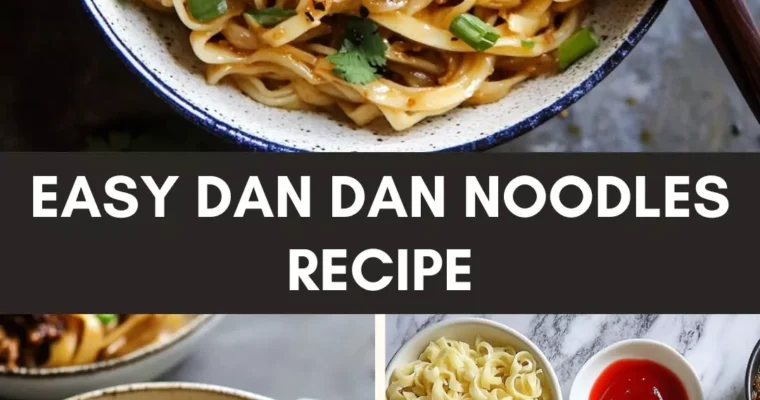
Before we dive into the mouth-watering world of Easy Dan Dan Noodles, let’s set the stage for a delightful meal. Picture a table filled with color and flavor. You could serve your Dan Dan noodles alongside fresh cucumber salad. The cool crunch of sliced cucumbers …
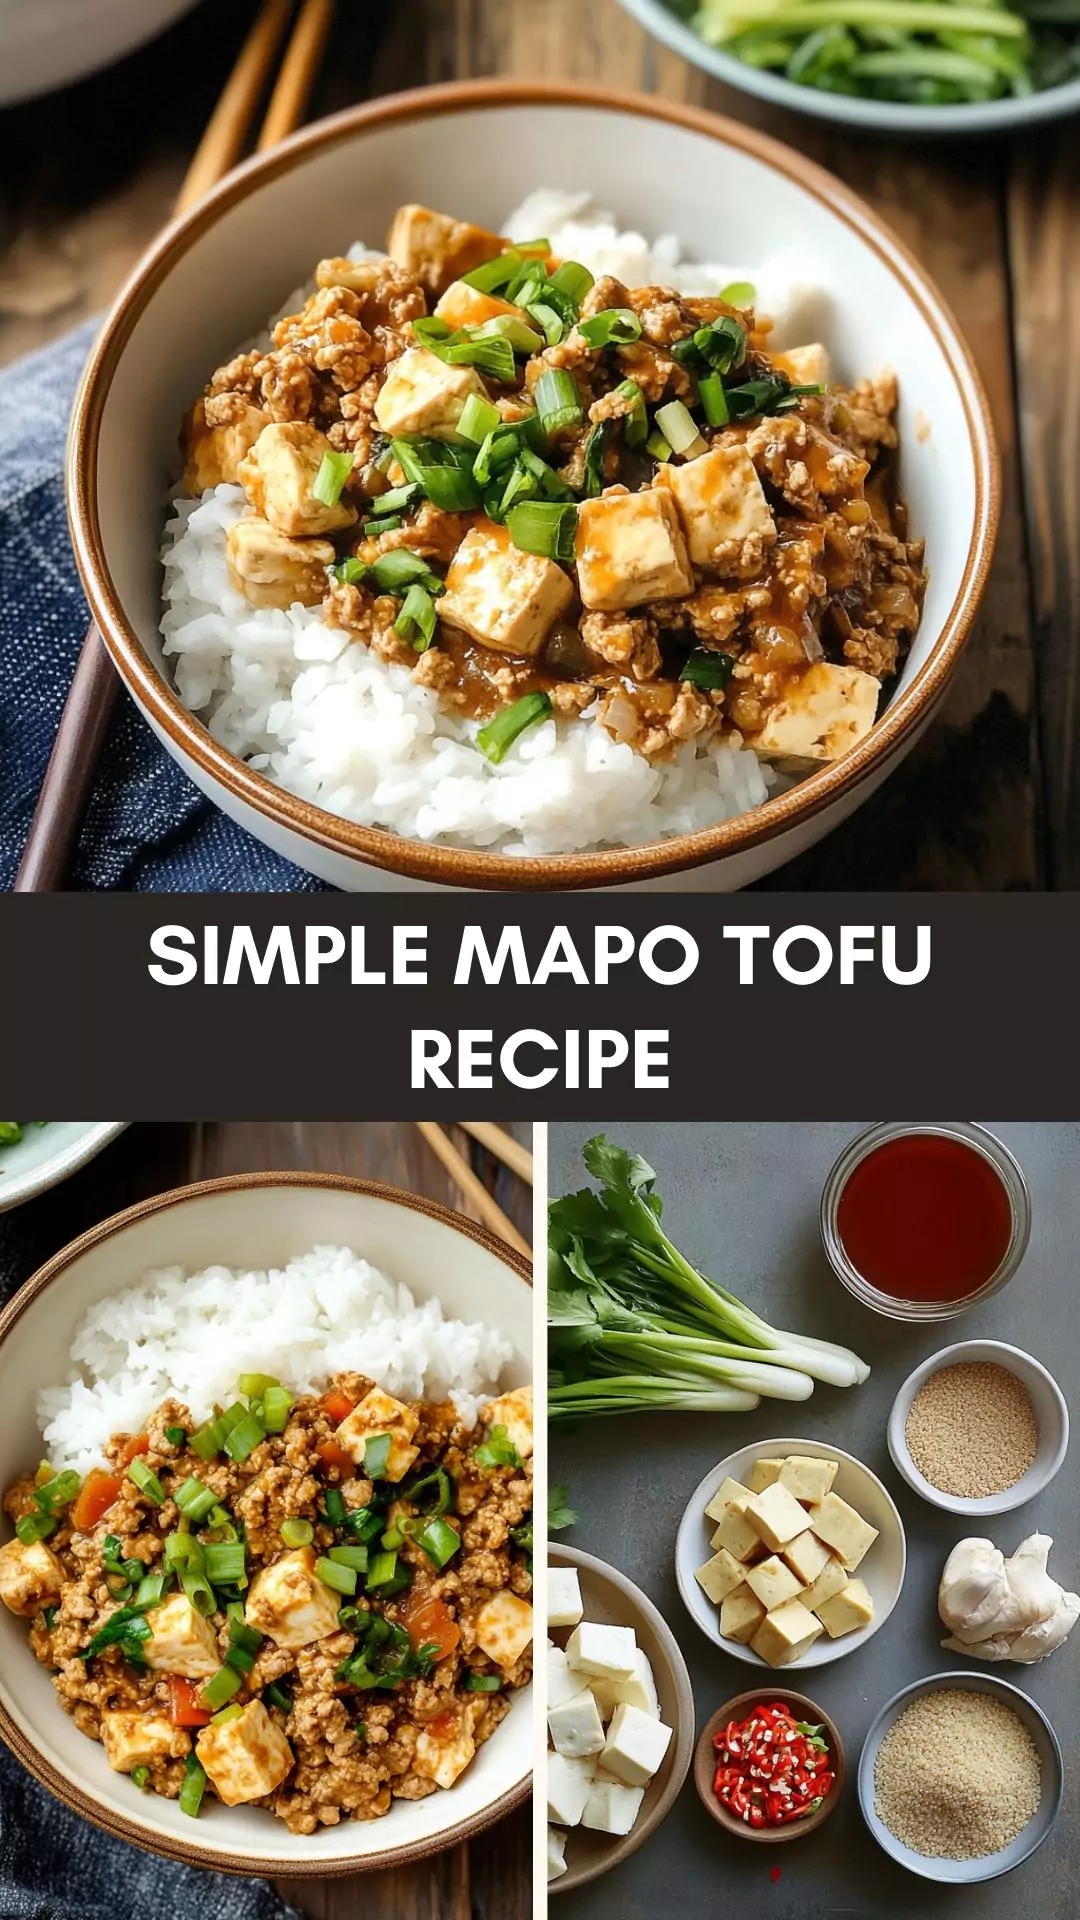
Before diving into the delightful world of cooking Mapo Tofu, let’s talk about what to pair it with. A great dish deserves great company! Mapo Tofu has a rich, spicy flavor that can complement several side dishes. Here are a few fantastic ideas: Steamed Jasmine Rice,Stir-Fried Bok Choy, Chinese Cucumber Salad or Spring Rolls.
Today, I’m excited to share a dish that has earned a spot among my all-time favorites: Simple Mapo Tofu. Growing up, I first encountered this dish at a local Chinese restaurant. It was captivating!
The tofu, paired with spicy bean sauce and ground meat, created a symphony of flavors that had me hooked.
Over the years, I’ve experimented with my own version, simplifying it while keeping the comforting essence intact. Cooking is personal, and my goal is to pass along what I’ve learned.
This dish is compelling for both its taste and adaptability. Whether you’re a dedicated chef or just starting out, I guarantee you’ll enjoy it.
At its core, Mapo Tofu stems from China’s Sichuan province. Traditionally, it comprises silken tofu, minced pork, and a spicy bean paste that packs a punch.
What sets it apart? The balance of flavors—spicy, salty, and savory. The name “Mapo” approximately translates to “old woman’s tofu,” signifying its humble origins.
Simple Mapo Tofu embraces this tradition but streamlines the process, making it accessible for the busy home cook. With a few quality ingredients, you’ll create a plate that not only warms the soul but ignites your taste buds.
Why This Recipe Works
Let’s break down what makes this recipe a winner. First off, it’s straightforward. You don’t need to be a culinary magician to whip this up. Secondly, the ingredients are easy to source. You can find everything at your local grocery store.
The flavors meld beautifully. The richness of the pork or alternative protein, the creaminess of the tofu, and the kick from the sauce create a balance that keeps you coming back for seconds. Additionally, it’s versatile. Adjust the spice level to your liking or substitute proteins based on what you have.
Simply put, this recipe reflects my journey in the kitchen—practical, flavorful, and always satisfying.
What You’ll Need to Make This Dish
Ingredients for Mapo Tofu:
14 oz soft/silken tofu: This gives the dish its creamy base. Make sure to drain it well for the best texture.
½ lb ground pork (or your choice of protein): For a vegan option, mushrooms work as a fantastic substitute.
2 cloves garlic: Minced for that aromatic touch.
1 tablespoon ginger: Also minced. Ginger adds a warming quality.
2 green onions/scallions: Chopped, for garnish and flavor.
1 tablespoon neutral oil: For cooking the meat.
Ingredients for the Sauce:
2½ tablespoons doubanjiang: A spicy chili bean paste that brings the heat.
1 tablespoon oyster sauce: For umami richness. Use a vegetarian stir-fry sauce if needed.
1 tablespoon miso paste: Enhances flavor depth.
½ tablespoon soy sauce: Saltiness that completes the balance.
2 tablespoons mirin: Adds a touch of sweetness.
1 teaspoon toasted sesame oil: For that nutty flavor.
1 teaspoon potato starch: This helps thicken the sauce.
4 tablespoons water: To achieve the desired consistency.
For Serving (Optional):
Japanese sansho pepper: Adds a unique peppery spice that can elevate your dish if you’re feeling adventurous.
How to Make Simple Mapo Tofu
Let’s get started on this mouthwatering adventure! You’ll find the steps simple yet effective.
Step 1: Prepare the Tofu
Start by draining the tofu. You want as much water out as possible. After that, cut it into bite-sized cubes. Set it aside to let it dry a bit more.
Step 2: Cook the Protein
In a large pan, add your oil over medium heat. Once hot, toss in the ground pork (or alternative). Sauté until it’s browned and crispy. The aim here is to get those delicious bits stuck to the pan.
Step 3: Add Aromatics
Once your protein is cooked, it’s time to introduce the flavor. Add the minced garlic and ginger to the pan. Let them cook for about 30 seconds, just long enough for that heavenly aroma to fill your kitchen.
Step 4: Whip Up the Sauce
Now, the fun begins! In a small bowl, mix the doubanjiang, oyster sauce, miso paste, soy sauce, mirin, potato starch, and water. Stir well until combined, and then pour it over the cooked meat and aromatics.
Step 5: Add the Tofu
Gently fold in the tofu cubes, taking care not to break them. Cook for a few minutes until everything is heated through.
Step 6: Final Touches
When the dish is nearly done, toss in the chopped green onions. Stir gently and taste. Adjust the seasoning if needed. If you like it spicier, sprinkle some extra doubanjiang.
Step 7: Serve Hot
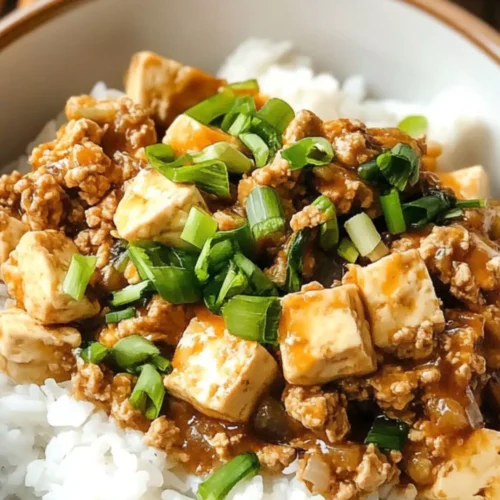
Serve your Simple Mapo Tofu over steamed rice. Garnish with a dash of sansho pepper if you’re feeling adventurous.
Tips for Making the Best Mapo Tofu
Choose the right tofu: Silken tofu yields a creamier texture. If you prefer firmer tofu, opt for medium tofu and cut it into larger cubes.
Don’t rush the cooking: Let the meat brown well for more flavor. Patience in cooking pays off!
Adjust the heat: If you’re cautious about spice, start with smaller amounts of doubanjiang and increase according to your comfort level.
Garnish generously: Fresh scallions not only add a pop of color but also enhance the flavors.
Serve immediately: Mapo Tofu is best enjoyed hot, maximizing its creaminess and richness.
How to Store Leftovers?
If you happen to have leftovers (which is rare in my house), store them in an airtight container. They can last in the fridge for up to four days.
When reheating, add a splash of water to keep the sauce from thickening too much.
How Would I Recommend Serving Simple Mapo Tofu?
Here are some delightful ways to serve Simple Mapo Tofu:
Over Steamed Rice: The classic choice! The rice absorbs the sauce, making every bite delightful.
In Lettuce Wraps: For a low-carb option, serve the Mapo Tofu in crisp lettuce leaves. A sprinkle of sesame seeds adds a nice touch.
With Noodles: Toss it with your favorite noodles for a hearty twist. The tofu and sauce coat the noodles for a tasty treat.
In a Bowl with Quinoa: For a nutritious twist, serve over quinoa. It pairs beautifully, offering an excellent source of protein.
What Alternatives Can You Use for the Ingredients if Not Available?
Sometimes, you might find yourself short on certain ingredients. Here are a few substitutes:
Ground Pork: Ground chicken or turkey can be used for a lighter version. If you’re vegan, opt for chopped mushrooms or a mix of sautéed vegetables for a similar texture.
Doubanjiang: If you can’t find it, Sriracha sauce mixed with miso can come close, though it won’t be as rich.
Oyster Sauce: If this isn’t available, a combination of soy sauce and a touch of sugar can replicate that umami flavor.
Mirin: In a pinch, white wine vinegar or even apple cider vinegar mixed with a little sugar can work as a substitute, although the taste will vary slightly.
Simple Mapo Tofu Recipe
Joe Williams
Today, I’m excited to share a dish that has earned a spot among my all-time favorites: Simple Mapo Tofu. Growing up, I first encountered this dish at a local Chinese restaurant. It was captivating!
14ozsoft/silken tofukinugoshi dofu; drained for 15–30 minutes
1tablespoonneutral oil
½lbground porkor your choice of protein; for vegan/vegetarian, use mushrooms or other veggies
For the Sauce:
2½tablespoonsdoubanjiangspicy chili bean paste; for less heat, use 1½ tablespoons non-spicy doubanjiang and 1 tablespoon spicy la doubanjiang; for gluten-free, use gluten-free doubanjiang
1tablespoonoyster saucesubstitute with Lee Kum Kee Vegetarian Stir-Fry Sauce for vegan/vegetarian or shellfish allergies
1tablespoonmiso paste
½tablespoonsoy sauce
2tablespoonsmirin
1teaspoontoasted sesame oil
1teaspoonpotato starchor cornstarch
4tablespoonswater
For Serving:
Japanese sansho pepperoptional, for a unique peppery spice
Instructions
Let’s get started on this mouthwatering adventure! You’ll find the steps simple yet effective.
Step 1: Prepare the Tofu
Start by draining the tofu. You want as much water out as possible. After that, cut it into bite-sized cubes. Set it aside to let it dry a bit more.
Step 2: Cook the Protein
In a large pan, add your oil over medium heat. Once hot, toss in the ground pork (or alternative). Sauté until it’s browned and crispy. The aim here is to get those delicious bits stuck to the pan.
Step 3: Add Aromatics
Once your protein is cooked, it’s time to introduce the flavor. Add the minced garlic and ginger to the pan. Let them cook for about 30 seconds, just long enough for that heavenly aroma to fill your kitchen.
Step 4: Whip Up the Sauce
Now, the fun begins! In a small bowl, mix the doubanjiang, oyster sauce, miso paste, soy sauce, mirin, potato starch, and water. Stir well until combined, and then pour it over the cooked meat and aromatics.
Step 5: Add the Tofu
Gently fold in the tofu cubes, taking care not to break them. Cook for a few minutes until everything is heated through.
Step 6: Final Touches
When the dish is nearly done, toss in the chopped green onions. Stir gently and taste. Adjust the seasoning if needed. If you like it spicier, sprinkle some extra doubanjiang.
Step 7: Serve Hot
Serve your Simple Mapo Tofu over steamed rice. Garnish with a dash of sansho pepper if you’re feeling adventurous.
Notes
Choose the right tofu: Silken tofu yields a creamier texture. If you prefer firmer tofu, opt for medium tofu and cut it into larger cubes.
Don’t rush the cooking: Let the meat brown well for more flavor. Patience in cooking pays off!
Adjust the heat: If you’re cautious about spice, start with smaller amounts of doubanjiang and increase according to your comfort level.
Garnish generously: Fresh scallions not only add a pop of color but also enhance the flavors.
Serve immediately: Mapo Tofu is best enjoyed hot, maximizing its creaminess and richness.
Absolutely! Substitute the ground pork with mushrooms or other vegetables, and use vegetarian oyster sauce or omit it altogether.
2. How spicy is Mapo Tofu?
The spice level can vary. By adjusting the amount of doubanjiang in your recipe, you can control how fiery it gets.
3. Can I freeze Mapo Tofu?
Yes, you can freeze it. However, the tofu may change texture upon thawing. I recommend eating it fresh for the best experience!
4. How can I adjust the flavor if I want it richer?
You can add additional oyster sauce or more miso paste for depth.
5. Is Mapo Tofu healthy?
Mapo Tofu can be a nutritious option, packed with protein and fiber. Using less oil and adding vegetables boosts its healthiness.
6. What if I don’t have a wok?
Not to worry! Any large skillet or frying pan works well. Just make sure it’s deep enough to hold the tofu and sauce.
Conclusion
Making Simple Mapo Tofu has been quite the journey for me. I love how it transforms from simple ingredients into a comfort food marvel. Whether you’re noshing on it for dinner or bringing it to a potluck, this dish never fails to impress.
It’s a wonderful experience to share your creation with family and friends, and I hope this guide has inspired you to try your hand at making it yourself.
Grab your ingredients, gather around the stove, and start cooking. Trust me, your taste buds will thank you! Remember, cooking should be fun. Don’t stress too much about the details. Enjoy the process, and happy cooking!
What pairs beautifully with a bowl of steaming Vietnamese pho chicken noodle soup? Imagine crunchy spring rolls or delicate shrimp chips at your side. Perhaps a refreshing cucumber salad could add a crisp touch. The effervescent sweetness of iced tea or the slight bitterness of …
As I sit down with a steaming bowl of chicken egg drop soup, the blending of flavors brings me back to my childhood. I remember rainy days, warm kitchens, and the irresistible aroma wafting through the air. This dish has a unique ability to warm …
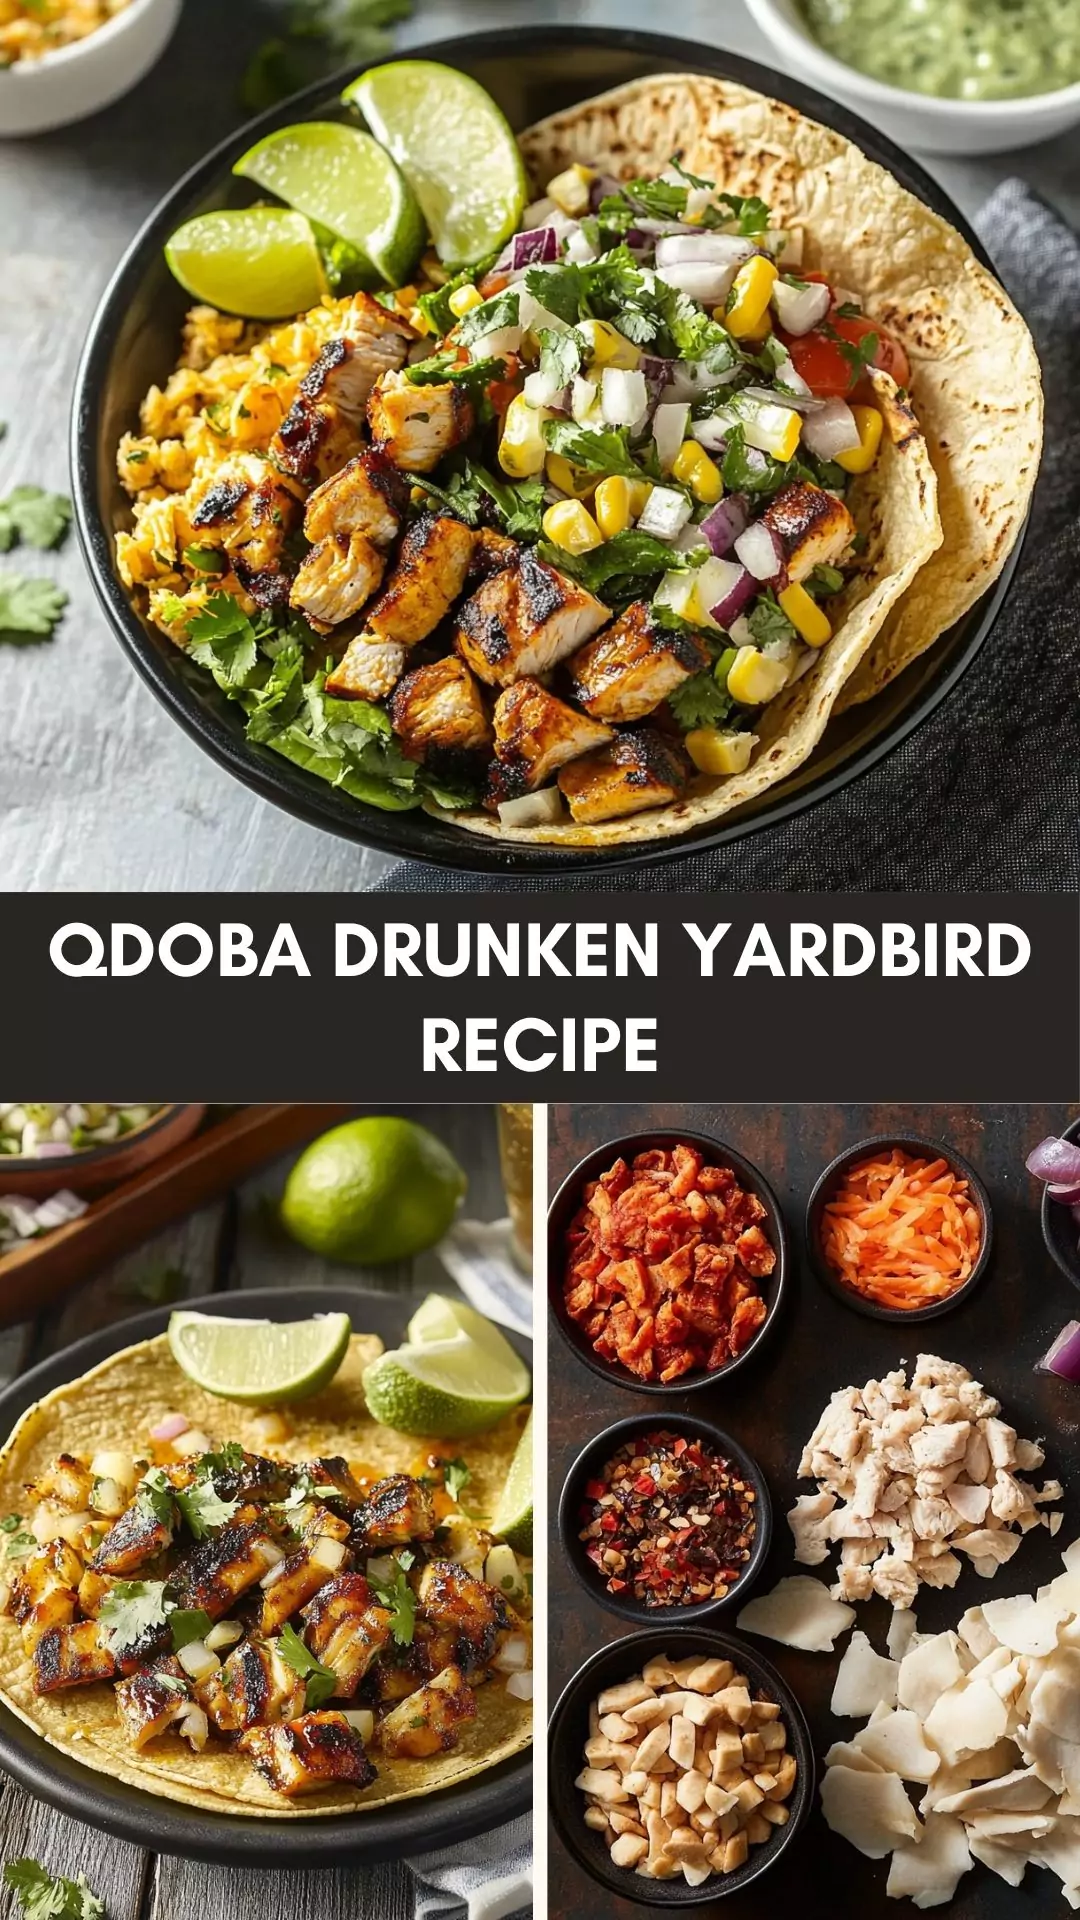
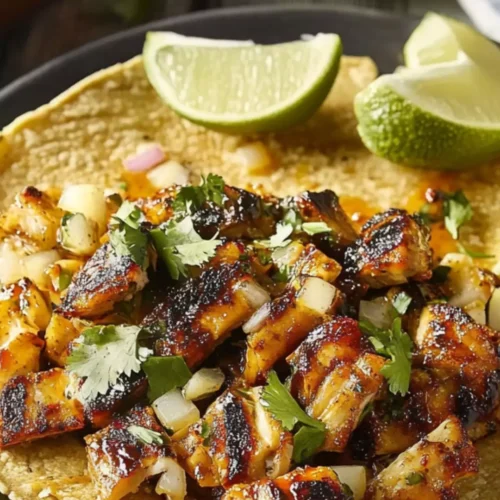
When enjoying Qdoba’s Drunken Yardbird, the right pairings can elevate the experience. Consider serving it with Mexican Street Corn, where the sweet, creamy, and spicy flavors contrast beautifully with the bold chicken.
A Black Bean Salad, packed with black beans, corn, and diced veggies, offers a refreshing balance to the dish’s richness. For a citrusy complement, Cilantro Lime Rice adds a bright, zesty touch that enhances every bite.
Kick things off with Tortilla Chips and Salsa, a crunchy starter that awakens the palate in anticipation of the meal. To round it all out, a classic Margarita, with its blend of tequila and lime, adds a festive note, making every bite of the Yardbird even more enjoyable.
Get ready for a fiesta of flavors, excitement, and a bit of a kick! I want to share my absolute favorite dish from Qdoba—Drunken Yardbird. It’s not just chicken; it’s an experience packed with spices, zest, and all the Mexican vibes.
In this post, we’ll delve into what makes this dish special, how to recreate it at home, and tips for making it shine at your next gathering. Whether you’re planning a summertime barbecue or just want a quick, delicious dinner, the Drunken Yardbird has got you covered.
Drunken Yardbird is Qdoba’s signature chicken dish, marinated in lime and tequila, then grilled to perfection. It’s a celebration of vibrant flavors, balancing smokiness, acidity, and a hint of spice.
Qdoba’s take on this dish ensures that each component—from the juicy chicken to the playful toppings like avocado and Cotija cheese—harmonizes beautifully. You might be wondering about the origins of “drunken” in its name.
The tequila marinade gives the chicken an added depth while tenderizing the meat. When you bite into it, you’ll find layers of flavor with every mouthful.
What is the Flavor Profile of This Dish?
The flavor profile of Drunken Yardbird is complex yet approachable. Here’s what you can expect:
Citrusy: The primary flavor comes from fresh lime juice and zest. It brightens each bite, cutting through the richness of the chicken.
Smoky: Tequila and the grilling process impart a smoky essence that transforms the dish.
Spicy: The jalapeño and the smoky chili blend add just the right amount of heat without overwhelming your taste buds.
Umami: Ingredients like garlic and fire-roasted salsa bring a savory component that is hard to resist.
Creamy: The avocado and Cotija cheese provide a delightful creaminess that complements the other flavors beautifully.
Why You’ll Love This?
So, why will this dish capture your heart? Let me count a few reasons:
Easy to Make: With simple ingredients and straightforward steps, you won’t be stuck in the kitchen.
Versatile: You can customize it to fit your preferences—add your favorite veggies, increase the spice level, or play with the toppings.
Healthful Option: Packed with protein and healthy fats, it’s a satisfying meal that fits well into a balanced diet.
Crowd Pleaser: Ideal for gatherings, this dish is sure to impress your family and friends.
Memorable Flavors: The unique combination of flavors creates an unforgettable dining experience, making it a dish you’ll crave again.
Ingredients
Here’s what you need to create the Drunken Yardbird at home:
2 boneless, skinless chicken breasts
1 teaspoon extra virgin olive oil
3 fresh limes, juiced and zested (divided)
¼ cup smooth silver tequila (optional)
1 teaspoon smoky chili blend
1 teaspoon garlic salt or garlic powder
½ teaspoon ground cumin
¼ teaspoon freshly ground black pepper
1 small jalapeño, finely diced
½ small red onion, finely minced
¼ cup freshly chopped cilantro
½ cup fire-roasted salsa
1 ripe avocado, sliced
8 corn tortillas, lightly charred
2 tablespoons crumbled Cotija cheese
Salt and pepper to taste
Hot sauce, to taste
Step-by-Step Instructions
Step 1: Prepare the Marinade
In a bowl, whisk together the lime juice, lime zest, tequila, smoky chili blend, garlic salt, cumin, and black pepper. This zesty mixture will transform your chicken into a flavor-packed delight.
Step 2: Marinate the Chicken
Place the chicken breasts in a zip-lock bag or shallow dish and pour the marinade over the chicken. Seal the bag or cover the dish with plastic wrap. Let it marinate for at least 30 minutes, but if you have time, an hour or two will allow the flavors to seep in even more.
Step 3: Get the Grill Ready
Preheat your grill to medium-high heat. If you don’t have one, a grill pan on the stove will work just fine. Lightly oil the grill grates to prevent sticking.
Step 4: Grill the Chicken
Once the grill is hot, place the marinated chicken on it. Cook for about 6 to 7 minutes on each side. The chicken should reach an internal temperature of 165°F.
Step 5: Prepare the Toppings
While the chicken is grilling, chop the jalapeño, mince the red onion, and prepare the cilantro. Cut the avocado into slices.
Step 6: Warm the Tortillas
In a separate pan, lightly char the corn tortillas for about 30 seconds on each side. This adds a beautiful texture and warmth to the tortillas.
Step 7: Assemble Your Dish
Once the chicken is grilled, let it rest for a few minutes before slicing it into strips. Lay the warm tortillas on your plates, add the chicken, and then top with salsa, jalapeño, red onion, cilantro, sliced avocado, and Cotija cheese. Don’t forget to sprinkle with salt and pepper to taste.
Step 8: Serve and Enjoy!
Serve immediately, and don’t hesitate to drizzle on some hot sauce for that extra kick.
Tips & Tricks
Here are some useful tips for preparing your Drunken Yardbird:
Marinate Longer: For better flavor, let the chicken marinate longer. Overnight is ideal.
Grill Marks Matter: Don’t move the chicken too often on the grill; let it develop those appealing grill marks.
Use Fresh Ingredients: Fresh limes and herbs make a significant difference in flavor.
Make It a Bowl: Switch it up by serving everything in a bowl over rice or salad greens for a lighter option.
Save Leftovers: Store any leftover chicken in an airtight container in the fridge for up to 3 days. It’s great for salads or wraps the next day.
How Can You Store This Qdoba Drunken Yardbird?
To properly store leftovers, allow the dish to cool completely. Transfer the chicken and toppings into an airtight container. It can be stored in the refrigerator for up to three days.
When you’re ready to eat, just reheat the chicken in the microwave or on a skillet until warm. Avoid reheating the avocado and salad toppings as they can lose their texture.
Ingredient Alternatives
If you find yourself missing some ingredients, don’t worry! Here are some substitute ideas:
Tequila: If you’d rather skip the alcohol but still want a hint of flavor, use apple cider vinegar or extra lime juice instead.
Cotija Cheese: If Cotija cheese is hard to find, consider using feta cheese for a similar texture and a salty taste.
Jalapeños: If you can’t handle the heat, try bell peppers for crunch without the spice. For more flavor, you could use roasted red peppers.
Qdoba Drunken Yardbird Recipe
Joe Williams
Get ready for a fiesta of flavors, excitement, and a bit of a kick! I want to share my absolute favorite dish from Qdoba—Drunken Yardbird.
In a bowl, whisk together the lime juice, lime zest, tequila, smoky chili blend, garlic salt, cumin, and black pepper. This zesty mixture will transform your chicken into a flavor-packed delight.
Step 2: Marinate the Chicken
Place the chicken breasts in a zip-lock bag or shallow dish and pour the marinade over the chicken. Seal the bag or cover the dish with plastic wrap. Let it marinate for at least 30 minutes, but if you have time, an hour or two will allow the flavors to seep in even more.
Step 3: Get the Grill Ready
Preheat your grill to medium-high heat. If you don’t have one, a grill pan on the stove will work just fine. Lightly oil the grill grates to prevent sticking.
Step 4: Grill the Chicken
Once the grill is hot, place the marinated chicken on it. Cook for about 6 to 7 minutes on each side. The chicken should reach an internal temperature of 165°F.
Step 5: Prepare the Toppings
While the chicken is grilling, chop the jalapeño, mince the red onion, and prepare the cilantro. Cut the avocado into slices.
Step 6: Warm the Tortillas
In a separate pan, lightly char the corn tortillas for about 30 seconds on each side. This adds a beautiful texture and warmth to the tortillas.
Step 7: Assemble Your Dish
Once the chicken is grilled, let it rest for a few minutes before slicing it into strips. Lay the warm tortillas on your plates, add the chicken, and then top with salsa, jalapeño, red onion, cilantro, sliced avocado, and Cotija cheese. Don’t forget to sprinkle with salt and pepper to taste.
Step 8: Serve and Enjoy!
Serve immediately, and don’t hesitate to drizzle on some hot sauce for that extra kick.
Notes
Here are some useful tips for preparing your Drunken Yardbird:
Marinate Longer: For better flavor, let the chicken marinate longer. Overnight is ideal.
Grill Marks Matter: Don’t move the chicken too often on the grill; let it develop those appealing grill marks.
Use Fresh Ingredients: Fresh limes and herbs make a significant difference in flavor.
Make It a Bowl: Switch it up by serving everything in a bowl over rice or salad greens for a lighter option.
Save Leftovers: Store any leftover chicken in an airtight container in the fridge for up to 3 days. It’s great for salads or wraps the next day.
Absolutely! Chicken thighs will offer a richer flavor and retain moisture well when grilled. Just ensure they reach a safe temperature.
2. Can I prepare Drunken Yardbird ahead of time?
Yes, you can prepare the marinade and marinate the chicken ahead of time. It’s best to wait until just before serving to grill and assemble the dish for the best texture.
3. What sides pair well with Qdoba Drunken Yardbird?
In addition to the suggested pairings, consider serving it with Spanish rice, guacamole, or a refreshing cucumber salad for a cool contrast.
4. How spicy is the Drunken Yardbird?
The spice level is customizable. If you prefer less heat, you can reduce the amount of jalapeño or omit it altogether. The smoky chili blend adds flavor without being overly spicy.
5. Is this dish gluten-free?
Yes! The ingredients themselves are gluten-free. Just be sure to use gluten-free tortillas if you need to adhere to a gluten-free diet.
Conclusion
There you have it. Qdoba’s Drunken Yardbird is a flavor-packed chicken dish that’s perfect for any occasion. With its simple preparation and delicious toppings, it’s hard to pass up. I hope this detailed guide inspires you to recreate it at home.
Share it with friends, enjoy it with family, or savor it alone on a casual Tuesday night—it’s versatile enough for any setting.
So fire up that grill and fill your kitchen with aromas that transport your taste buds straight to Mexico! Trust me; once you try this dish, you’ll be calling it your favorite too.
I first encountered Qdoba Salsa Roja during a casual dinner with friends. It was served alongside a platter of burritos, tacos, and nachos. As soon as I tasted that bold flavor, a light bulb went off in my head. Why hadn’t I tried to recreate …
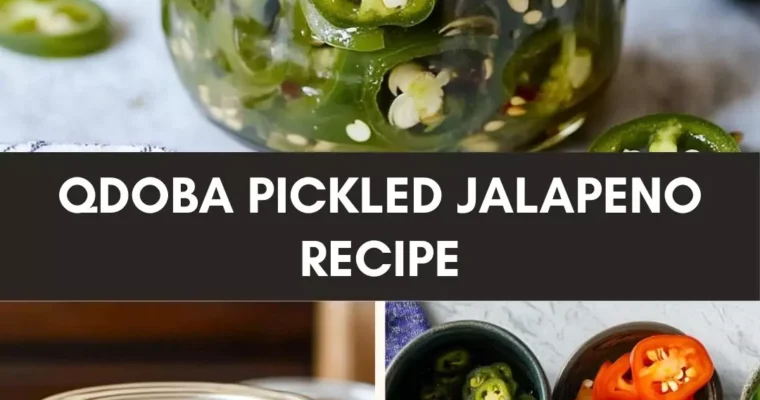
QDOBA pickled jalapeños are the perfect addition to a variety of dishes, bringing a spicy, tangy bite that enhances any meal. They’re an excellent topping for tacos, whether you’re using beef, chicken, or plant-based fillings, adding a zesty citrusy zing. For nachos, layer them with …
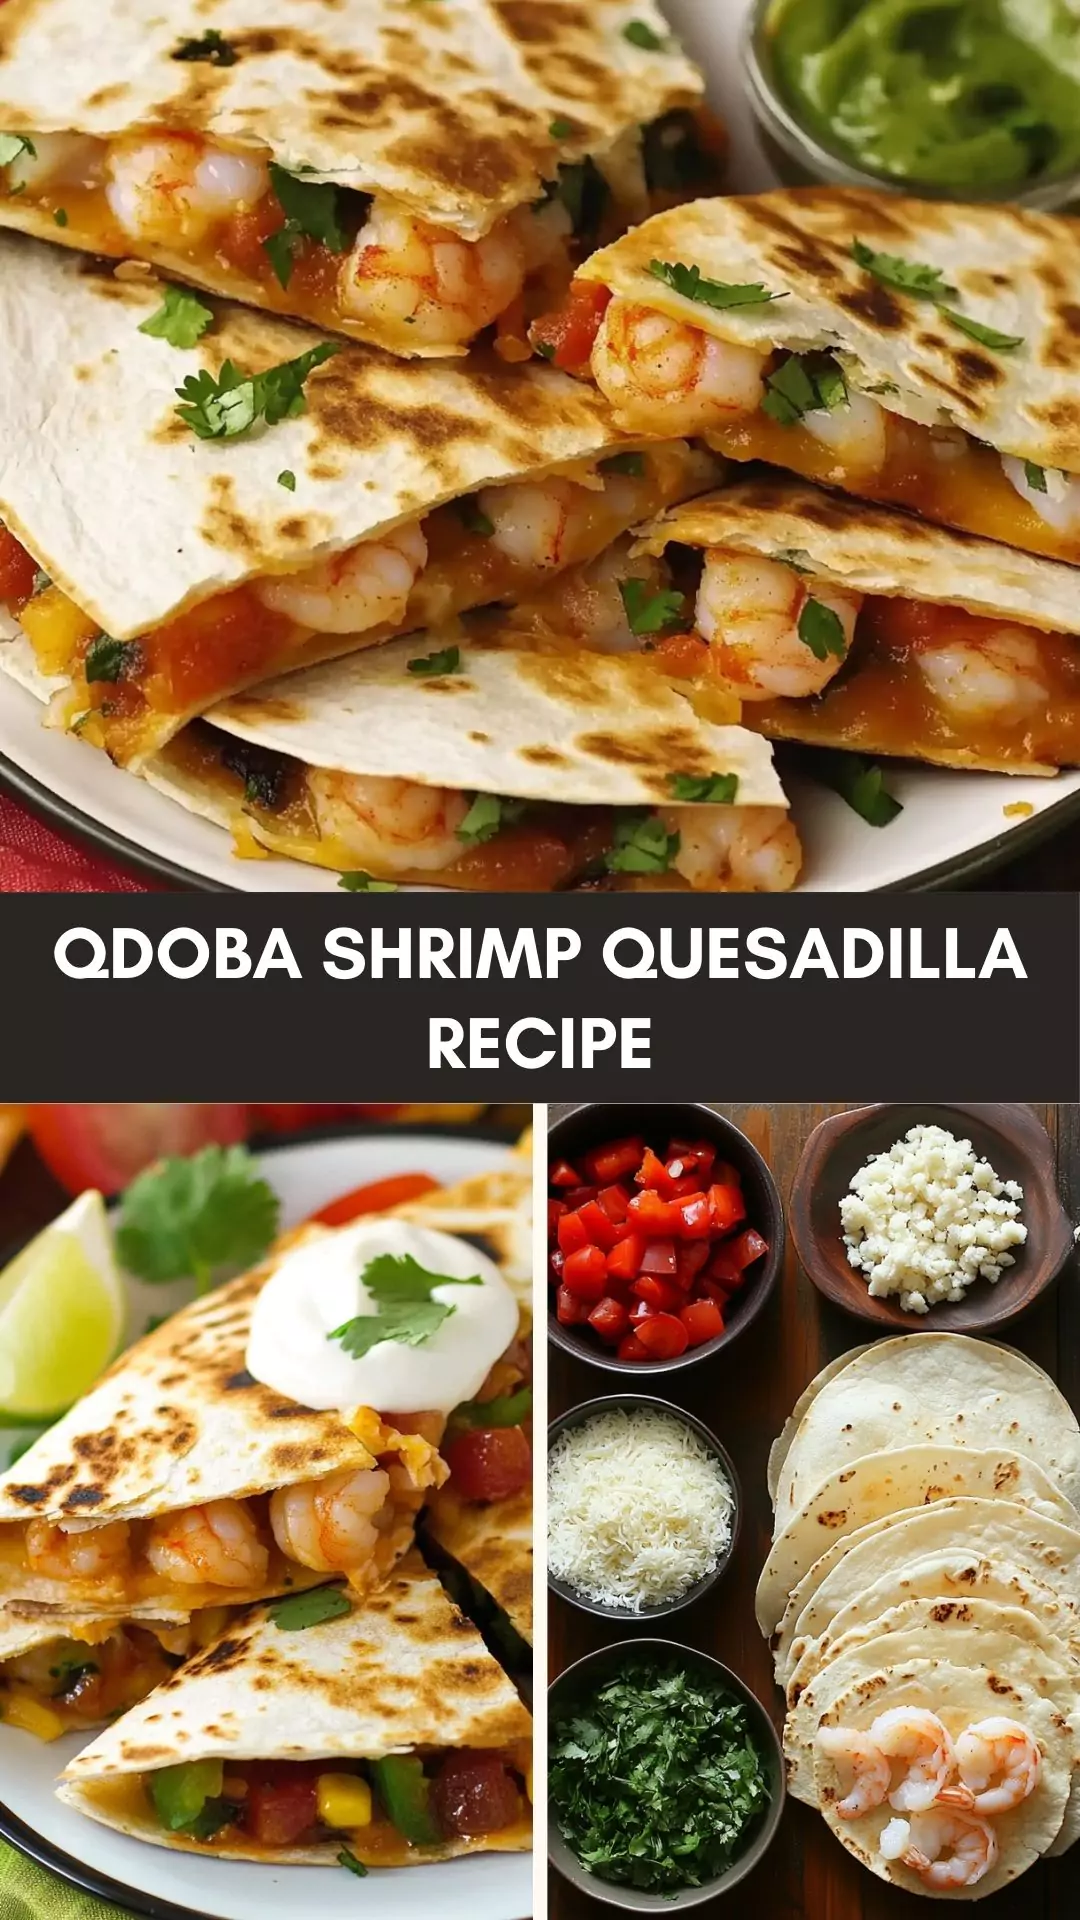
Before we dive into the mouthwatering experience of the QDOBA shrimp quesadilla, let’s talk about what to serve alongside it. Pairing can elevate any meal, and the shrimp quesadilla is no exception.
Imagine enjoying a quesadilla packed with flavor, alongside a refreshing drink, crispy chips, or a zesty salsa.
Some great accompaniments include crispy tortilla chips, which provide the perfect crunch to balance the softness of the quesadilla; chunky guacamole, made with fresh avocados, lime juice, and a sprinkle of salt, adding creaminess that pairs wonderfully with the shrimp filling; fresh salsa
Whether it’s a classic pico de gallo or a fruity mango salsa, which brings brightness to your plate and enhances the flavors of the shrimp; and Mexican street corn salad, a refreshing dish made with corn, cheese, and a spicy dressing that complements the richness of the quesadilla.
With these tasty side dishes in mind, let’s introduce the star of the show: the QDOBA shrimp quesadilla.
When I first stumbled upon the QDOBA shrimp quesadilla, it felt like a delicious revelation. The combination of spices, the freshness of the shrimp, and that melting cheese?
It was nothing short of fantastic! Shrimp in a quesadilla might seem like a simple idea, but indulge me for a moment as we explore why this particular dish deserves a spot in your meal rotation.
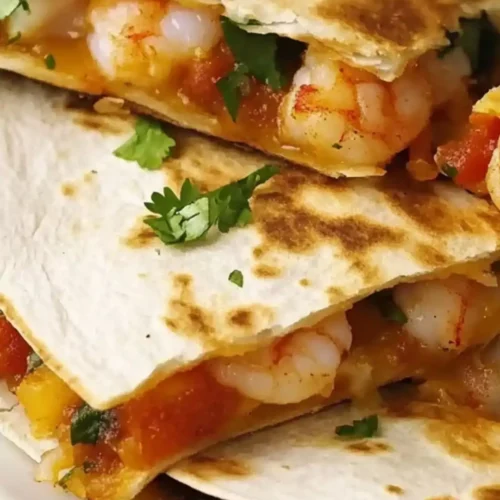
The QDOBA shrimp quesadilla is a delightful Mexican-inspired dish. It features succulent shrimp seasoned with spices, enveloped in a tortilla with melted cheese, and cooked until crispy.
This quesadilla brings together bold flavors and satisfying textures, making it a favorite at home and in restaurants alike.
Why This Recipe Works?
Here are four reasons why this shrimp quesadilla stands out:
Bold Flavors: The combination of smoked paprika, cumin, and jalapeños creates a vibrant taste that makes every bite exhilarating. These spices don’t hold back; they truly enhance the shrimp’s natural sweetness.
Quick and Easy: This dish can be prepared in under 30 minutes. With minimal prep and cooking time, it fits perfectly into a busy weeknight routine without sacrificing flavor.
Versatile Ingredients: The ingredients are flexible. You can tweak them based on what’s available in your pantry. Shrimp lovers will enjoy the ease of being able to make this recipe their own.
Crispy, Cheesy Goodness: The perfect blend of oozing Oaxaca cheese and a crisp tortilla creates a delicious contrast. It’s that satisfying crunch paired with a cheesy melt that makes this quesadilla pure comfort food.
Now that we’ve established its appeal, let’s gather our ingredients!
Ingredients You’ll Need To Make This QDOBA Shrimp Quesadilla
To whip up these delightfully crispy quesadillas, here are the ingredients you’ll need:
1 teaspoon avocado oil, or as needed
1 tablespoon fresh cilantro, chopped
1 red bell pepper, thinly sliced
1 green bell pepper, thinly sliced
6 large whole wheat tortillas
1 medium onion, thinly sliced
1 fresh jalapeño pepper, finely chopped and seeds removed
1 lime, freshly squeezed for juice
1 pound medium shrimp, peeled and deveined
2 tablespoons olive oil
1 teaspoon sea salt
1 teaspoon ground cumin
1 teaspoon smoked paprika
3 cups shredded Oaxaca cheese, divided
1/4 teaspoon chili flakes
How To Make These?
Let’s break this down into simple steps so we can easily get to the good part: eating!
Step 1: Prepare the Ingredients
Start by gathering everything you’ll need. Chop the bell peppers, onion, and jalapeño. Don’t forget to rinse the shrimp under cold water and pat them dry. Keeping everything prepped makes the cooking process much smoother.
Step 2: Sauté the Vegetables
In a skillet, heat the avocado oil over medium heat. Add the chopped onion and bell peppers. Sauté for about 5-7 minutes until they are tender. Toss in the jalapeño for an extra kick about halfway through.
Step 3: Cook the Shrimp
Next up, move those sautéed veggies to the side. In the same skillet, add the shrimp. Drizzle olive oil over them, and sprinkle with sea salt, cumin, smoked paprika, and chili flakes. Cook for approximately 3-4 minutes, or until the shrimp turn pink and curl up. Don’t forget to squeeze in some lime juice!
Step 4: Assemble the Quesadillas
Now comes the fun part. Take a tortilla and spread some of the shrimp and veggie mixture on one half. Top with a generous handful of Oaxaca cheese, then fold the tortilla over. Repeat with the remaining ingredients.
Step 5: Cook the Quesadillas
In the same skillet, add a little more oil if necessary. Place the folded quesadilla in the skillet. Cook on each side for about 2-3 minutes until they are golden brown and the cheese is melted. You can press down slightly for even cooking!
Step 6: Slice and Serve
Once golden, transfer the quesadillas to a cutting board and slice them into triangles. Serve immediately with your favorite sides.
Tips for Success
Use Fresh Shrimp: Fresh shrimp make all the difference in flavor. If using frozen, make sure to thoroughly thaw them in advance.
Experiment with Cheeses: Oaxaca is excellent, but feel free to use a mixture of cheeses like cheddar or pepper jack for different flavors.
Don’t Overcrowd the Pan: If you’re making multiple quesadillas, work in batches. Overcrowding can cause them to steam rather than crisp up.
Customize the Spice: Adjust the amount of jalapeño and chili flakes to suit your heat preference. Your taste buds will thank you!
Add Extra Fillings: Feel free to sneak in other ingredients such as black beans, diced tomatoes, or corn for added texture and taste.
How to Store the Leftovers?
If you end up with leftover quesadillas (unlikely, but it can happen), place them in an airtight container. They can stay fresh in the refrigerator for about 2-3 days. To reheat, use a skillet for that crispy texture again. Microwaving is quick, but it won’t give you that crunch.
Recommended Side Dishes for QDOBA Shrimp Quesadilla
Side dishes can kick your meal up a notch. Here are four tasty options:
Mexican Rice: Seasoned rice infused with lime and cilantro complements the quesadilla perfectly, creating a harmonious plate full of flavor.
Refried Beans: Creamy and hearty, refried beans can provide a wonderful counterpoint to the quesadilla. They also add fiber to your meal!
Corn Salsa: A zesty corn salsa brings a burst of sweetness. Made with fresh corn, cilantro, lime juice, and diced tomatoes, it’s a refreshing contrast.
Chili Lime Slaw: A crunchy slaw made with cabbage, carrots, and a lime dressing adds brightness and a crispy texture. It’s a delicious way to sneak in some extra veggies.
Substitute Options for Ingredients
If you’re missing some ingredients, here are some great substitutions:
Tortillas: Don’t have whole wheat tortillas? Corn tortillas work well, or try using a low-carb option if that fits your dietary needs.
Oaxaca Cheese: A combination of mozzarella and Monterey Jack can create a similar melt factor and flavor profile.
Medium Shrimp: If shrimp aren’t available, chicken breast or tofu can make excellent protein alternatives.
Avocado Oil: Olive oil can easily replace avocado oil in this recipe without losing flavor.
Qdoba Shrimp Quesadilla Recipe
Joe Williams
Before we dive into the mouthwatering experience of the QDOBA shrimp quesadilla, let’s talk about what to serve alongside it. Pairing can elevate any meal, and the shrimp quesadilla is no exception.
1fresh jalapeño pepperfinely chopped and seeds removed
1limefreshly squeezed for juice
1poundmedium shrimppeeled and deveined
2tablespoonsolive oil
1teaspoonsea salt
1teaspoonground cumin
1teaspoonsmoked paprika
3cupsshredded Oaxaca cheesedivided
1/4teaspoonchili flakes
Instructions
Let’s break this down into simple steps so we can easily get to the good part: eating!
Step 1: Prepare the Ingredients
Start by gathering everything you’ll need. Chop the bell peppers, onion, and jalapeño. Don’t forget to rinse the shrimp under cold water and pat them dry. Keeping everything prepped makes the cooking process much smoother.
Step 2: Sauté the Vegetables
In a skillet, heat the avocado oil over medium heat. Add the chopped onion and bell peppers. Sauté for about 5-7 minutes until they are tender. Toss in the jalapeño for an extra kick about halfway through.
Step 3: Cook the Shrimp
Next up, move those sautéed veggies to the side. In the same skillet, add the shrimp. Drizzle olive oil over them, and sprinkle with sea salt, cumin, smoked paprika, and chili flakes. Cook for approximately 3-4 minutes, or until the shrimp turn pink and curl up. Don’t forget to squeeze in some lime juice!
Step 4: Assemble the Quesadillas
Now comes the fun part. Take a tortilla and spread some of the shrimp and veggie mixture on one half. Top with a generous handful of Oaxaca cheese, then fold the tortilla over. Repeat with the remaining ingredients.
Step 5: Cook the Quesadillas
In the same skillet, add a little more oil if necessary. Place the folded quesadilla in the skillet. Cook on each side for about 2-3 minutes until they are golden brown and the cheese is melted. You can press down slightly for even cooking!
Step 6: Slice and Serve
Once golden, transfer the quesadillas to a cutting board and slice them into triangles. Serve immediately with your favorite sides.
Notes
Use Fresh Shrimp: Fresh shrimp make all the difference in flavor. If using frozen, make sure to thoroughly thaw them in advance.
Experiment with Cheeses: Oaxaca is excellent, but feel free to use a mixture of cheeses like cheddar or pepper jack for different flavors.
Don’t Overcrowd the Pan: If you’re making multiple quesadillas, work in batches. Overcrowding can cause them to steam rather than crisp up.
Customize the Spice: Adjust the amount of jalapeño and chili flakes to suit your heat preference. Your taste buds will thank you!
Add Extra Fillings: Feel free to sneak in other ingredients such as black beans, diced tomatoes, or corn for added texture and taste.
Yes! Just ensure they are thawed completely for the best texture.
Can I make this recipe vegetarian?
Absolutely! Substitute shrimp with sautéed mushrooms or grilled zucchini for a delicious vegetarian twist.
What other spices can I add?
You could consider adding garlic powder, onion powder, or even a dash of cayenne for extra heat.
How can I make this dish gluten-free?
Use gluten-free tortillas to make an entirely gluten-free version of the dish.
What dip pairs well with these quesadillas?
Sour cream or a creamy chipotle sauce makes a great dip. These dips enhance the flavors and add an extra layer of creaminess.
Conclusion
The QDOBA shrimp quesadilla is more than just a dish; it’s a celebration of flavors, textures, and the joy of cooking. Whether you are making this for a weeknight dinner, a weekend gathering, or simply indulging yourself, it’s a recipe that delivers satisfaction in every bite.
With all the fresh ingredients and customizable options, this quesadilla allows you to have fun in the kitchen while enjoying a meal that feels indulgent yet doesn’t compromise on health.
So, what are you waiting for? Grab those ingredients, fire up that skillet, and let’s make some magic. Your taste buds will thank you!
Starting your day with a flavorful breakfast burrito is like wrapping yourself in a warm hug. It sets the tone for a fantastic day ahead. Think about it: you’ll want to pair your QDOBA breakfast burrito with sides that complement its flavors without overpowering them. …