Qdoba Brownie Recipe – Culinary Chase
Before diving into the visual treat that is the QDOBA brownie, let’s talk about what happily complements this indulgent dessert. These brownies are rich and chocolatey, making them an excellent fit with a few accompaniments.
First, a scoop of vanilla ice cream can elevate your experience to a whole new level. The creaminess beautifully contrasts the brownie’s fudginess.
Next, consider pairing them with fresh berries. Their tartness can balance the sweetness of the brownie. Raspberries or strawberries sprinkled on top not only look stunning but also add delightful flavor.
Lastly, a drizzle of caramel sauce provides a luscious touch that turns an already delightful dessert into a little slice of decadence.

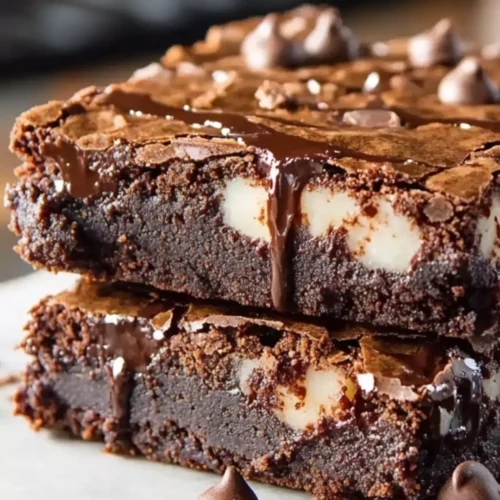
On a lazy afternoon, I found myself rummaging through my kitchen, uncertain about dessert. Just then, I remembered the QDOBA brownie recipe I had stumbled upon. This wasn’t just any brownie.
It promised a profound chocolate flavor, rich textures, and a touch of warmth from espresso powder. I could almost already taste the deliciousness. If you’re ready to whip up a tasty treat, let’s journey together through the sweet world of QDOBA brownies.
What is QDOBA Brownie?
QDOBA brownies are unique creations inspired by the flavorful food from the QDOBA restaurant chain. They take the traditional brownie and elevate it with unexpected ingredients.
Imagine the richness of cocoa and chocolate chips combined with the nutty crunch of walnuts or pecans. They capture everything you love about brownies while bringing an exciting twist. These desserts are a great way to make a classic feel fresh and adventurous.
You will also like the following Dessert recipes!
- Best Sugar Cookie Pumpkin Pie Cups
- How to make Old fashioned fruit cocktail cake
- Easy Peanut butter cookie with sour cream
How Does It Taste Like?
The moment you take a bite, you’re greeted with a rich chocolate flavor that dances on your taste buds. Each morsel melts in your mouth, leaving lingering notes of cocoa and a slight kick from the espresso powder.
The nuts add a lovely crunch, making every bite both soft and satisfying. It’s a perfect mix of textures and tastes that invites you into a blissful chocolate experience.
Why You’ll Love This
If you’re not convinced yet, let me share why this brownie recipe is a must-try. Firstly, it’s incredibly easy to make. With straightforward steps, you don’t need to be a professional baker. Secondly, it’s versatile.
You can easily adjust ingredients based on what you have on hand. Finally, these brownies are perfect for sharing. Cut them into squares for a potluck or keep them all to yourself — no judgment!
Ingredients
Let’s gather the magic for our QDOBA brownies. Here’s what you’ll need:
- 2 large eggs
- 1 cup granulated sugar
- 1/2 cup neutral-flavored oil (such as canola)
- 1 teaspoon pure vanilla extract
- 1/3 cup premium cocoa powder
- 1/2 cup finely sifted all-purpose flour
- 1/2 cup mini semi-sweet chocolate chips
- 1/4 teaspoon espresso powder
- 1/4 cup chopped walnuts or pecans
- 1/2 teaspoon fine sea salt
- 1/4 teaspoon baking powder
These ingredients combine to yield brownies that are rich, fudgy, and utterly irresistible.

Step by Step Directions
To succeed in making these brownies, follow these detailed steps.
Step 1: Preheat the Oven
Start by preheating your oven to 350°F (175°C). This is crucial for achieving that perfect texture when baking.
Step 2: Prepare the Baking Dish
While your oven works its magic, take an 8×8 baking dish and grease it lightly. This ensures your brownies will come out cleanly and won’t stick.
Step 3: Beat the Eggs and Sugar
In a large mixing bowl, whisk together the eggs and granulated sugar. You want to mix until everything is well combined and slightly fluffy. This step is vital for incorporating air into the mixture, resulting in a nice texture.
Step 4: Add Oil and Vanilla
Pour in the neutral oil and add the pure vanilla extract. Blend it with the egg-sugar mixture until smooth. This is where the magic begins; the aroma of vanilla becomes tantalizing, filling your kitchen.
Step 5: Combine Dry Ingredients
In a separate bowl, sift together the cocoa powder, all-purpose flour, espresso powder, fine sea salt, and baking powder. Sifting helps to eliminate lumps and ensures even distribution of the dry ingredients.
Step 6: Mix Dry Ingredients into Wet Ingredients
Gradually add your dry mixture to the wet ingredients. Stir gently until it’s just combined. Avoid overmixing; we are aiming for that fudgy brownie texture!
Step 7: Stir in Chocolate Chips and Nuts
Next, fold in the mini chocolate chips and chopped walnuts or pecans. These add texture and a burst of flavor. You can add more chocolate chips if you’re feeling indulgent!
Step 8: Pour into the Baking Dish
Pour the batter into your prepared baking dish. Use a spatula to spread it evenly. This ensures uniform baking and a nice texture throughout.
Step 9: Bake
Place your baking dish into the preheated oven and bake for about 25-30 minutes. To check for doneness, insert a toothpick in the center. It should come out with a few moist crumbs, indicating the brownies are perfectly baked.
Step 10: Cool and Serve
Once done, take your brownies out of the oven and allow them to cool in the dish for about 10-15 minutes. After that, transfer them to a wire rack to cool completely. Cut them into squares and enjoy your delicious adventure in baking!
Tips on Making QDOBA Brownie
To ensure your QDOBA brownies turn out perfect every time, here are some handy tips:
- Use Quality Ingredients: Good cocoa powder and chocolate chips create the best flavors. Opt for brands that you trust.
- Room Temperature Eggs: Let your eggs sit out for about 30 minutes before using them. Room temperature ingredients blend more easily.
- Avoid Overmixing: Once you add the dry ingredients, mix just until combined. This helps maintain a soft, fudgy texture.
- Chill for Flavor: For even better flavor, chill your brownies overnight after baking. It allows the flavors to deepen.
- Cut with a Warm Knife: For clean cuts, run your knife under warm water before slicing. This helps prevent the brownies from crumbling.

How Do You Store This QDOBA Brownie?
To keep your brownies fresh, follow these simple storage tips:
- Cool Completely: Wait until your brownies have cooled completely before storing them.
- Use an Airtight Container: Place the brownies in an airtight container. This prevents them from drying out and retains their fudgy texture.
- Refrigerate for Longer Shelf Life: If you won’t eat them in a few days, keep them in the fridge. They last up to a week this way.
- Freeze for Extended Storage: Cut brownies into squares and wrap them individually in plastic wrap. Store in a freezer-safe container for up to three months. Thaw them at room temperature when you’re ready to enjoy.
What Other Substitutes Can You Use in QDOBA Brownie?
You can make several substitutions in this recipe if you’re out of some ingredients or looking for healthier options. Here are some ideas:
- Coconut Oil Instead of Neutral Oil: For a coconut flavor, use melted coconut oil in place of canola oil. It brings a distinct taste and adds healthy fats.
- Applesauce for Reduced Sugar: Substitute half of the sugar with unsweetened applesauce. This makes your brownies moist and lowers calorie content.
- Flax Eggs for a Vegan Option: Combine 2 tablespoons of ground flaxseed with 6 tablespoons of water. Let it thicken and use it as a substitute for eggs. This creates a vegan-friendly brownie.
- Almond Flour Instead of All-Purpose Flour: For gluten-free brownies, swap all-purpose flour for almond flour. Adjust the amount as needed since almond flour behaves differently.
- Dark Chocolate Chips for Extra Richness: If you prefer a darker flavor, replace semi-sweet chocolate chips with dark chocolate ones. They add a more intense chocolate taste.
Qdoba Brownie Recipe
Equipment
- 8×8 baking dish
Ingredients
- 2 large eggs
- 1 cup granulated sugar
- 1/2 cup neutral-flavored oil such as canola
- 1 teaspoon pure vanilla extract
- 1/3 cup premium cocoa powder
- 1/2 cup finely sifted all-purpose flour
- 1/2 cup mini semi-sweet chocolate chips
- 1/4 teaspoon espresso powder
- 1/4 cup chopped walnuts or pecans
- 1/2 teaspoon fine sea salt
- 1/4 teaspoon baking powder
Instructions
- To succeed in making these brownies, follow these detailed steps.
Step 1: Preheat the Oven
- Start by preheating your oven to 350°F (175°C). This is crucial for achieving that perfect texture when baking.
Step 2: Prepare the Baking Dish
- While your oven works its magic, take an 8×8 baking dish and grease it lightly. This ensures your brownies will come out cleanly and won’t stick.
Step 3: Beat the Eggs and Sugar
- In a large mixing bowl, whisk together the eggs and granulated sugar. You want to mix until everything is well combined and slightly fluffy. This step is vital for incorporating air into the mixture, resulting in a nice texture.
Step 4: Add Oil and Vanilla
- Pour in the neutral oil and add the pure vanilla extract. Blend it with the egg-sugar mixture until smooth. This is where the magic begins; the aroma of vanilla becomes tantalizing, filling your kitchen.
Step 5: Combine Dry Ingredients
- In a separate bowl, sift together the cocoa powder, all-purpose flour, espresso powder, fine sea salt, and baking powder. Sifting helps to eliminate lumps and ensures even distribution of the dry ingredients.
Step 6: Mix Dry Ingredients into Wet Ingredients
- Gradually add your dry mixture to the wet ingredients. Stir gently until it’s just combined. Avoid overmixing; we are aiming for that fudgy brownie texture!
Step 7: Stir in Chocolate Chips and Nuts
- Next, fold in the mini chocolate chips and chopped walnuts or pecans. These add texture and a burst of flavor. You can add more chocolate chips if you’re feeling indulgent!
Step 8: Pour into the Baking Dish
- Pour the batter into your prepared baking dish. Use a spatula to spread it evenly. This ensures uniform baking and a nice texture throughout.
Step 9: Bake
- Place your baking dish into the preheated oven and bake for about 25-30 minutes. To check for doneness, insert a toothpick in the center. It should come out with a few moist crumbs, indicating the brownies are perfectly baked.
Step 10: Cool and Serve
- Once done, take your brownies out of the oven and allow them to cool in the dish for about 10-15 minutes. After that, transfer them to a wire rack to cool completely. Cut them into squares and enjoy your delicious adventure in baking!
Notes
- Use Quality Ingredients: Good cocoa powder and chocolate chips create the best flavors. Opt for brands that you trust.
- Room Temperature Eggs: Let your eggs sit out for about 30 minutes before using them. Room temperature ingredients blend more easily.
- Avoid Overmixing: Once you add the dry ingredients, mix just until combined. This helps maintain a soft, fudgy texture.
- Chill for Flavor: For even better flavor, chill your brownies overnight after baking. It allows the flavors to deepen.
- Cut with a Warm Knife: For clean cuts, run your knife under warm water before slicing. This helps prevent the brownies from crumbling.
Nutrition
Frequently Asked Questions
1. Can I use different nuts in the recipe?
Absolutely! Feel free to use pecans, almonds, or even peanuts. Just chop them up, and add them to the batter. Each nut will bring its unique flavor and texture.
2. Can I double the recipe?
Yes, you can double the recipe! If you do, use a larger baking dish or split the batter into two smaller dishes. Adjust the baking time accordingly, checking for doneness a few minutes earlier.
3. Do QDOBA brownies freeze well?
Definitely! As mentioned earlier, wrap each brownie individually in plastic wrap and store them in an airtight container in the freezer for up to three months. They’ll taste just as good once thawed.
4. What should I do if my brownies are too dry?
If your brownies come out dry, it may be due to overbaking. Make sure to keep an eye on them as they cook and test with a toothpick early. If they do turn out dry, consider adding a drizzle of fudge sauce on top for moisture!
5. Can I make them ahead of time?
Sure, these brownies are great for making ahead! They can be baked a few days in advance. Store them in an airtight container at room temperature or in the fridge for about a week.
6. What’s the best way to know when they’re done?
Check your brownies with a toothpick; it should come out with moist crumbs — not wet batter or completely clean, a few crumbs sticking signifies perfection.
Conclusion
Trying out the QDOBA brownie recipe has been an adventurous dive into chocolatey goodness, leading to delightful flavors and joyful moments. Gathering simple ingredients and following easy steps, you can create something genuinely special.
So, the next time someone asks for dessert, serve them these brownies with confidence. Let their rich flavors and inviting textures make the occasion unforgettable. Happy baking!