Youtiao Recipe – Culinary Chase
Before diving into the deliciousness of youtiao, let’s talk about what pairs well with this delightful treat. These crispy, golden strips can complement various dishes and flavors, making them incredibly versatile.
Soy Milk: A classic pairing, sweetened or unsweetened. A warm bowl of soy milk alongside your youtiao will make for a satisfying breakfast. Each dip reveals a contrasting texture, with the soft creaminess of the soy milk enveloping the crispy youtiao.
Congee: This rice porridge is another match made in heaven. The softness of congee balances the crunch of youtiao perfectly. For an authentic experience, drizzle some soy sauce and sprinkle scallions over your congee before adding in those crunchy strips.
Savory Dips: Whether it’s a spicy chili sauce or a creamy sesame dip, youtiao benefits from that extra flavor kick. A dollop of homemade peanut sauce also turns this simple snack into a gastronomic delight.

I remember the first time I tried youtiao. It was at a bustling street vendor in Singapore. The smell of freshly fried dough wafted through the air, beckoning me closer. With each dip into the steaming bowl of soy milk, I felt a wave of comfort. Ever since that day, I knew I had to recreate this simple yet special dish at home.
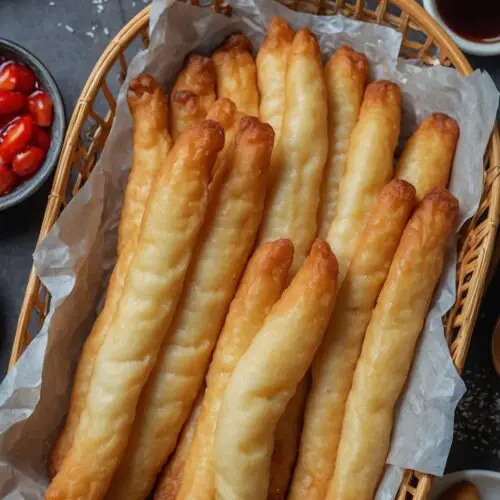
Youtiao, or Chinese crullers, are deep-fried dough sticks that have been cherished for generations. The simplicity of the ingredients belies the delightful crunch and fluffy texture. Today, I want to share my tried and true recipe, along with everything I’ve learned throughout my culinary journey. Buckle up; this is going to be delicious!
Why This Recipe Works?
Bringing you a recipe for youtiao is a joyous occasion filled with expert insights. Here’s why my version is a must-try:
1. Easy To Follow Steps: I’ve broken down the process into simple steps. Forget complicated procedures. This recipe is designed for everyone, regardless of kitchen experience.
2. Perfectly Crispy Texture: The combination of all-purpose flour and the right amount of water ensures that your youtiao turns out crispy on the outside and soft on the inside. That’s a golden ratio if I ever saw one!
3. Minimal Ingredients, Maximum Flavor: With just seven ingredients, you can whip up these delights without a lengthy grocery list. Each ingredient works in tandem for a richer flavor.
4. Versatility: Whether you’re serving them as a breakfast staple or a tasty snack, youtiao is incredibly versatile. You can make small adjustments to suit your palate or dietary preferences.
How Does It Taste?
Let me tell you—it’s a magnificent experience! When you take the first bite, the youtiao is hot and slightly crunchy. As you chew, the soft, airy inside bursts forth with flavor. The subtle taste of the vanilla extract adds just the right hint of sweetness. You might find yourself taking a second, or maybe a third, piece. It’s that addictive.
You will also like the following Breakfast recipes!
What Sets This Recipe Apart from Other Youtiao Variations?
What I love about my take on this dish is the careful balance of ingredients and techniques. Traditional youtiao can often lean towards greasy or unbalanced in flavor. My experience has helped me perfect the proportions. This method ensures that the youtiao strikes the right harmony between crispiness and chewiness. Plus, the inclusion of vanilla in the dough gives a little extra flair, making it stand out from ordinary recipes.
The Ingredients

Here’s what you’ll need:
- 400 g plain/all-purpose flour: This is the backbone of the recipe, providing structure and chew.
- ½ teaspoon fine salt: A little salt enhances the overall flavor without being overpowering.
- 2 teaspoons baking powder: This creates that lovely puffiness we crave.
- 2 tablespoons neutral-flavored cooking oil: Essential for frying and adds richness to the dough.
- 2 eggs: Lightly beaten and combined with water to total 250 g; they contribute to a tender texture.
- Oil for deep frying: Don’t be shy here; good frying oil is key to achieving that crunch.
- Extra flour for dusting: Helps to prevent sticking as you roll out the dough.
- 1 teaspoon vanilla extract: This adds an unexpected hint of sweetness, enhancing the overall experience.
Instructions
To make this sinfully delicious youtiao, follow these steps closely. I promise, it’s easier than you think!
Step 1: Prepare the Dough

In a large mixing bowl, combine the flour, salt, and baking powder. Mix it well with a whisk to ensure even distribution. While that’s happening, in a separate bowl, mix the beaten eggs with water. Pour this egg mixture into the flour mixture slowly, stirring constantly.
Step 2: Knead

When the mixture starts coming together, it’s time to get your hands in there. Knead the dough for about 5-7 minutes until it’s smooth and elastic. If it feels sticky, don’t hesitate to sprinkle in a little more flour.
Step 3: Rest the Dough

Transfer the dough into a lightly oiled bowl, covering it with a damp cloth. Let it rest for about 1 hour. This ensures the gluten develops, making it easier to stretch out later.
Step 4: Shape the Youtiao

After the dough has rested, divide it into smaller portions. Roll each portion into a long strip. Aim for a thickness similar to your pinky finger. If it springs back, allow it to rest for a bit longer before shaping.
Step 5: Heat the Oil

In a deep frying pan or pot, heat oil over medium-high heat. To test if the oil is hot enough, drop a small piece of dough in; it should sizzle immediately.
Step 6: Fry

Carefully place one or two youtiao strips into the hot oil. Fry them until they turn a gorgeous golden brown, usually around 2-3 minutes. Don’t crowd the pan; that’ll lead to steaming instead of frying.
Step 7: Drain and Enjoy
Once golden and crispy, remove them from the oil and let them drain on paper towels. Serve immediately while they are hot and crisp.
Notes
Here are some helpful tips to ensure your youtiao turns out perfect every time:
- Use Fresh Ingredients: Fresh flour and baking powder make a big difference.
- Temperature is Key: Maintaining oil at the right temperature is crucial for great texture.
- Resting is Essential: Don’t skip the resting time; it affects the dough’s elasticity.
- Experiment: Feel free to try different seasonings or flavors to personalize your youtiao.
- Double the Batch: Youtiao freezes well; make extra for easy snacks later.
Nutrition Information
Here’s a rough breakdown for one serving of youtiao (based on a batch providing about 8 servings):

How Do You Store This Youtiao Recipe?
To keep your youtiao fresh, follow these steps:
- Cool down completely.
- Store in an airtight container at room temperature for up to 2 days.
- For long-term storage, place them in a freezer-safe bag and freeze for up to a month. Reheat in the oven for best results, so they regain their crispness.
Sides for Youtiao Recipe
Pairing side dishes enhances the youtiao experience. Here are a few excellent options:
1. Congee: This creamy rice porridge provides a comforting base that works perfectly with the crunchy texture of youtiao.
2. Soy Milk: A nutritious drink option, hot or cold, it contrasts the youtiao’s crunch and complements the flavors wonderfully.
3. Pickled Vegetables: Crunchy, tangy pickled veggies add a refreshing balance, cutting through the richness of the fried dough.

What Alternatives Can You Use for the Ingredients?
If you find yourself short on any ingredients, here are some substitutes:
1. Flour Substitutes: You can use bread flour for a chewier texture or gluten-free flour for a lightweight alternative.
2. Baking Powder Alternatives: In a pinch, mix 1 teaspoon of baking soda with 1 teaspoon of vinegar.
3. Cooking Oil: If you’re out of neutral oil, olive oil or melted butter can work, although they may alter the taste slightly.
4. Egg Alternatives: Vegan substitutes like flaxseed meal or unsweetened applesauce can replace the eggs in the recipe.
Youtiao Recipe
Equipment
- Deep pot
Ingredients
- 400 g plain/all-purpose flour: This is the backbone of the recipe providing structure and chew.
- ½ teaspoon fine salt: A little salt enhances the overall flavor without being overpowering.
- 2 teaspoons baking powder: This creates that lovely puffiness we crave.
- 2 tablespoons neutral-flavored cooking oil: Essential for frying and adds richness to the dough.
- 2 eggs: Lightly beaten and combined with water to total 250 g; they contribute to a tender texture.
- Oil for deep frying: Don’t be shy here; good frying oil is key to achieving that crunch.
- Extra flour for dusting: Helps to prevent sticking as you roll out the dough.
- 1 teaspoon vanilla extract: This adds an unexpected hint of sweetness enhancing the overall experience.
Instructions
Step 1: Prepare the Dough
- In a large mixing bowl, combine the flour, salt, and baking powder. Mix it well with a whisk to ensure even distribution. While that’s happening, in a separate bowl, mix the beaten eggs with water. Pour this egg mixture into the flour mixture slowly, stirring constantly.
Step 2: Knead
- When the mixture starts coming together, it’s time to get your hands in there. Knead the dough for about 5-7 minutes until it’s smooth and elastic. If it feels sticky, don’t hesitate to sprinkle in a little more flour.
Step 3: Rest the Dough
- Transfer the dough into a lightly oiled bowl, covering it with a damp cloth. Let it rest for about 1 hour. This ensures the gluten develops, making it easier to stretch out later.
Step 4: Shape the Youtiao
- After the dough has rested, divide it into smaller portions. Roll each portion into a long strip. Aim for a thickness similar to your pinky finger. If it springs back, allow it to rest for a bit longer before shaping.
Step 5: Heat the Oil
- In a deep frying pan or pot, heat oil over medium-high heat. To test if the oil is hot enough, drop a small piece of dough in; it should sizzle immediately.
Step 6: Fry
- Carefully place one or two youtiao strips into the hot oil. Fry them until they turn a gorgeous golden brown, usually around 2-3 minutes. Don’t crowd the pan; that’ll lead to steaming instead of frying.
Step 7: Drain and Enjoy
- Once golden and crispy, remove them from the oil and let them drain on paper towels. Serve immediately while they are hot and crisp.
Notes
- Use Fresh Ingredients: Fresh flour and baking powder make a big difference.
- Temperature is Key: Maintaining oil at the right temperature is crucial for great texture.
- Resting is Essential: Don’t skip the resting time; it affects the dough’s elasticity.
- Experiment: Feel free to try different seasonings or flavors to personalize your youtiao.
- Double the Batch: Youtiao freezes well; make extra for easy snacks later.
Nutrition
Frequently Asked Questions
1. Can I make youtiao without eggs?
Yes! You can substitute eggs with vegan options like ground flaxseeds mixed with water or unsweetened applesauce. The texture will be slightly different but still delicious.
2. How do I know when the oil is hot enough for frying?
The best test is to drop a tiny piece of dough into the oil. If it sizzles and floats to the surface, the oil is ready!
3. Can I flavor the youtiao dough?
Absolutely! You can add seasonings like garlic powder or herbs into the dough for an exciting flavor twis
4. How do I reheat leftover youtiao?
For the crispiest results, place them in an oven preheated to 350°F (175°C) for about 10 minutes, or until they are warmed through and crispy.
Conclusion
In conclusion, youtiao is more than just a delicious treat; it’s a culinary adventure that transports you to streets bustling with life and flavor. The process may seem intimidating, but with this guide, you’re well-equipped to create these delightful fried dough sticks at home.
Don’t just take my word for it—try making this recipe for yourself and feel the magic when those golden strips emerge from the oil. Pair them with your favorite dips or sides, and savor every bite. Happy cooking!