The Magic of Pastéis de Nata Recipe – Culinary Chase
From the moment I had my first bite of a Pastéis de Nata, I knew I was in for an adventure. The creamy custard, nestled in a flaky crust, packed a punch that made my tastebuds sing. With origins deep in Portugal’s culinary history, these little tarts have a tale of tradition, love, and the pursuit of perfection. Let’s take a delightful journey together as we explore everything you need to know about these scrumptious pastries.

What is Pastéis de Nata?
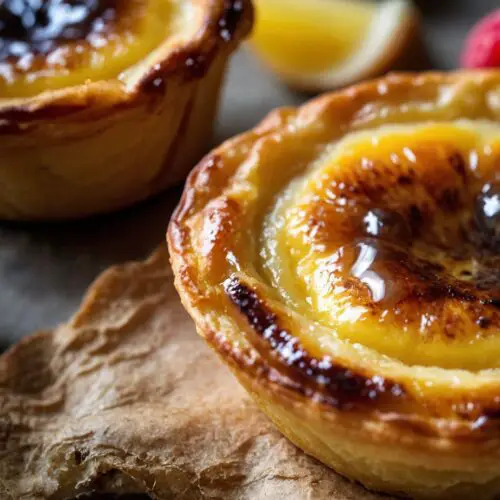
Pastéis de Nata, often referred to as Portuguese custard tarts, are small, round pastries with a rich custard filling. They are typically baked in a mini tart shell, resulting in a crispy exterior that contrasts beautifully with the smooth custard within. The joy of biting into one is unparalleled; you experience the crunch before being enveloped by the creaminess of the filling, which has hints of vanilla and a dusting of cinnamon on top.
A Brief History
These tarts trace their roots back to the 18th century in Lisbon. Originally, they were created by Catholic monks at the Jerónimos Monastery, who made use of excess egg yolks. The monks sold these treats to support the monastery. Over the years, many bakeries across Portugal honed the recipe, with the most famous being Pastéis de Belém, which continues to draw tourists with its secret formula.
You will also like the following Dessert recipes!
Why You’ll Love Pastéis de Nata
If you’ve never tasted Pastéis de Nata, prepare for a treat. Once you take your first bite, you might fall in love instantly. They’re not just desserts; they’re experiences. Imagine sitting at a quaint café in Lisbon, sunlight spilling onto the cobblestones, as you enjoy one with a sprinkle of cinnamon. The combination of flaky pastry and creamy custard is like a warm hug on a plate.
Not only are these tarts delicious, but they’re also surprisingly easy to make. With a few simple ingredients and steps, anyone can recreate this Portuguese delight at home. Whether it’s for a special occasion or just a Tuesday, these pastries will add a touch of magic to your day.
The Ingredients

Before we dive into the steps of making these heavenly tarts, let’s gather our ingredients. Here’s what you’ll need for both the pastry and the custard:
For the Pastry:
1 pound sheet of puff pastry: This can be store-bought or homemade if you’re feeling adventurous.
For the Custard:
1 1/4 cups whole milk: Full-fat is best for creaminess.
1 1/4 cups granulated white sugar: This balances the eggs and adds sweetness.
1/4 cup plain all-purpose flour: To thicken the custard.
6 large egg yolks: These are essential for the richness.
2/3 cup filtered water: Keeps the custard from getting too thick.
1 large cinnamon stick: For that comforting aroma.
Peel of one large lemon: Cut into broad strips for a bright flavor.
1 teaspoon premium pure vanilla extract: A must for the custard’s depth.
1 tablespoon freshly squeezed lemon juice: Just a touch for brightness.
1/2 teaspoon freshly grated nutmeg: A warm, subtle spice that enhances the flavor.
Step-by-Step Instructions
Making Pastéis de Nata is a rewarding process. Let’s break it down step by step.
Step 1: Preheat the Oven
Start by preheating your oven to 450°F (230°C). High heat is crucial for getting that enticingly crispy crust.
Step 2: Prepare the Puff Pastry

If you’re using store-bought puff pastry, discard it from the package and let it come to room temperature. If you’re brave enough to make your own, roll it out into a thin layer. Cut out circles that are about 4 inches in diameter, which will fit neatly into your muffin tin. Press these circles into the tin to form the tart shells.
Step 3: Prepare the Custard Mixture

In a medium saucepan, combine the milk, sugar, flour, and water. Whisk these ingredients together until smooth. Add the cinnamon stick, lemon peel, and nutmeg. Turn on the heat to medium and bring the mixture to a gentle simmer, stirring continuously.
Step 4: Add Egg Yolks

Once the mixture is simmering and well combined, remove it from the heat. In a separate bowl, whisk the egg yolks together. Gradually add a small amount of the hot mixture to the yolks, stirring constantly. This step is critical; it prevents the eggs from scrambling. Once tempered, pour the egg mixture back into the saucepan, stirring until fully combined.
Step 5: Strain the Custard

To ensure a silky texture, strain the custard through a fine sieve into a clean bowl. Discard the solids. This step might feel tedious, but trust me, it’s worth it.
Step 6: Fill the Tart Shells

Pour the cooled custard into each pastry shell, filling them about three-quarters full. You want some space for the custard to puff up while baking.
Step 7: Bake

Place the muffin tin in the preheated oven. Bake for about 15-20 minutes or until the tops are golden brown and slightly charred in spots. Keep an eye on them; every oven is different, and you want that perfect balance between crispy and soft.
Step 8: Cool and Enjoy
Once they’re done, take them out of the oven and let them cool in the tin for about 10 minutes. Then carefully remove them and transfer them to a wire rack to cool completely. They are best enjoyed warm or at room temperature.
Tips & Tricks
To make your Pastéis de Nata even more delightful, consider these handy tips:
Work with Cold Pastry: If you opt for store-bought pastry, keep it cold until you’re ready to use it. This helps maintain layers.
Don’t Overfill: Leave some room at the top of each pastry shell to prevent spills during baking.
Check for Doneness: Look for a slight char on the custard’s surface—this adds flavor.
Experiment with Flavor: Try substituting lemon peel with orange peel for a different citrus twist.
Store Wisely: If you have extras, store them in an airtight container at room temperature, but best eaten fresh.
Nutrition Information
Here’s a rough estimate of the nutrition information per Pastéis de Nata, assuming the recipe makes about 12 tarts:

Remember, nutritional values can vary based on exact ingredients used and portion sizes.

Can I Store Pastéis de Nata?
Pastéis de Nata are best enjoyed fresh, but if you have leftovers (which is rare!), you can store them. Keep them in an airtight container at room temperature for up to 2 days. For longer storage, freeze them individually, then place in a freezer-safe bag. Reheat gently in the oven to enjoy later.
What Can I Serve with Pastéis de Nata?
These custard tarts are perfect on their own or paired with simple accompaniments. Here are some ideas:
Espresso or Coffee: A strong brew complements the sweetness beautifully.
Fruit Salad: Fresh fruits add a refreshing contrast to the richness of the tarts.
Ice Cream: A scoop of vanilla or cinnamon ice cream for an indulgent dessert.
Whipped Cream: Lightly sweetened whipped cream on the side adds a nice touch.
Port Wine: If you’re feeling adventurous, a glass of Port can elevate your tasting experience.
Variations
Want to mix things up? Here are some delightful variations to experiment with:
Chocolate Pastéis de Nata: Add cocoa powder to the custard base or top with a drizzle of chocolate sauce.
Berry Infused Custard: Blend in your favorite berries into the custard for a fruity twist.
Matcha Custard Tarts: Replace some of the flour with matcha powder for a unique flavor and color.
Savory Spinach and Cheese Pastries: Use the pastry base but fill it with spinach, feta, and a sprinkle of nutmeg.
Almond Paste Tarts: Add marzipan to the custard for a richer, nutty flavor profile.
The Magic of Pastéis de Nata Recipe
Equipment
- Bowl
- mixture
Ingredients
- 1 pound sheet of puff pastry.
- 1 1/4 cups whole milk
- 1 1/4 cups granulated white sugar
- 1/4 cup plain all-purpose flour
- 6 large egg yolks
- 2/3 cup filtered water
- 1 large cinnamon stick
- Peel of one large lemon
- 1 teaspoon premium pure vanilla extract
- 1 tablespoon freshly squeezed lemon juice
- 1/2 teaspoon freshly grated nutmeg
Instructions
Step 1: Preheat the Oven
- Start by preheating your oven to 450°F (230°C). High heat is crucial for getting that enticingly crispy crust.
Step 2: Prepare the Puff Pastry
- If you’re using store-bought puff pastry, discard it from the package and let it come to room temperature. If you’re brave enough to make your own, roll it out into a thin layer. Cut out circles that are about 4 inches in diameter, which will fit neatly into your muffin tin. Press these circles into the tin to form the tart shells.
Step 3: Prepare the Custard Mixture
- In a medium saucepan, combine the milk, sugar, flour, and water. Whisk these ingredients together until smooth. Add the cinnamon stick, lemon peel, and nutmeg. Turn on the heat to medium and bring the mixture to a gentle simmer, stirring continuously.
Step 4: Add Egg Yolks
- Once the mixture is simmering and well combined, remove it from the heat. In a separate bowl, whisk the egg yolks together. Gradually add a small amount of the hot mixture to the yolks, stirring constantly. This step is critical; it prevents the eggs from scrambling. Once tempered, pour the egg mixture back into the saucepan, stirring until fully combined.
Step 5: Strain the Custard
- To ensure a silky texture, strain the custard through a fine sieve into a clean bowl. Discard the solids. This step might feel tedious, but trust me, it’s worth it.
Step 6: Fill the Tart Shells
- Pour the cooled custard into each pastry shell, filling them about three-quarters full. You want some space for the custard to puff up while baking.
Step 7: Bake
- Place the muffin tin in the preheated oven. Bake for about 15-20 minutes or until the tops are golden brown and slightly charred in spots. Keep an eye on them; every oven is different, and you want that perfect balance between crispy and soft.
Step 8: Cool and Enjoy
- Once they’re done, take them out of the oven and let them cool in the tin for about 10 minutes. Then carefully remove them and transfer them to a wire rack to cool completely. They are best enjoyed warm or at room temperature.
Notes
- Work with Cold Pastry: If you opt for store-bought pastry, keep it cold until you’re ready to use it. This helps maintain layers.
- Don’t Overfill: Leave some room at the top of each pastry shell to prevent spills during baking.
- Check for Doneness: Look for a slight char on the custard’s surface—this adds flavor.
- Experiment with Flavor: Try substituting lemon peel with orange peel for a different citrus twist.
- Store Wisely: If you have extras, store them in an airtight container at room temperature, but best eaten fresh.
Nutrition
Frequently Asked Questions
Can I use a different type of pastry?
Absolutely! If puff pastry isn’t your thing, you can try phyllo dough for a thinner, flakier option. Just note that the texture will differ.
What happens if my custard is too thick?
If your custard thickens too much while cooking, you can whisk in a little more milk to create a smoother consistency.
Can I make the custard ahead of time?
Yes, you can prepare the custard a day ahead. Just make sure to cover it with plastic wrap directly on the surface to prevent a skin from forming.
Are these tarts gluten-free?
Traditional Pastéis de Nata are not gluten-free due to the puff pastry. However, you can try gluten-free pastry options available in stores.
How can I make the tarts vegan?
You can experiment with vegan pastry and create an egg-free custard using silken tofu blended with plant-based milk and thickened with cornstarch.
Conclusion
Pastéis de Nata is more than just a pastry; it’s a piece of history and culture. Every bite connects you to centuries of tradition. Making these tarts at home may seem daunting, but it’s genuinely rewarding. Each step opens up a world of flavors and textures that dance in harmony. Whether you enjoy them solo with a cup of coffee or serve them at your next gathering, these custard tarts are sure to impress.
So grab your apron, roll up your sleeves, and let your kitchen become the stage for these delightful creations. Your friends and family will thank you, and who knows? You might just start a new tradition of your own!