Thai Basil Chicken Pad Krapow Recipe – Culinary Chase
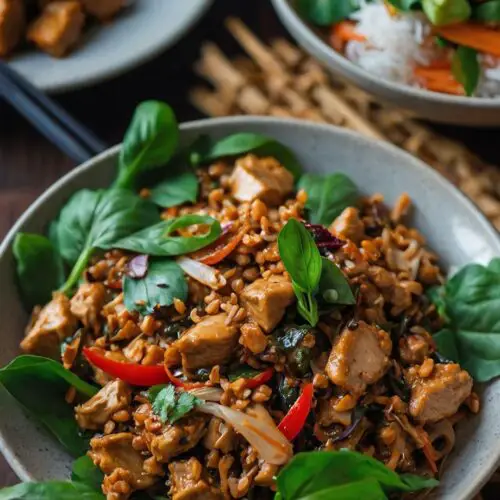
When I first encountered Thai basil chicken pad krapow, I was captivated by its vibrant flavors and enticing aroma. Every bite of this dish tells a story, one that’s rooted deeply in Thai culinary tradition. Often served over jasmine rice or with a fried egg, pad krapow lets you taste the heart of Thai street food. Picture yourself in a bustling Bangkok market, steam rising from woks, the sound of sizzling stir-fries filling the air. It’s a little piece of heaven on a plate.

What is Thai Basil Chicken Pad Krapow?
This dish, often referred to simply as “pad krapow,” combines ground meat, fresh Thai basil, and a medley of seasonings for a flavor explosion. The heat from the chilies, the sweetness from the brown sugar, and the umami from the sauces come together to create a dish that’s both comforting and exciting. Traditionally made with ground pork or chicken, pad krapow is adaptable, allowing you to make it your own. For me, it’s an easy weeknight dinner and an impressive dish to serve guests.
You will also like the following Lunch and Dinner recipes!
The Ingredients
Before diving into the cooking process, let’s gather our supporting cast. Having fresh ingredients makes all the difference here:
- 1 pound ground chicken (preferably thigh for a juicier texture)
- 3 to 4 tablespoons of neutral cooking oil (such as canola or sunflower)
- 3 medium shallots, thinly sliced
- 4 cloves of garlic, minced
- 3 small Thai bird’s eye chilies (or red Holland chilies), finely sliced
- 1 teaspoon freshly grated ginger
- 2 teaspoons light brown sugar (or honey)
- 2 tablespoons naturally brewed soy sauce
- 1 tablespoon premium fish sauce
- 1/3 cup low-sodium chicken stock (or filtered water)
- 1 teaspoon rice vinegar
- A generous handful of fresh Thai basil (or holy basil)

How to Make Thai Basil Chicken Pad Krapow?
The cooking process is straightforward but filled with opportunities to enhance the flavors. Each step builds the foundations of this delicious dish.
Step 1: Prepare the Ingredients
Before you start cooking, make sure all your ingredients are prepped and ready. This not only speeds up the cooking process but allows you to focus on the flavors evolving in the pan. Slice the shallots, mince the garlic, and chop the chilies. Be mindful of their heat—remove the seeds if you prefer a milder taste.
Step 2: Heat the Oil
In a large wok or skillet, heat the neutral cooking oil over medium-high heat. This step is crucial. The oil should shimmer but not smoke. The right temperature ensures your ingredients cook evenly.
Step 3: Sauté Aromatics
Add the sliced shallots and stir-fry for about two minutes until they start to soften and become fragrant. Next, add in the minced garlic and chilies. You’ll want to watch things carefully here; garlic can burn quickly and turn bitter. Stir constantly for another minute until everything is well combined.
Step 4: Add the Ground Chicken
It’s time to introduce the ground chicken to the mix. Use a spatula to break it up as it cooks. You want it to brown nicely, imparting a savory depth to the dish. Cook this for around 5-7 minutes, until the chicken is no longer pink.
Step 5: Introduce the Flavorings
Here comes the fun part! Sprinkle in the brown sugar, soy sauce, fish sauce, ginger, and rice vinegar. Stir them in smoothly. You’re crafting an incredible balance of flavors here. Pour in the chicken stock to keep everything moist, and let it simmer for an additional two minutes.
Step 6: Add the Thai Basil
Just before serving, fold in the fresh Thai basil. The heat from the dish will wilt the leaves perfectly, infusing the entire mixture with their unique flavor. This final touch is what makes pad krapow truly special.
Notes
- Fresh Ingredients: Always use the freshest basil available for a brighter taste.
- Chili Heat: Adjust the amount of chilies to fit your spice preference.
- Meat Choices: While I’m a fan of ground chicken, this dish works beautifully with pork or beef as well.
- Cooking Time: Don’t rush the cooking; allow the flavors to develop.
- Serving Size: This recipe comfortably feeds about four people.
Storage Tips
If you’ve got leftovers (and that’s a big “if” with such a tasty dish), store them in an airtight container in the fridge. They’ll keep well for 3-4 days. Reheat in the microwave or on the stove, adding a splash of water or stock to bring back the moisture.
Nutrition Information
This dish packs a punch not just in flavor, but in nutrients too:
Serving Suggestions
- Steamed Jasmine Rice: The perfect base to soak up the flavorful juices. The lightness of the rice offsets the savory chicken.
- Fried Egg: Placed on top, a runny yolk adds richness, taking the dish to a whole new level.
- Fresh Salad: A side of cucumber and carrot salad offers crispness and a refreshing contrast.
- Spicy Thai Slaw: Shredded veggies with a spicy lime dressing complement the heat of the dish. It’s crunchy and tangy.
- Spring Rolls: Serve alongside for an appetizer that enhances the overall dining experience.

What Other Substitutes Can I Use in Thai Basil Chicken Pad Krapow?
- Ground Turkey: A leaner alternative, it works well while still delivering great flavor.
- Tofu: For a vegetarian twist, crumble firm tofu in place of meat. Enhance with extra spices.
- Vegetable Stock: Use this instead of chicken stock to keep it plant-based.
- Kaffir Lime Leaves: Add for an extra burst of citrus flavor, enhancing the dish’s depth.
- Sweet Soy Sauce: For a richer sweetness, swap out the regular soy sauce with sweet soy sauce.
Thai Basil Chicken Pad Krapow Recipe
Equipment
- sauce pan
- Mixing bowl
Ingredients
- 1 pound ground chicken
- 3 to 4 tablespoons of neutral cooking oil
- 3 medium shallots
- 4 cloves of garlic minced
- 3 small Thai bird’s eye chilies
- 1 teaspoon freshly grated ginger
- 2 teaspoons light brown sugar or honey
- 2 tablespoons naturally brewed soy sauce
- 1 tablespoon premium fish sauce
- 1/3 cup low-sodium chicken stock
- 1 teaspoon rice vinegar
- A generous handful of fresh Thai basil
Instructions
Step 1: Prepare the Ingredients
- Before you start cooking, make sure all your ingredients are prepped and ready. This not only speeds up the cooking process but allows you to focus on the flavors evolving in the pan. Slice the shallots, mince the garlic, and chop the chilies. Be mindful of their heat—remove the seeds if you prefer a milder taste.
Step 2: Heat the Oil
- In a large wok or skillet, heat the neutral cooking oil over medium-high heat. This step is crucial. The oil should shimmer but not smoke. The right temperature ensures your ingredients cook evenly.
Step 3: Sauté Aromatics
- Add the sliced shallots and stir-fry for about two minutes until they start to soften and become fragrant. Next, add in the minced garlic and chilies. You’ll want to watch things carefully here; garlic can burn quickly and turn bitter. Stir constantly for another minute until everything is well combined.
Step 4: Add the Ground Chicken
- It’s time to introduce the ground chicken to the mix. Use a spatula to break it up as it cooks. You want it to brown nicely, imparting a savory depth to the dish. Cook this for around 5-7 minutes, until the chicken is no longer pink.
Step 5: Introduce the Flavorings
- Here comes the fun part! Sprinkle in the brown sugar, soy sauce, fish sauce, ginger, and rice vinegar. Stir them in smoothly. You’re crafting an incredible balance of flavors here. Pour in the chicken stock to keep everything moist, and let it simmer for an additional two minutes.
Step 6: Add the Thai Basil
- Just before serving, fold in the fresh Thai basil. The heat from the dish will wilt the leaves perfectly, infusing the entire mixture with their unique flavor. This final touch is what makes pad krapow truly special.
Notes
- Fresh Ingredients: Always use the freshest basil available for a brighter taste.
- Chili Heat: Adjust the amount of chilies to fit your spice preference.
- Meat Choices: While I’m a fan of ground chicken, this dish works beautifully with pork or beef as well.
- Cooking Time: Don’t rush the cooking; allow the flavors to develop.
- Serving Size: This recipe comfortably feeds about four people.
Nutrition
Frequently Asked Questions
Can I make this dish ahead of time?
Yes! You can prepare pad krapow in advance. Just store it in the fridge and reheat when needed.
What if I can’t find Thai basil?
You can substitute with regular basil, although the flavor will differ slightly. Adding a bit of mint may help replicate some notes.
Is this dish gluten-free?
To ensure it’s gluten-free, use tamari instead of soy sauce and double-check the ingredients of your fish sauce.
Can I freeze pad krapow?
Yes, but I recommend freezing the chicken mixture separately from the rice. It can be frozen for up to 3 months.
How can I adjust the spice level?
Simply reduce the number of chilies used or remove the seeds. You can always add heat later if needed!
Conclusion
Thai basil chicken pad krapow is a vibrant dish that brings flavor and comfort to any meal. With its simple yet bold ingredients, it exemplifies the beauty of Thai cuisine. Whether enjoyed alone or served with friends, this dish never fails to impress.
So, next time you crave a quick, satisfying meal, reach for this recipe. It’s a little slice of culinary paradise waiting to be served. Enjoy every spoonful!