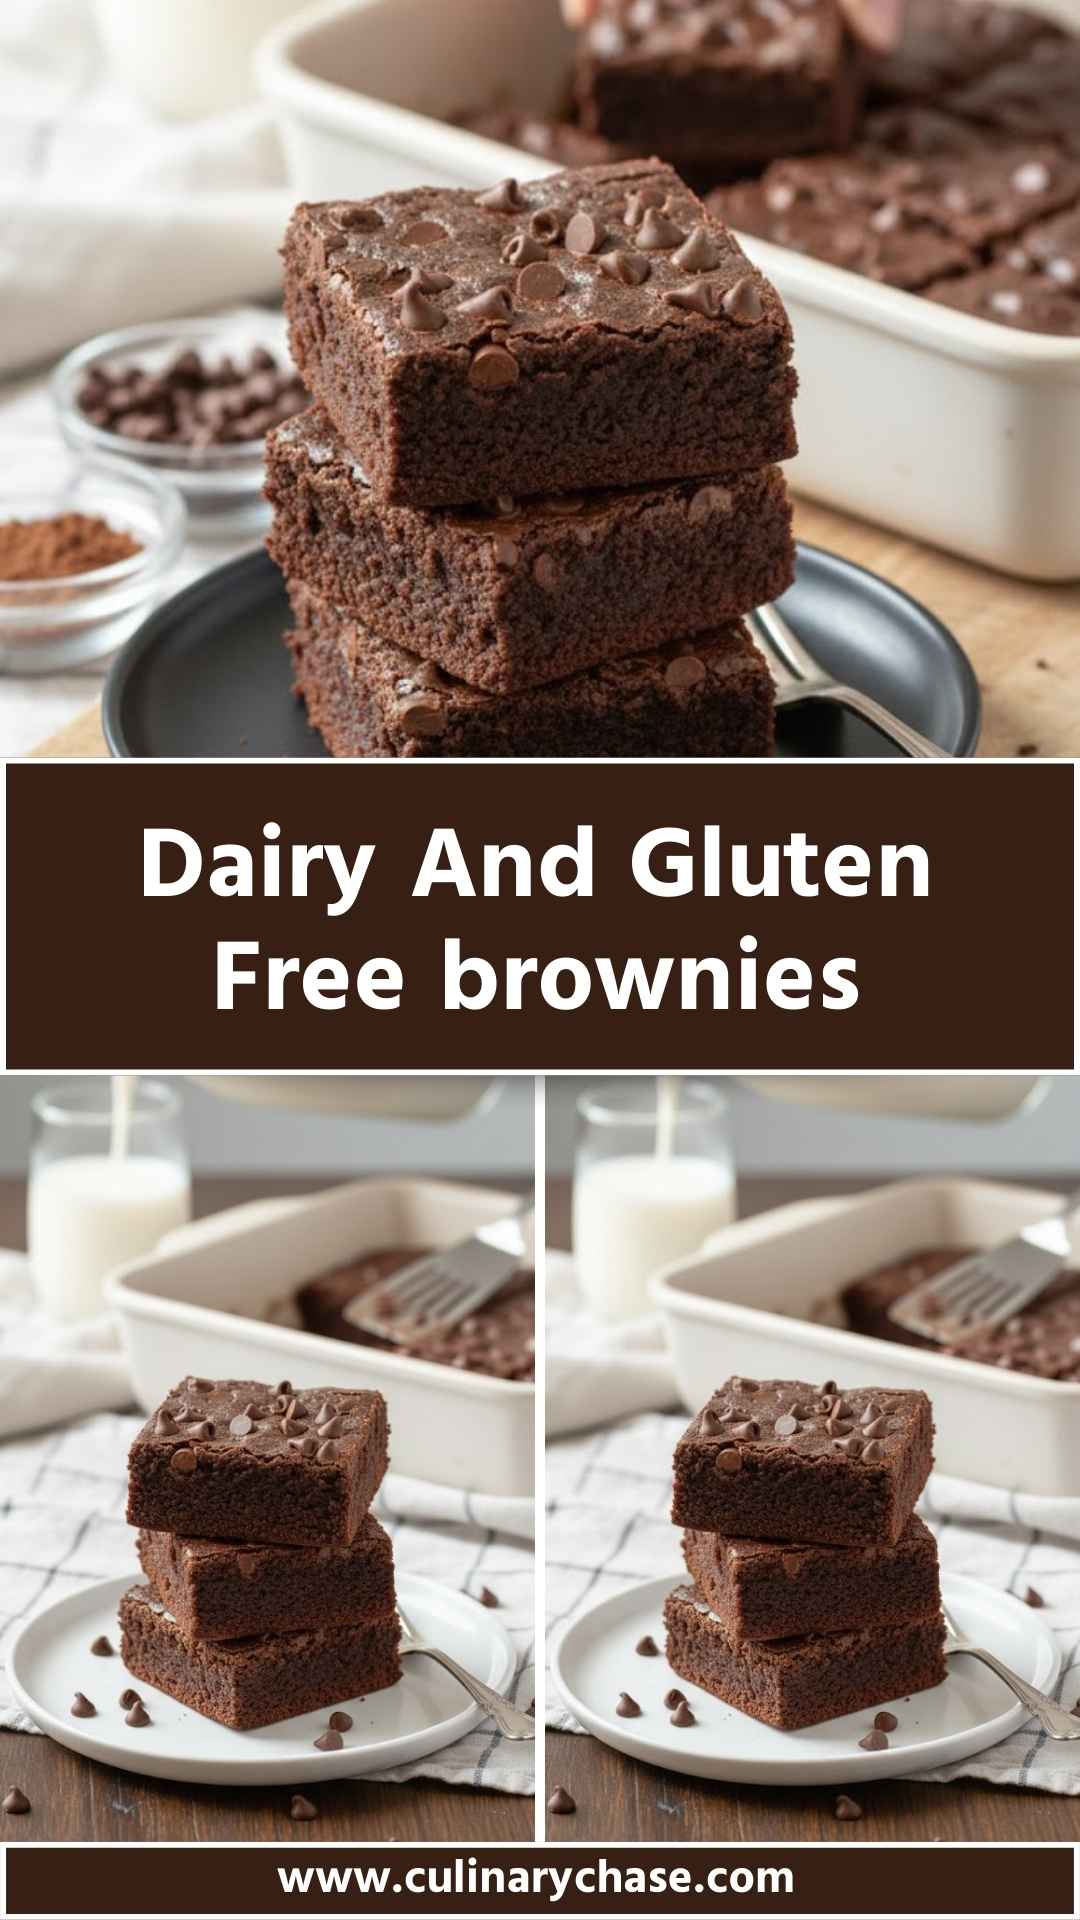
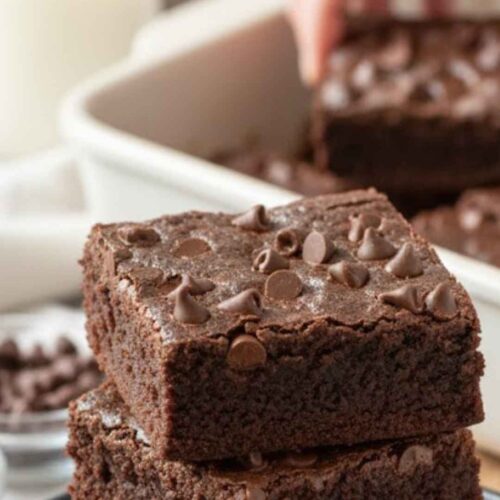
Recent Posts

Steamed Eggs Recipe – Culinary Chase

Steamed Eggs Recipe – Culinary Chase

If you’re wondering what can accompany steamed eggs on your dining table, you’re in for a treat! Steamed eggs are versatile and pair wonderfully with various side dishes. Traditionally, they find a great match with rice for a satisfying meal. Adding sautéed vegetables or pickled 

Chicken Larb – Culinary Chase

Chicken Larb – Culinary Chase

Before diving into the delicious world of chicken larb, let’s talk about what makes a great sidekick for this dish. Chicken larb, with its bright flavors and vibrant textures, pairs wonderfully with various accompaniments. Here are a few ideas that will elevate your dining experience: 

Braised Pork Belly Dong Po Rou – Culinary Chase

Braised Pork Belly Dong Po Rou – Culinary Chase

Before diving into the details of this delectable dish, let’s talk about what you can pair with Braised Pork Belly Dong Po Rou to create a memorable meal. This dish is rich and has a balance of savory, sweet, and umami flavors, making it perfect with a variety of accompaniments.

  1. Steamed Jasmine Rice: This classic pairing is simple but transforms your plate. The rice soaks up the luscious sauce from the pork belly, allowing you to enjoy every drop.
  2. Sautéed Greens: Consider garlic sautéed bok choy or Chinese broccoli. The slight bitterness of the greens complements the richness of the pork.
  3. Pickled Vegetables: A side of pickled cucumbers or radishes adds a refreshing crunch. The tanginess helps cut through the fatty pork belly.
  4. Soft Boiled Eggs: These can be marinated in soy sauce, giving them a slightly salty flavor that elevates the meal even further.
  5. Spicy Tofu: Crispy tofu tossed in a spicy sauce brings an additional protein element and contrasts well with the pork’s texture.
braised pork belly dong po rou

Let’s embark on a culinary journey to savor the traditional flavors of Braised Pork Belly Dong Po Rou. This dish isn’t just food; it’s a celebration steeped in history and cultural significance. Originating from the Eastern regions of China, Dong Po Rou is named after the famous poet Su Dongpo. He savored this dish in his time, and today, countless people indulge in its rich history and taste.

Reflecting on my adventures in cooking, I remember the first time I attempted this dish. As I carefully sliced the pork belly and marinated it in a perfect harmony of soy sauce, Shaoxing wine, and spices, I felt an excitement that I now want to share with you. The pleasure of savoring the outcome—rich, satisfying, and aromatic—was a delightful experience!

What is Braised Pork Belly Dong Po Rou?

Braised Pork Belly Dong Po Rou is an iconic Chinese dish. It features tender, melt-in-your-mouth pork belly, simmered to perfection in a treasure trove of flavors. The method of cooking typically involves slow braising, allowing the rich flavors to meld over time. The dish isn’t just about taste; it’s an art that encapsulates centuries-old culinary techniques.

Pork belly is cut into thick slices, often seared before being braised with ingredients like soy sauce, cooking wine, ginger, and aromatic spices, which enhance the savory notes. The rock sugar balances the dish by adding a soft sweetness, cutting through the fattiness of the pork belly. The result is a glossy, dark brown that invites anyone to take a bite.

You will also like the following Side Dishes recipes!

Why You’ll Love This Braised Pork Belly Dong Po Rou

Now, let’s delve into why Dong Po Rou will capture your heart—and your stomach.

  1. Rich Flavor Profile: The marriage of salty, sweet, and umami flavors creates a complex taste sensation you won’t forget. Each bite unfolds layers of flavors that dance on the palate.
  2. Texture: The pork belly becomes incredibly tender, contrasting the rich fat with a bit of chewiness. It’s a delightful balance that keeps you coming back for more.
  3. Cultural Significance: Each serving of Dong Po Rou tells a story. Understanding its historical roots adds a rich depth to your dining experience. Enjoying this dish is like taking a bite out of history.
  4. Comfort Food: There’s something inherently comforting about slow-cooked meals. Dong Po Rou brings warmth on cold days and is perfect for gatherings with family and friends.
  5. Versatile: You can pair it with various sides, turning it into a splendid feast. Its ability to shine regardless of the accompaniment is part of its charm.

The Ingredients You Will Need To Make Braised Pork Belly Dong Po Rou

To bring this delightful dish to your table, you’ll need a few essential ingredients. Let’s gather everything you need:

  • 2 pounds pork belly slab (the star of the dish)
  • 2 ½ tablespoons dark soy sauce (adds depth and color)
  • 2/3 cup light soy sauce (for a salty punch)
  • 2 cups Shaoxing cooking wine (imparts a complex flavor)
  • 4 – 5 oz. rock sugar (adjust for your sweetness preference)
  • 3 bunches green onions (washed and halved)
  • 8 thin slices fresh ginger (adds warmth)
  • 2 star anise pods (for floral notes)
  • 1 cinnamon stick (introduces subtle sweetness)
how to make braised pork belly dong po rou

Directions

Let’s get into the fun part—cooking! Follow these steps for success.

Step 1: Prepare the Pork Belly

Start by selecting a good-quality pork belly. Look for meat and fat in balanced proportions. Cut the pork belly into thick slices, about 1.5 inches each. This thickness allows the meat to retain moisture while cooking.

Step 2: Sear the Pork Belly

In a large pot, heat a splash of oil over medium heat. Place the slices of pork belly in the pot, skin-side down. Cook until slightly caramelized and golden brown, around 3-4 minutes. Then flip the slices to sear the other side. Searing adds flavor and color, creating a lovely crust.

Step 3: Add Aromatics

With the pork belly nicely browned, remove it from the pot and set it aside. In the same pot, add ginger, green onions, star anise, and cinnamon. Sauté for a minute until fragrant. This step enhances the aroma of the dish and lays the foundation for the infusion of flavors.

Step 4: Build the Braising Liquids

Pour in your Shaoxing cooking wine, scraping the bottom of the pot to deglaze. Add the dark soy sauce and light soy sauce. Stir in the rock sugar, ensuring it dissolves completely. This combination creates a tantalizing sauce that envelops the pork belly.

Step 5: Braise the Pork Belly

Now, place the previously seared pork belly back into the pot. Ensure the pork is covered in the sauce. Bring the mixture to a gentle simmer, then reduce the heat to low. Cover the pot and allow it to braise for at least two hours. The long cooking time transforms the meat into something incredibly tender.

Step 6: Final Touches

Check on the pork from time to time, adding water if necessary to ensure it doesn’t dry out. Once it’s fork-tender, remove it from the pot. You can strain the sauce if you prefer a smoother texture. For extra shine, consider simmering the sauce until slightly thickened before serving.

Notes

Here are five tips to ensure your Dong Po Rou turns out perfectly:

  • Quality of meat: Always opt for high-quality pork belly. Look for a good balance of fat and meat for the best texture and flavor.
  • Marinate longer: If you have time, marinate the pork belly overnight for a deeper infusion of flavors.
  • Adjust sweetness: Taste the sauce and adjust the sweetness to your liking; some prefer it sweeter, while others may want it less so.
  • Use fresh ingredients: Fresh ginger and green onions significantly enhance the overall flavor of your dish. Don’t skimp on freshness.
  • Control heat: Keep the braising temperature low and steady. Slow cooking is key to achieving the tender texture you desire.

Storage Tips

Leftovers from this rich dish can last up to three days in the fridge. To store, cover the braised pork belly in an airtight container. You can also freeze the braised pork belly for up to three months. When ready to enjoy again, simply thaw and reheat gently on the stovetop in its sauce to maintain moisture.

Nutrition Information

Here’s a rough overview of the nutritional content per serving (assuming six servings):

  • Calories: 450
  • Protein: 25g
  • Fat: 35g
  • Carbohydrates: 15g
  • Fiber: 1g
  • Sodium: 800mg
braised pork belly dong po rou copycat recipe

Serving Suggestions

When it comes to serving this dish, consider these ideas:

  • Over rice: Serve the pork belly over a mound of perfectly steamed rice. The rice will soak in the delectable sauce.
  • Garnished with cilantro: Fresh cilantro as a garnish adds a burst of herbal freshness that brightens the dish.
  • Alongside a stir-fry: Pair with your favorite vegetable stir-fry for a complete meal.
  • Accompanied by soup: It pairs wonderfully with a light soup, creating a well-rounded dining experience.
  • In a sandwich: Layer pieces in a soft bao or sandwich for a fusion twist.

What Other Substitutes Can I Use in Braised Pork Belly Dong Po Rou?

If you don’t have pork belly or simply want to switch it up, consider these substitutes:

  • Pork shoulder: A great alternative, pork shoulder offers a similar fat-to-meat ratio, although it might take longer to cook.
  • Chicken thighs: They will absorb the flavors well and will be quicker to cook, making for a lighter dish.
  • Firm tofu: For a vegetarian option, firm tofu can be easily braised in the same sauce. It’s hearty and richly flavorful.
  • Duck breast: This will offer a different flavor. The richness of the duck pairs beautifully with the sweet and savory sauce.
  • Beef brisket: If you prefer beef, brisket can work although the taste profile will change slightly.
braised pork belly dong po rou copycat recipe

Braised Pork Belly Dong Po Rou

Before diving into the details of this delectable dish, let’s talk about what you can pair with Braised Pork Belly Dong Po Rou to create a memorable meal.
Prep Time 20 minutes
Cook Time 3 hours 30 minutes
Total Time 3 hours 50 minutes
Course Side Dish
Cuisine Chinese
Servings 8
Calories 450 kcal

Equipment

  • Pot
  • Cup

Ingredients
  

  • 2 pounds pork belly slab the star of the dish
  • 2 ½ tablespoons dark soy sauce adds depth and color
  • 2/3 cup light soy sauce for a salty punch
  • 2 cups Shaoxing cooking wine imparts a complex flavor
  • 4 – 5 oz. rock sugar adjust for your sweetness preference
  • 3 bunches green onions washed and halved
  • 8 thin slices fresh ginger adds warmth
  • 2 star anise pods for floral notes
  • 1 cinnamon stick introduces subtle sweetness

Instructions
 

Step 1: Prepare the Pork Belly

  • Start by selecting a good-quality pork belly. Look for meat and fat in balanced proportions. Cut the pork belly into thick slices, about 1.5 inches each. This thickness allows the meat to retain moisture while cooking.

Step 2: Sear the Pork Belly

  • In a large pot, heat a splash of oil over medium heat. Place the slices of pork belly in the pot, skin-side down. Cook until slightly caramelized and golden brown, around 3-4 minutes. Then flip the slices to sear the other side. Searing adds flavor and color, creating a lovely crust.

Step 3: Add Aromatics

  • With the pork belly nicely browned, remove it from the pot and set it aside. In the same pot, add ginger, green onions, star anise, and cinnamon. Sauté for a minute until fragrant. This step enhances the aroma of the dish and lays the foundation for the infusion of flavors.

Step 4: Build the Braising Liquids

  • Pour in your Shaoxing cooking wine, scraping the bottom of the pot to deglaze. Add the dark soy sauce and light soy sauce. Stir in the rock sugar, ensuring it dissolves completely. This combination creates a tantalizing sauce that envelops the pork belly.

Step 5: Braise the Pork Belly

  • Now, place the previously seared pork belly back into the pot. Ensure the pork is covered in the sauce. Bring the mixture to a gentle simmer, then reduce the heat to low. Cover the pot and allow it to braise for at least two hours. The long cooking time transforms the meat into something incredibly tender.

Step 6: Final Touches

  • Check on the pork from time to time, adding water if necessary to ensure it doesn’t dry out. Once it’s fork-tender, remove it from the pot. You can strain the sauce if you prefer a smoother texture. For extra shine, consider simmering the sauce until slightly thickened before serving.

Notes

  • Quality of meat: Always opt for high-quality pork belly. Look for a good balance of fat and meat for the best texture and flavor.
  • Marinate longer: If you have time, marinate the pork belly overnight for a deeper infusion of flavors.
  • Adjust sweetness: Taste the sauce and adjust the sweetness to your liking; some prefer it sweeter, while others may want it less so.
  • Use fresh ingredients: Fresh ginger and green onions significantly enhance the overall flavor of your dish. Don’t skimp on freshness.
  • Control heat: Keep the braising temperature low and steady. Slow cooking is key to achieving the tender texture you desire.

Nutrition

Calories: 450kcalCarbohydrates: 15gProtein: 35gFat: 25gSodium: 800mgFiber: 1g
Keyword Braised Pork Belly Dong Po Rou
Tried this recipe?Let us know how it was!

Frequently Asked Questions

Can I make Dong Po Rou in advance?

 Absolutely! Dong Po Rou is even better the next day. Make it ahead, refrigerate it, and gently reheat it before serving.

What is the best way to serve Dong Po Rou?

 Serve it with rice and garnished with fresh herbs. This provides a good contrast to the rich flavors.

Can I adjust the level of sweetness?

Yes, the amount of rock sugar can be modified based on your preferences. Taste as you go!

How do I make it spicier?

You can add a pinch of chili flakes or some sliced fresh chili while sautéing the aromatics for a kick.

Is there a vegetarian version?

 Yes! Using firm tofu or seitan as a base with a similar braising sauce offers a hearty vegetarian option.

Can I use other types of alcohol?

 While Shaoxing wine is ideal, any dry white wine can substitute in a pinch but may alter the flavor slightly.

Conclusion

After embarking on this flavorful journey through Braised Pork Belly Dong Po Rou, I hope you feel inspired to try your hand at this dish. It showcases the beauty of traditional Chinese cooking, simple yet devastatingly delicious. Whether you’re serving it at a family gathering or enjoying a cozy dinner at home, this dish never fails to impress.

As you simmer and savor, remember the joy of sharing food with loved ones. Each bite is a moment, a memory just waiting to happen. Happy cooking!

You’ll also like these latest recipes!

Kimchi Ramen – Culinary Chase

Kimchi Ramen – Culinary Chase

If you’re diving into the delightful world of kimchi ramen, you might wonder what to serve alongside it. Think light, crunchy flavors that complement the rich and spicy notes of the ramen. Here are some ideas: I remember the first time I tasted kimchi ramen. 

Chrysanthemum Tea Benefits – Culinary Chase

Chrysanthemum Tea Benefits – Culinary Chase

Chrysanthemum tea is refreshing and floral. It’s perfect alongside light bites. Think of savory snacks such as rice crackers, fresh spring rolls, or a sliced cucumber salad. The delicate flowery notes of the tea balance beautifully with the crispness of these snacks.  For something heartier, 

Quinoa Rice Recipe – Culinary Chase

Quinoa Rice Recipe – Culinary Chase

Quinoa rice is a fantastic dish that offers an incredible flavor and texture profile. You can pair it with a myriad of sides. For instance, you might pair it with grilled chicken or fish. Both complement the nutty taste of quinoa without overpowering it. You could also serve it alongside a fresh vegetable stir-fry, which adds color and crunch. If you’re vegan, roasted vegetables drizzled with balsamic glaze make a delightful addition. This versatility makes quinoa rice a great base for all sorts of meals.

quinoa rice

Have you ever wandered through a grocery store, staring deep into a pasta aisle packed with colorful options? Yes, there’s something fun about choosing between rotini and ravioli. But what if I told you that quinoa rice can provide a truly delightful alternative that’s just as versatile and satisfying? I’ll dive into the details about this dish that has taken many kitchens by storm. Let’s unfold the wonders of quinoa rice together.

When I first decided to experiment with quinoa rice, I wasn’t sure what to expect. I knew quinoa was healthy, but could it blend seamlessly with rice? Could it enhance any meal? After cooking it several times and playing around with flavors, I’ve found that quinoa rice not only brightens my dinner plate but also fits into a busy lifestyle.

Why This Recipe Works

Let’s break down what makes quinoa rice an exceptional choice for your next meal.

1. Nutritional Powerhouse: Quinoa is often celebrated for its remarkable health benefits. Just one cup packs a whopping 8 grams of protein, making it a fantastic choice for vegetarians. Plus, it’s loaded with fiber, which keeps you full for longer. When combined with rice, you get an added dose of energy, all while keeping it wholesome.

2. Versatile Base: Quinoa rice can complement a range of flavors. Whether you prefer spicy, tangy, or earthy seasonings, this dish can adapt brilliantly. You can serve it plain, or jazz it up with herbs, spices, or veggies based on what you have on hand. It’s a blank canvas.

3. Easy to Prepare: I can confidently say that anyone, regardless of cooking skill, can whip up this dish. With just a handful of ingredients and minimal prep time, it’s perfect for weeknight dinners or meal prep. It’s quick, straightforward, and satisfying.

4. Gluten-Free Option: For those avoiding gluten, quinoa rice is a fantastic choice. It offers all the comfort of a grain without the gluten, making it suitable for various dietary needs. This allows everyone at the table to enjoy it without worry.

How Does It Taste?

Imagine taking a mouthful of perfectly cooked quinoa rice. It’s fluffy, with a slight nutty flavor from the quinoa balancing the mildness of the rice. Each grain has a bit of bite, contributing to a lovely texture that keeps you wanting more. It’s subtle enough to absorb the flavors of any sauce or seasoning you decide to add, making it a versatile side or base.

What Sets This Recipe Apart from Other Quinoa Rice Variations?

There are many quinoa recipes floating around, but what makes this one distinct? It’s all about the cooking method and ingredient pairing. I’ve spent hours experimenting to get it just right, focusing on the perfect water-to-grain ratio. Further, I use fragrant jasmine rice, which infuses the dish with an inviting aroma. This enhances the overall dining experience, elevating your simple quinoa rice to something memorable.

You will also like the following Lunch and Dinner recipes!

The Ingredients

  • 1 tablespoon unsalted butter or olive oil: This adds richness and a hint of flavor to our dish.
  • 1/2 teaspoon sea salt: Essential for bringing out the flavors.
  • 1 cup fragrant jasmine rice: Choose this for its lovely scent and taste.
  • 2 cups filtered water: This ensures a pure flavor.
  • 1 cup quinoa: Whether you pick white or red, both options work beautifully.
how to make quinoa rice

Instructions

Step 1: Rinse the Quinoa

First things first! Rinse the quinoa under cold water in a fine-mesh sieve. This crucial step removes the saponins, which can give quinoa a bitter flavor. Rinsing is key—trust me on this one.

Step 2: Prepare the Rice

In a medium saucepan, add the jasmine rice, water, and half of the salt. Bring it to a boil over medium heat, then lower the heat and cover. Let it simmer until the rice is tender and water is absorbed. This usually takes about 15 minutes.

Step 3: Cook the Quinoa

In a separate pot, combine the rinsed quinoa, water, and the remaining salt. Bring it to a boil as well, then reduce to low heat. Cover it and cook for about 15 minutes until the quinoa is fluffy. It’s done when you can see the little germ ring around each grain.

Step 4: Combine and Fluff

Once both the quinoa and rice are cooked, it’s time to combine them. Add the quinoa to the rice pot and mix gently with a fork. This ensures the grains stay fluffy and don’t become mushy.

Step 5: Add Butter or Olive Oil

Finally, add the unsalted butter or olive oil to the pot. Give it a good stir, season with additional salt if needed, and prepare to enjoy this delightful dish.

Notes

Here are some helpful tips to enhance your quinoa rice experience:

  • Rinse your quinoa properly to avoid bitterness.
  • Experiment with spices: Try adding garlic powder or cumin for an extra kick.
  • Add veggies: Chopped vegetables can elevate this dish. Think bell peppers, peas, or even spinach.
  • Make a larger batch: This meal works great for leftovers, so double the recipe and save some for lunch.
  • Consider using broth: Cooking the rice or quinoa in vegetable broth adds more depth of flavor.

Nutrition Information

One serving of quinoa rice offers approximately:

This makes it a nutrient-dense option that supports your energy levels and health goals.

quinoa rice copycat recipe

How Do You Store This Quinoa Rice?

To store quinoa rice, allow it to cool completely before transferring it into an airtight container. It can sit in the refrigerator for about 4–5 days. If you’ve made a big batch, you can also freeze portions for up to 2 months. Just reheat lightly in the microwave or on the stove.

Sides for Quinoa Rice

Now, let’s talk sides that can take your quinoa rice to the next level.

1. Grilled Chicken: Flavorful and juicy, grilled chicken adds a protein boost. Marinate it in lemon juice and garlic for a perfect pairing. You can slice it on top of the quinoa rice for a beautiful presentation.

2. Roasted Vegetables: A colorful mixture of bell peppers, zucchini, and carrots can be delicious. Toss them in olive oil, salt, and pepper, then roast until golden. This adds both flavor and vibrant color to your meal.

3. Black Bean Salad: A refreshing black bean salad with corn, tomatoes, and a lime vinaigrette complements quinoa rice beautifully. It’s refreshing and adds a delightful crunch.

What Alternatives Can You Use for the Ingredients if They Are Not Present in Your Kitchen?

Sometimes it happens that you open the pantry and find missing ingredients. Don’t fret; here are some alternatives:

1. Brown Rice: If you don’t have jasmine rice, brown rice will work too. It will give a chewier texture, but it’s equally delicious and nutritious.

2. Olive Oil Swap: Instead of olive oil, you could use coconut oil or avocado oil. Both provide healthy fats and unique flavors to the dish.

3. Different Types of Quinoa: If you only have red quinoa, use it! The flavor is slightly nuttier, but it still provides a great texture.

4. Vegetable Broth: If you don’t have water or want to enhance the flavor even more, consider using vegetable broth to cook the quinoa or rice. It adds another layer of taste.

how to make quinoa rice

Quinoa Rice Recipe

Quinoa rice is a fantastic dish that offers an incredible flavor and texture profile. You can pair it with a myriad of sides. For instance, you might pair it with grilled chicken or fish. Both complement the nutty taste of quinoa without overpowering it.
Prep Time 5 minutes
Cook Time 25 minutes
Total Time 30 minutes
Course Main Course
Cuisine American
Servings 4
Calories 267 kcal

Equipment

  • Stovetop
  • Medium pot

Ingredients
  

  • 1 tablespoon unsalted butter or olive oil
  • 1/2 teaspoon sea salt
  • 1 cup fragrant jasmine rice
  • 2 cups filtered water
  • 1 cup quinoa

Instructions
 

Step 1: Rinse the Quinoa

  • First things first! Rinse the quinoa under cold water in a fine-mesh sieve. This crucial step removes the saponins, which can give quinoa a bitter flavor. Rinsing is key—trust me on this one.

Step 2: Prepare the Rice

  • In a medium saucepan, add the jasmine rice, water, and half of the salt. Bring it to a boil over medium heat, then lower the heat and cover. Let it simmer until the rice is tender and water is absorbed. This usually takes about 15 minutes.

Step 3: Cook the Quinoa

  • In a separate pot, combine the rinsed quinoa, water, and the remaining salt. Bring it to a boil as well, then reduce to low heat. Cover it and cook for about 15 minutes until the quinoa is fluffy. It’s done when you can see the little germ ring around each grain.

Step 4: Combine and Fluff

  • Once both the quinoa and rice are cooked, it’s time to combine them. Add the quinoa to the rice pot and mix gently with a fork. This ensures the grains stay fluffy and don’t become mushy.

Step 5: Add Butter or Olive Oil

  • Finally, add the unsalted butter or olive oil to the pot. Give it a good stir, season with additional salt if needed, and prepare to enjoy this delightful dish.

Notes

  • Rinse your quinoa properly to avoid bitterness.
  • Experiment with spices: Try adding garlic powder or cumin for an extra kick.
  • Add veggies: Chopped vegetables can elevate this dish. Think bell peppers, peas, or even spinach.
  • Make a larger batch: This meal works great for leftovers, so double the recipe and save some for lunch.
  • Consider using broth: Cooking the rice or quinoa in vegetable broth adds more depth of flavor.

Nutrition

Serving: 195gCalories: 267kcalCarbohydrates: 42gProtein: 10gFat: 10.7gSaturated Fat: 2.7gCholesterol: 4mgSodium: 298mgFiber: 9g
Keyword Quinoa Rice Recipe
Tried this recipe?Let us know how it was!

Frequently Asked Questions

1. Can quinoa rice be made ahead of time?

Absolutely! Quinoa rice can be made in advance and stored in the fridge. It’s great for meal prep; just reheat when needed.

2. Is quinoa suitable for weight loss?

Quinoa can be beneficial for weight loss, as it’s high in protein and fiber, both of which contribute to feeling fuller for longer.

3. Can I use brown quinoa instead of white?

Yes, brown quinoa can be used! It has a chewier texture and a slightly nuttier flavor, which some people enjoy even more.

4. How can I spice up quinoa rice for a different flavor?

To spice it up, consider adding herbs such as parsley, basil, or cilantro. You can also incorporate spices like curry powder or paprika for flavor enhancement.

Conclusion

There’s a reason why quinoa rice is garnering so much attention in kitchens worldwide. Not only is it a health powerhouse, but it is also incredibly versatile and easy to prepare. Whether paired with grilled chicken or a delightful veggie medley, quinoa rice can absolutely steal the show at your next dinner gathering. I hope you feel inspired to try making this dish today or modify it to suit your preferences. Just remember, cooking is all about having fun and experimenting, so don’t hesitate to make it your own!

You’ll also like these latest recipes!

Chicken Katsu Curry Rice – Culinary Chase

Chicken Katsu Curry Rice – Culinary Chase

When indulging in Chicken Katsu Curry Rice, you want the perfect accompaniments. Trust me; it can elevate your meal from good to unforgettable. Pickled vegetables are a fantastic choice. Their tangy notes cut through the richness of the curry beautifully. Think pickled cucumbers or daikon 

How To Make Five Spice Powder – Culinary Chase

How To Make Five Spice Powder – Culinary Chase

Five spice powder is a culinary gem that amplifies flavors in countless dishes. It whispers sweet nothings to stir-fries, dances in marinades, and wakes up roasted meats. Imagine biting into tender chicken, marinated in this fragrant blend, or savoring a steaming bowl of Asian-inspired noodles.  

Buddha’s Delight Lo Han Jai – Culinary Chase

Buddha’s Delight Lo Han Jai – Culinary Chase

Before diving into the delightful world of Buddha’s Delight Lo Han Jai, let’s talk about what to serve alongside this intricate dish. A light, fragrant jasmine rice pairs beautifully, soaking up the medley of flavors from the main dish. 

Alternatively, a simple vegetable broth or miso soup can complement it well. For a crunchy element, consider a side of cool cucumber salad sprinkled with sesame seeds. This helps balance the hearty textures and flavors found in Lo Han Jai, ensuring a fulfilling dining experience.

buddhas delight lo han jai

Let’s journey together into the heart of a beautiful dish. Picture a vibrant medley of vegetables, mushrooms, and delightful textures all swirling around in a pot. That’s Buddha’s Delight Lo Han Jai for you—a true gem in Chinese vegetarian cuisine. 

It’s not just food; it’s a celebration of flavors, joyfully blending tradition with nutrition in every bite. This dish isn’t merely for vegetarians or vegans; it’s for anyone wanting a taste journey that leaves their taste buds dancing.

Honestly, when I first tried Buddha’s Delight, I was captivated. The textures, the colors, the flavors—it all felt magical. Over the years, I’ve honed my recipe and found ways to share it, and I can confidently say it’s now easier than ever to recreate at home. Let’s explore this treasure together, shall we?

What is Buddha’s Delight Lo Han Jai?

Buddha’s Delight, or Lo Han Jai, is an ancient vegetarian dish popular in Chinese culture. Traditionally served during the Lunar New Year, it’s said to bring good fortune. This recipe is usually made with a combination of six or more different vegetables and ingredients, reflecting prosperity and abundance.

You’ll find an array of dried ingredients and fresh vegetables in this dish. It’s a hearty mix featuring shiitake mushrooms, black fungus, and cellophane noodles, among other components. This is food that warms the soul as well as the stomach. Each ingredient has significance, including the auspicious jujubes or red dates, believed to bring happiness.

What is the Flavor Profile of This Dish?

Imagine biting into a diverse palette of flavors and textures. Each spoonful brings a balance of savory, slightly sweet, and earthy notes. The shiitake mushrooms provide umami, while the black moss adds a hint of earthiness. The fresh vegetables deliver a crisp contrast to the chewy textures of the dried ingredients.

The dish achieves a delightful depth from the combination of soy sauces and rice wine. Meanwhile, the red fermented bean curd introduces a distinctive savory element, melding harmoniously with toasted sesame oil’s nuttiness. Overall, it’s a flavor journey that evolves in each mouthful.

You will also like the following Side Dishes recipes!

What Makes This Recipe Different from Other Buddha’s Delight Lo Han Jai?

While traditional recipes exist, my approach to Buddha’s Delight embraces accessibility and flavor without compromising authenticity. I use a variety of vegetables that culminate in a rich and satisfying dish. My version draws from personal experience, using fresh ingredients whenever possible while respecting the dish’s roots.

Unlike some recipes that can be overly simplistic or bland, this one features multiple textures and flavors, ensuring a genuine experience that transports you straight to your favorite Chinese restaurant. My tweaks offer you the chance to prepare a restaurant-quality dish right in your kitchen.

Ingredients You’ll Need

For a dish as rich as Buddha’s Delight, selecting the right ingredients is key. Here’s what you’ll need:

Dried Ingredients

  • 12 dried red jujubes (red dates): Sweet and nutritious.
  • 50 g cellophane noodles (1 bundle): For a delightful chewy texture.
  • 10 g dried wood ear mushrooms (black fungus): For a unique crunch.
  • 3 g dried black moss (fat choy): Adds visual appeal and earthy flavor.
  • 10 g dried lily buds (lily flowers): Delicate yet flavorful.
  • 60 g dried shiitake mushrooms (approximately 10–12 pieces): Packed with umami.

Aromatics

  • 3 spring onions (scallions), trimmed: Fresh and mild.
  • 5 cm piece of fresh ginger, sliced: Provides warmth and zest.
  • 2 garlic cloves, smashed: Essential for depth of flavor.

Vegetables

  • 1 medium carrot, peeled and sliced: Sweet and crunchy.
  • ½ small napa cabbage, chopped: Soft and mild.
  • 2 bunches of pak choi, washed and halved: Adds color and crispness.

Braising Liquid

  • 125 ml shiitake mushroom soaking water: Infuses rich flavor.
  • 125 ml lily flower soaking water: Adds another layer of depth.
  • 2 tablespoons Shaoxing rice wine (or substitute with any rice wine, dry sherry, or ½ teaspoon clear vinegar for alcohol-free).
  • ½ teaspoon salt: Enhances all the flavors.
  • 1 teaspoon white sugar: To balance flavors.
  • 2 tablespoons light soy sauce: A classic salty profile.
  • 1 tablespoon dark soy sauce: For color and extra depth.

Remaining Ingredients

  • 3 heaping tablespoons red fermented bean curd: Unique umami flavor.
  • 1 tablespoon toasted sesame oil: Enriches the dish with nuttiness.
  • 1 tablespoon vegetable oil: For cooking.
  • 30 g gingko nuts (or 60 g / 2 oz if preferred): Traditional and adds a nice texture.
  • 100 g fried tofu puffs: Adds protein and heartiness.
  • 1 small dried star anise—added for a subtle aromatic depth.
how to make buddhas delight lo han jai

Step by Step Directions

Crafting Buddha’s Delight Lo Han Jai is an adventure that indulges your senses. Follow these steps for a rewarding cooking experience.

Step 1: Preparing Dried Ingredients

Start by soaking the dried ingredients. In separate bowls, soak the shiitake mushrooms, lily buds, and black moss for about 30 minutes. The wood ear mushrooms should also be soaked until they soften. This has them ready for cooking and enhances their flavors.

Step 2: Preparing Fresh Ingredients

While your dried ingredients are soaking, prep your fresh ones. Chop the napa cabbage, carrot, and pak choi. Slice the ginger and garlic. This will streamline your cooking process.

Step 3: Stir Frying

In a deep wok or large saucepan, heat the vegetable oil over medium heat. Add ginger and garlic, stirring for about a minute until they become fragrant. Toss in the soaked dried ingredients—shiitake mushrooms, wood ear mushrooms, and lily buds—and stir-fry for an additional 3 to 4 minutes.

Step 4: Adding Vegetables

Now, add the chopped napa cabbage and carrot to the pan. Stir frequently until they soften slightly, which should take about 5 minutes. Then, add the pak choi. Keep cooking until everything is well-mixed.

Step 5: Mixing the Braising Liquid

In a separate bowl, mix together the soaking water from the shiitake mushrooms, lily flower, soy sauces, rice wine, sugar, and salt. Pour this mixture over your stir-fried ingredients.

Step 6: Adding Remaining Ingredients

Add the cellophane noodles and stir well to ensure they are covered in the braising liquid. Let it simmer on low heat for about 10-15 minutes. This will allow all the flavors to meld beautifully!

Step 7: Final Touches

Towards the end, fold in the fried tofu puffs, red fermented bean curd, gingko nuts, and sesame oil. Cook for 5 more minutes. You want everything heated through and well-combined.

Step 8: Serve

Serve the Buddha’s Delight over a bed of jasmine rice or on its own. This dish is amazing hot but can also shine the next day as leftovers—if there are any left!

Tips On Making Buddha’s Delight Lo Han Jai

Soak Wisely: Make sure to soak your dried ingredients long enough. This enhances their flavors and textures.
Don’t Rush Cooking: Allow each ingredient to properly soften and absorb flavors during the cooking process.
Balance Flavors: Taste as you go. You may prefer more soy sauce or a hint of sweetness; adjust according to your taste.
Experiment with Vegetables: Feel free to add other vegetables like bell peppers or zucchini. Use what you have on hand!
Use Fresh Ingredients: Fresh vegetables not only enhance flavor but also add vital nutrients.

Nutrition Information

One serving of Buddha’s Delight Lo Han Jai is packed with essential nutrients. Here’s a quick breakdown:

Calories: 210
Protein: 12g
Fat: 8g
Carbohydrates: 29g
Fiber: 6g
Sugar: 5g

These values may vary based on portion size and specific ingredients used but provide a solid overview of the dish’s nutritional profile.

buddhas delight lo han jai copycat

How Can I Store This Buddha’s Delight Lo Han Jai?

If you find yourself with leftovers (which, let’s face it, is always a good thing), store Buddha’s Delight in an airtight container in the refrigerator. It keeps well for about 3-4 days. For longer storage, consider freezing the dish. It will last for about a month in the freezer. Just reheat it on the stovetop, adding a splash of water to bring back some moisture.

Substitute Options

If you’re lacking some ingredients, don’t fret! Here are some substitutes that can save the day:

Cellophane Noodles: If these are hard to find, you can use rice noodles or even thin spaghetti. Just cook them accordingly as they might require different cooking times.
Dried Shiitake Mushrooms: Can’t find them? You can swap them with baby bella mushrooms. They provide a similar flavor profile.
Red Fermented Bean Curd: In a pinch, try using miso paste or soy sauce. Although they won’t mimic the exact flavor, they add a savory touch.
Dried Black Moss: If you can’t find this ingredient, simply omit it or substitute with chopped, fresh greens for texture.

how to make buddhas delight lo han jai

Buddha’s Delight Lo Han Jai

Before diving into the delightful world of Buddha's Delight Lo Han Jai, let's talk about what to serve alongside this intricate dish.
Prep Time 30 minutes
Cook Time 15 minutes
Soaking Time: 30 minutes
Total Time 1 hour 15 minutes
Course Side Dish
Cuisine Chinese
Servings 8
Calories 210 kcal

Equipment

  • saucepan
  • Bowl

Ingredients
  

Dried Ingredients

  • 12 dried red jujubes red dates: Sweet and nutritious.
  • 50 g cellophane noodles 1 bundle: For a delightful chewy texture.
  • 10 g dried wood ear mushrooms black fungus: For a unique crunch.
  • 3 g dried black moss fat choy: Adds visual appeal and earthy flavor.
  • 10 g dried lily buds lily flowers: Delicate yet flavorful.
  • 60 g dried shiitake mushrooms approximately 10–12 pieces: Packed with umami.

Aromatics

  • 3 spring onions scallions, trimmed: Fresh and mild.
  • 5 cm piece of fresh ginger sliced: Provides warmth and zest.
  • 2 garlic cloves smashed: Essential for depth of flavor.

Vegetables

  • 1 medium carrot peeled and sliced: Sweet and crunchy.
  • ½ small napa cabbage chopped: Soft and mild.
  • 2 bunches of pak choi washed and halved: Adds color and crispness.

Braising Liquid

  • 125 ml shiitake mushroom soaking water: Infuses rich flavor.
  • 125 ml lily flower soaking water: Adds another layer of depth.
  • 2 tablespoons Shaoxing rice wine or substitute with any rice wine, dry sherry, or ½ teaspoon clear vinegar for alcohol-free.
  • ½ teaspoon salt: Enhances all the flavors.
  • 1 teaspoon white sugar: To balance flavors.
  • 2 tablespoons light soy sauce: A classic salty profile.
  • 1 tablespoon dark soy sauce: For color and extra depth.

Remaining Ingredients

  • 3 heaping tablespoons red fermented bean curd: Unique umami flavor.
  • 1 tablespoon toasted sesame oil: Enriches the dish with nuttiness.
  • 1 tablespoon vegetable oil: For cooking.
  • 30 g gingko nuts or 60 g / 2 oz if preferred: Traditional and adds a nice texture.
  • 100 g fried tofu puffs: Adds protein and heartiness.
  • 1 small dried star anise—added for a subtle aromatic depth.

Instructions
 

Step 1: Preparing Dried Ingredients

  • Start by soaking the dried ingredients. In separate bowls, soak the shiitake mushrooms, lily buds, and black moss for about 30 minutes. The wood ear mushrooms should also be soaked until they soften. This has them ready for cooking and enhances their flavors.

Step 2: Preparing Fresh Ingredients

  • While your dried ingredients are soaking, prep your fresh ones. Chop the napa cabbage, carrot, and pak choi. Slice the ginger and garlic. This will streamline your cooking process.

Step 3: Stir Frying

  • In a deep wok or large saucepan, heat the vegetable oil over medium heat. Add ginger and garlic, stirring for about a minute until they become fragrant. Toss in the soaked dried ingredients—shiitake mushrooms, wood ear mushrooms, and lily buds—and stir-fry for an additional 3 to 4 minutes.

Step 4: Adding Vegetables

  • Now, add the chopped napa cabbage and carrot to the pan. Stir frequently until they soften slightly, which should take about 5 minutes. Then, add the pak choi. Keep cooking until everything is well-mixed.

Step 5: Mixing the Braising Liquid

  • In a separate bowl, mix together the soaking water from the shiitake mushrooms, lily flower, soy sauces, rice wine, sugar, and salt. Pour this mixture over your stir-fried ingredients.

Step 6: Adding Remaining Ingredients

  • Add the cellophane noodles and stir well to ensure they are covered in the braising liquid. Let it simmer on low heat for about 10-15 minutes. This will allow all the flavors to meld beautifully!

Step 7: Final Touches

  • Towards the end, fold in the fried tofu puffs, red fermented bean curd, gingko nuts, and sesame oil. Cook for 5 more minutes. You want everything heated through and well-combined.

Step 8: Serve

  • Serve the Buddha’s Delight over a bed of jasmine rice or on its own. This dish is amazing hot but can also shine the next day as leftovers—if there are any left!

Notes

  • Soak Wisely: Make sure to soak your dried ingredients long enough. This enhances their flavors and textures.
  • Don’t Rush Cooking: Allow each ingredient to properly soften and absorb flavors during the cooking process.
  • Balance Flavors: Taste as you go. You may prefer more soy sauce or a hint of sweetness; adjust according to your taste.
  • Experiment with Vegetables: Feel free to add other vegetables like bell peppers or zucchini. Use what you have on hand!
  • Use Fresh Ingredients: Fresh vegetables not only enhance flavor but also add vital nutrients.

Nutrition

Calories: 210kcalCarbohydrates: 29gProtein: 12gFiber: 6gSugar: 5g
Keyword Buddha’s Delight Lo Han Jai
Tried this recipe?Let us know how it was!

Frequently Asked Questions

1. Can I add meat to Buddha’s Delight?

Yes, feel free to add proteins like chicken or shrimp if you wish. Just cook them first and set aside when preparing the dish. Add them back in once the veggies are tender.

2. Is this dish vegan?

Absolutely! All ingredients in this version are plant-based. It’s suitable for those following a vegan diet.

3. Can I make this dish gluten-free?

Yes, simply use gluten-free soy sauce or tamari when preparing the dish. Cellophane noodles are usually gluten-free, so you’re in luck!

4. What’s the best way to prepare leftovers?

Reheat leftovers in a pan or microwave, adding a splash of water or broth. This helps retain moisture and prevents drying out.

5. Is Buddha’s Delight healthy?

Certainly! This dish features plenty of vegetables, plant-based proteins, and minimal oil, making it a healthy option compared to many other dishes.

Conclusion

Buddha’s Delight Lo Han Jai represents harmony on a plate. With each ingredient playing a pivotal role, this dish tells a story of tradition, health, and flavor. The textures and layers create more than just a meal; they craft an experience worth sharing.

As you venture into making this dish, remember that cooking is about joy and exploration. Don’t hesitate to experiment—after all, that’s how the best recipes come to life. I hope this guide empowers you not just to recreate Buddha’s Delight but to cultivate an appreciation for the simplicity and richness it offers. Here’s to making lasting memories around the dinner table, one delightful bite at a time!

You’ll also like these latest recipes!

Soy Butter Glazed King Oyster Mushrooms – Culinary Chase

Soy Butter Glazed King Oyster Mushrooms – Culinary Chase

Before diving into the savory world of soy butter glazed king oyster mushrooms, let’s talk about what pairs harmoniously with this dish. These mushrooms shine as a main attraction, but let’s not forget about their supporting cast. – Rice: A fluffy mound of jasmine rice