How To Make Katsudon – Culinary Chase
Before diving deep into the art of making katsudon, let’s talk about what you can pair with this delicious dish. Katsudon is a versatile meal that thrives when complemented by a few side dishes. Try serving it alongside:
- Miso Soup: A warm bowl of miso soup balances the meal effortlessly. Its umami flavors fit the deep richness of katsudon.
- Pickled Vegetables: These add a nice crunch and acidity to counter the dish’s richness. Think pickled daikon or cucumber.
- Steamed Edamame: A side of edamame provides a nutritious protein boost. Sprinkle a bit of sea salt on those green pods for added flavor.
- Japanese Salad: A simple salad with greens, sesame dressing, and maybe some seaweed can brighten up the plate.
- Sake or Green Tea: Enjoy a glass of cold sake or a steaming cup of green tea. It sets a lovely mood and helps soothe your palate after each bite.

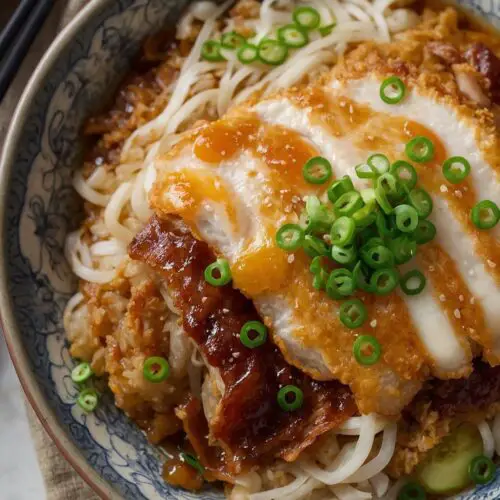
Katsudon, a beloved Japanese dish, is like a warm hug on your dinner table. It features tender, breaded pork cutlets sitting delicately atop a bowl of fluffy steamed rice, all brought together with scrambled eggs and a savory sauce. This dish isn’t just a meal; it’s an engaging experience.
I vividly remember the first time I tried katsudon. I was in a small izakaya, the air filled with sizzling sounds and the scent of soy sauce and panko. One bite, and I felt I had uncovered something truly special. Now, I’ll walk you through the steps to create this comforting bowl at home.
What Is Katsudon?
Katsudon, which translates to “cutlet bowl,” combines two staples: katsu (breaded and fried cutlet) and donburi (a rice bowl). Originating in Japan, this dish traditionally uses pork cutlets, but it’s become more flexible, welcoming chicken and even vegetarian options in recent years.
The crispy texture of the katsu paired with the rich, savory-sweet sauce finds harmony in every bite. It’s a dish that not only fills your stomach but also warms your spirit.
What Makes This Recipe Different From Other Katsudon Recipes?
In this recipe, I aim for authenticity while incorporating some personal twists. Using high-quality ingredients is paramount. The use of both dashi and mirin is a must for a flavorful sauce.
This recipe steps away from overcomplicated techniques. My goal is to create a katsudon that anyone can make, regardless of culinary skill level. You won’t need any special equipment—just a sturdy pan, some basic ingredients, and a love for good food.
You will also like the following Lunch and Dinner recipes!
How Does It Taste?
Katsudon delivers a delightful combination of tastes. The pork cutlet provides a satisfying crunch with an irresistible golden-brown crust. Then, the umami-rich sauce seeps into the fluffy rice, creating a melody of flavors.
Topped with fluffy scrambled eggs, each bite is comforting and hearty. You’ll experience sweetness from the mirin, depth from the dashi, and a slight savoriness from the soy. Honestly, it’s like a treat for your senses.
Ingredients You’ll Need To Make This Dish
1 tablespoon sesame oil
1 medium yellow onion, thinly sliced
1 fresh scallion, chopped finely
2 servings of steamed jasmine rice
2 boneless pork chops, center-cut, flattened to about 1 cm thick
Salt and freshly ground black pepper
All-purpose flour, for dusting
1 large egg, lightly beaten
2 large eggs, beaten
1 cup Japanese panko breadcrumbs
Vegetable oil, for frying
1/2 cup dashi broth
2 teaspoons brown sugar
1 tablespoon tamari or regular soy sauce
2 teaspoons sweet Mirin

Step by Step Instructions
Now, let’s get cooking! Here’s how to create that perfect katsudon, step by step.
Step 1: Prepare the Ingredients
Start by prepping your ingredients. Slice the onion and scallion. Flatten your pork chops to ensure even cooking. Make sure you have everything ready to go—it makes the cooking process smoother.
Step 2: Bread the Pork Chops
- Season each pork chop with salt and pepper on both sides.
- Next, dust them lightly with flour to create a base for the egg wash.
- Dip the chops into the beaten egg, letting any excess drip off.
- Finally, coat them with panko breadcrumbs. Press gently to ensure the breadcrumbs adhere well.
Step 3: Fry the Pork Chops
- Heat a generous amount of vegetable oil in a frying pan over medium heat.
- Once hot, add the coated pork chops. Cook until golden brown, typically about 4-5 minutes on each side. You want a crispy outer layer.
- After cooking, transfer the pork to a plate lined with paper towels to drain excess oil.
Step 4: Prepare the Sauce
- In the same pan, add sesame oil over medium heat. Toss in the sliced onions. Saute until they soften and turn translucent.
- Pour in the dashi broth, soy sauce, and add the brown sugar. Stir until the sugar dissolves. Allow it to simmer for about 3 minutes to meld the flavors.
Step 5: Add the Eggs
- Pour the beaten eggs into the sauce and gently swirl the mixture.
- Once the eggs are about halfway cooked, place the fried pork chops on top. Cover the pan with a lid, allowing the residual heat to fully cook the eggs. This should take 2-3 minutes.
Step 6: Assemble Your Katsudon
- Serve by spooning steamed rice into bowls. Top each bowl with the pork, the egg mixture, and a sprinkle of chopped scallions.
Step 7: Enjoy Your Creation
Finally, tuck in and savor your homemade katsudon! Take a moment to appreciate each component.
Tips & Tricks On Making Katsudon
Here are some insights gathered over my adventures in the kitchen:
- Use Fresh Ingredients: Always select the freshest pork chops and vegetables. The taste difference is real.
- Choice of Oil Matters: Consider using a blend of oils for frying, like canola and sesame. It gives a nice flavor.
- Perfect the Frying Temperature: Keep an eye on the temperature. Too hot, and the outside burns before the inside cooks; too low, and it can turn soggy.
- Make Extra Sauce: If you like a saucier katsudon, whip up extra sauce. You can always add more if desired.
- Experiment with Toppings: Try adding some furikake or even sliced avocado for an extra splash of flavor and texture.
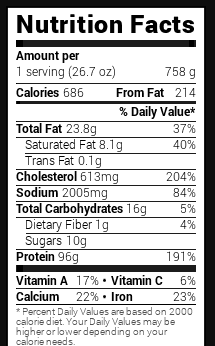
Nutrition Information
How To Make Katsudon Nutrition Facts
How Do I Store This Dish?
To store leftover katsudon, cool it down completely and transfer it to an airtight container. Refrigerate for up to 2 days. The rice may lose some texture over time, but reheating gently can bring it back to life.

What Other Substitutes Can You Use in Katsudon?
Feel free to get creative with your katsudon! Here are a few tasty alternatives:
- Chicken Cutlet: Swap pork for chicken thighs or breasts. Season and cook the same way for a lighter version.
- Tofu: For a vegetarian take, use firm tofu. Coat and fry it as you would the pork for a crispy, meat-free option.
- Eggplant: Slice and bread eggplant for a unique twist. It absorbs flavors beautifully.
- Tempeh: This nutritional powerhouse can stand in for meat in a plant-based version.
- Quinoa Rice: If you want to up the health factor, use quinoa instead of rice. It adds a nutty flavor and boosts protein content.
How To Make Katsudon
Equipment
- Frying pan
Ingredients
- 1 tablespoon sesame oil
- 1 medium yellow onion thinly sliced
- 1 fresh scallion chopped finely
- 2 servings of steamed jasmine rice
- 2 boneless pork chops center-cut, flattened to about 1 cm thick
- Salt and freshly ground black pepper
- All-purpose flour for dusting
- 1 large egg lightly beaten
- 2 large eggs beaten
- 1 cup Japanese panko breadcrumbs
- Vegetable oil for frying
- 1/2 cup dashi broth
- 2 teaspoons brown sugar
- 1 tablespoon tamari or regular soy sauce
- 2 teaspoons sweet Mirin
Instructions
Step 1: Prepare the Ingredients
- Start by prepping your ingredients. Slice the onion and scallion. Flatten your pork chops to ensure even cooking. Make sure you have everything ready to go—it makes the cooking process smoother.
Step 2: Bread the Pork Chops
- Season each pork chop with salt and pepper on both sides.
- Next, dust them lightly with flour to create a base for the egg wash.
- Dip the chops into the beaten egg, letting any excess drip off.
- Finally, coat them with panko breadcrumbs. Press gently to ensure the breadcrumbs adhere well.
Step 3: Fry the Pork Chops
- Heat a generous amount of vegetable oil in a frying pan over medium heat.
- Once hot, add the coated pork chops. Cook until golden brown, typically about 4-5 minutes on each side. You want a crispy outer layer.
- After cooking, transfer the pork to a plate lined with paper towels to drain excess oil.
Step 4: Prepare the Sauce
- In the same pan, add sesame oil over medium heat. Toss in the sliced onions. Saute until they soften and turn translucent.
- Pour in the dashi broth, soy sauce, and add the brown sugar. Stir until the sugar dissolves. Allow it to simmer for about 3 minutes to meld the flavors.
Step 5: Add the Eggs
- Pour the beaten eggs into the sauce and gently swirl the mixture.
- Once the eggs are about halfway cooked, place the fried pork chops on top. Cover the pan with a lid, allowing the residual heat to fully cook the eggs. This should take 2-3 minutes.
Step 6: Assemble Your Katsudon
- Serve by spooning steamed rice into bowls. Top each bowl with the pork, the egg mixture, and a sprinkle of chopped scallions.
Step 7: Enjoy Your Creation
- Finally, tuck in and savor your homemade katsudon! Take a moment to appreciate each component.
Notes
- Use Fresh Ingredients: Always select the freshest pork chops and vegetables. The taste difference is real.
- Choice of Oil Matters: Consider using a blend of oils for frying, like canola and sesame. It gives a nice flavor.
- Perfect the Frying Temperature: Keep an eye on the temperature. Too hot, and the outside burns before the inside cooks; too low, and it can turn soggy.
- Make Extra Sauce: If you like a saucier katsudon, whip up extra sauce. You can always add more if desired.
- Experiment with Toppings: Try adding some furikake or even sliced avocado for an extra splash of flavor and texture.
Nutrition
Frequently Asked Questions
1. Can katsudon be frozen?
Yes, you can freeze katsudon. It’s best to freeze the components separately to maintain texture. Keep rice and katsu in different containers.
2. How do I make katsudon gluten-free?
Using gluten-free flour and panko breadcrumbs, as well as tamari instead of regular soy sauce, will keep the dish gluten-free.
3. Can I add vegetables to katsudon?
Absolutely! Consider adding thinly sliced carrots, green beans, or even spinach. Just sauté them in the pan before adding the sauce.
4. What should I serve with katsudon?
Try miso soup, pickled vegetables, or even a refreshing salad to create a balanced meal.
5. Can I make katsudon in advance?
It’s best enjoyed fresh, but you can prep components ahead. Just reheat when ready to serve.
Conclusion
Cooking katsudon is a rewarding journey that connects you to the heart of Japanese cuisine. With the detailed steps I’ve shared, you can confidently create this flavorful masterpiece in your own kitchen. Whether you mix in additional ingredients or stick to tradition, each bowl of katsudon brings warmth and happiness.
Don’t forget to share it with family and friends; good food is always better when savored together. Get ready to impress everyone at your next dinner gathering, and enjoy every comforting bite!