How To Make Chili Oil At Home – Culinary Chase
Chili oil is one of those magical concoctions that can elevate even the simplest of dishes, bringing them to life with a spicy kick. It’s certainly a favorite of mine, especially when drizzled over dumplings, noodles, or roasted vegetables.
The beautiful thing about chili oil is its versatility—use it as a condiment, cooking oil, or even a marinade. It pairs beautifully with dishes like stir-fried vegetables, dumplings, savory pancakes, and even salads. Seriously, can you think of anything that wouldn’t taste better with a touch of heat?

Today, we’re diving into the art of making chili oil at home. As a registered dietitian and food enthusiast, I’ve experimented with flavors for years. There’s something satisfying about crafting your own ingredients. Making chili oil at home is not just easy but also a way to personalize the heat to your liking.
When I first started making chili oil, I was taken aback by how simple it was. You don’t need to be a culinary expert or possess any special skills. It’s all about knowing your ingredients and having a few tools on hand.
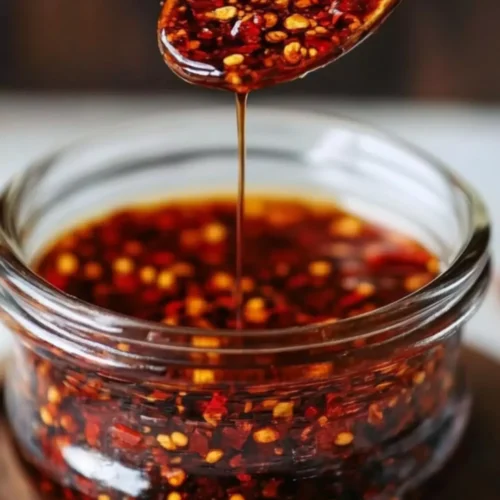
Trust me, once you make your batch, you’ll want to bottle it and gift it to everyone you know. So, let’s get started!
You will also like the following Sauce recipes!
- Best Qdoba Chipotle Barbecue Sauce Recipe
- How to make Qdoba Ancho Chile Bbq Sauce
- Easy Qdoba Ranchero Sauce Recipe
What is Chili Oil and How to Make It at Home?
Chili oil is an infused oil that carries the heat and flavor of dried chilies. Commonly found in Asian cuisines, this homemade version allows you to adjust the spiciness according to your preference.
The process is rewarding, and you’ll end up with a delicious oil for various dishes.
Why Does This Recipe Work?
Here are four solid reasons why you’ll love making chili oil at home:
- Personalized Heat Level: You control the spice! Start with mild chili flakes and progressively work your way up to the hottest varieties. When I first made my chili oil, I wished for something milder. Adjusting the chili flakes made all the difference in my next batch.
- Quality Control: You know exactly what goes into your oil. Opt for high-quality ingredients and avoid any preservatives. Once, I went for a store-bought version, and the flavor just didn’t compare. My oil was fresher, with taste and depth that store-bought couldn’t match.
- Fresh Ingredients: Homemade chili oil has a palette of flavors that can only come from fresh ingredients. Dried chilies, aromatic spices, and herbal notes combined create a fragrant oil. I remember that first whiff—smoky, slightly sweet, and oh-so-delicious.
- Easy Storage: You can keep it for use later on! Chili oil stores exceptionally well in a dark bottle. It gets better as it ages, which makes it perfect for meal prep. What’s better than having a jar ready for those last-minute cooking needs?
Ingredients You’ll Need To Make Chili Oil at Home
You’ll need the following ingredients to whip up this fiery delight:
- 1½–3 cups neutral oil (like canola or vegetable oil for frying)
- 3 tablespoons Sichuan peppercorns
- ¾ to 1¼ cup Sichuan chili flakes
- 5 whole star anise
- 1 cinnamon stick (preferably cassia cinnamon)
- 2 dried bay leaves
- 2 black cardamom pods (optional)
- 2 teaspoons whole cloves (optional)
- 1–2 shallots (optional – halved)
- 3 garlic cloves (optional – crushed)
- 1 tablespoon ginger slices (adds a certain warmth)
- 4 small pieces dried sand ginger (optional)
- 1–2 teaspoons sea salt (to taste)
- 1 teaspoon fennel seeds (adds subtle sweetness)

How To Make Chili Oil
Let me walk you through the steps! Making chili oil is as enjoyable as it is easy. Just follow these clear instructions.
Step 1: Gather Materials
Before diving in, gather all your ingredients and tools. You’ll need a heavy-bottomed pot, a heat-resistant bottle or jar for storage, and a fine-mesh sieve or cheesecloth for straining.
Step 2: Heat the Oil
In your heavy-bottomed pot, pour in the neutral oil and heat it over a medium flame. Use enough oil to submerge the ingredients. You’ll want it hot but not smoking—about 300°F (150°C). If you don’t have a thermometer, just watch for small bubbles as it warms up.
Step 3: Toast the Spices
Once the oil is hot, add the Sichuan peppercorns, star anise, bay leaves, and the other whole spices. Let the spices gently sizzle and infuse the oil. Keep it on low heat for about 5–10 minutes. Be careful not to burn them! The aroma will begin to fill your kitchen.
Step 4: Add Chili Flakes and Aromatics
After the spices have toasted, turn off the heat. Stir in the Sichuan chili flakes. This is where the heat truly develops. If you’re adding shallots, garlic, or ginger, toss them in at this point. They’ll steep and release their flavors and aromas. Let everything steep for about 10–15 minutes.
Step 5: Strain and Store
After steeping, strain the chili oil through a fine-mesh sieve or cheesecloth into your clean bottle or jar. Discard the solid spices, and let the oil cool down to room temperature. Seal the jar and store it in a cool, dark place.
Tips for Making Perfect Chili Oil
Here are some tips to ensure your chili oil turns out just right:
- Quality of Ingredients: Opt for high-quality dried chilies and whole spices. The better the quality, the tastier the oil.
- Adjusting Spice Level: If you’re unsure about the spice level, start with less chili and gradually increase as needed.
- Avoid Overheating: Do not let the oil smoke. If it starts to smoke, it will impart a burnt flavor to your oil.
- Customize Flavors: Feel free to add herbs or other aromatics based on your taste. Have fun experimenting!
- Storage Matters: Always store your chili oil in a dark bottle. Light can degrade the flavor and quality over time.

How to Store Leftovers
Chili oil can be stored in your pantry. Just make sure to keep it in an airtight container. It should last for 2–3 months, though the flavors will probably develop over time.
You might find that the spiciness intensifies. Keep an eye (and nose) on it, and toss it if you ever detect any off smells.
Recommended Side Dishes for Chili Oil
Here are some amazing dishes to pair your homemade chili oil with:
- Steamed Dumplings: Almost a match made in heaven, the chili oil provides a flavorful dip for dumplings.
- Noodle Dishes: Whether it’s ramen or soba, a drizzle of chili oil will kick it up a notch.
- Roasted Vegetables: Toss veggies like asparagus or broccoli in chili oil before roasting. The heat caramelizes beautifully.
- Savory Pancakes: Add chili oil to the batter or serve it as a condiment with savory pancakes. Those pancakes will be incredibly satisfying.
Substitute Options for Ingredients
If you find yourself missing some ingredients, don’t fret! Here are some substitutes:
- Neutral Oil: Canola or sunflower oil works if you don’t have neutral oil. Olive oil also works but will impart its own flavor.
- Sichuan Peppercorns: In a pinch, use regular black pepper or a blend of black and white peppercorns.
- Chili Flakes: If you can’t find Sichuan chili flakes, crushed red pepper flakes are a reasonable alternative.
- Whole Spices: If you lack specific whole spices, like star anise or fennel seeds, consider omitting them or using what you have on hand.
How To Make Chili Oil At Home
Equipment
- heavy bottom pot
Ingredients
- 1½-3 cups neutral oil 350-700 ml
- 3 tablespoons Sichuan peppercorns
- ¾-1 1/4 cup Sichuan chili flakes 65-110g
- 5 whole star anise
- 1 cinnamon stick preferably cassia cinnamon
- 2 dried bay leaves
- 2 black cardamom pods optional
- 2 teaspoons whole cloves optional
- 1-2 shallots optional – halved
- 3 garlic cloves optional – crushed
- 1 tablespoon ginger slices adds a bit of fresh warmth
- 4 small pieces dried sand ginger optional – about 1 tablespoon
- 1-2 teaspoons sea salt to taste
- 1 teaspoon fennel seeds adds a subtle sweet note
Instructions
- Let me walk you through the steps! Making chili oil is as enjoyable as it is easy. Just follow these clear instructions.
Step 1: Gather Materials
- Before diving in, gather all your ingredients and tools. You’ll need a heavy-bottomed pot, a heat-resistant bottle or jar for storage, and a fine-mesh sieve or cheesecloth for straining.
Step 2: Heat the Oil
- In your heavy-bottomed pot, pour in the neutral oil and heat it over a medium flame. Use enough oil to submerge the ingredients. You’ll want it hot but not smoking—about 300°F (150°C). If you don’t have a thermometer, just watch for small bubbles as it warms up.
Step 3: Toast the Spices
- Once the oil is hot, add the Sichuan peppercorns, star anise, bay leaves, and the other whole spices. Let the spices gently sizzle and infuse the oil. Keep it on low heat for about 5–10 minutes. Be careful not to burn them! The aroma will begin to fill your kitchen.
Step 4: Add Chili Flakes and Aromatics
- After the spices have toasted, turn off the heat. Stir in the Sichuan chili flakes. This is where the heat truly develops. If you’re adding shallots, garlic, or ginger, toss them in at this point. They’ll steep and release their flavors and aromas. Let everything steep for about 10–15 minutes.
Step 5: Strain and Store
- After steeping, strain the chili oil through a fine-mesh sieve or cheesecloth into your clean bottle or jar. Discard the solid spices, and let the oil cool down to room temperature. Seal the jar and store it in a cool, dark place.
Notes
- Quality of Ingredients: Opt for high-quality dried chilies and whole spices. The better the quality, the tastier the oil.
- Adjusting Spice Level: If you’re unsure about the spice level, start with less chili and gradually increase as needed.
- Avoid Overheating: Do not let the oil smoke. If it starts to smoke, it will impart a burnt flavor to your oil.
- Customize Flavors: Feel free to add herbs or other aromatics based on your taste. Have fun experimenting!
- Storage Matters: Always store your chili oil in a dark bottle. Light can degrade the flavor and quality over time.
Nutrition
Frequently Asked Questions
Can I use fresh chilies instead of dried?
Yes, you can use fresh chilies to infuse oil, but the process is different. Fresh chilies require proper drying to avoid introducing moisture.
Is chili oil healthy?
While it contributes healthy fat from the oil, it should be used sparingly. Enjoy the flavors without overdoing calorie intake.
Can I add other spices or flavors?
Absolutely! Experiment with different herbs and spices to find combinations that suit your taste. Garlic or lemongrass can add unique notes.
How can I make it less spicy?
Simply use fewer chili flakes or opt for milder varieties. You could even add sugar to balance the heat if needed.
Does chili oil go bad?
Like other oils, chili oil can go rancid if exposed to heat, light, or air. Store it properly, and it should last for several months.
Conclusion
Crafting your own chili oil is an exciting journey into flavor. It’s a practical project that pays off in droves, enriching your meals with a personal touch. I believe that once you start making your own, you’ll never want to go back to store-bought versions.
Each batch can bring a different experience, and the joy of sharing with friends and family? Simply priceless. So grab those ingredients, and let’s get cooking! Remember, the right oil can transform your dishes from mundane to magnificent. Happy cooking!