Filo Pizza Recipe – Culinary Chase
Whenever friends gather at my place, the atmosphere buzzes with laughter, chatter, and good food. Nothing complements a lively night better than a slice of crispy Filo Pizza paired with a fresh garden salad or even a pasta dish.
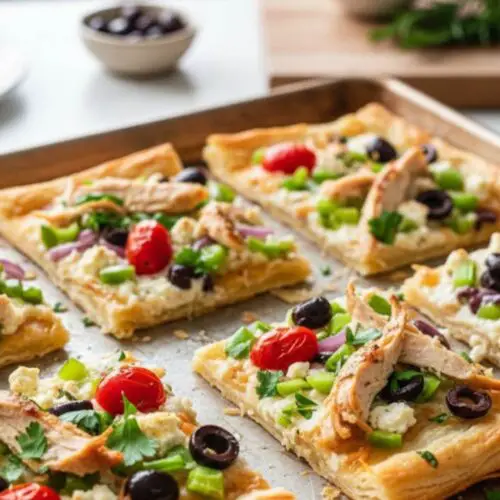
Picture yourself munching on these golden, flaky squares while sipping on your favorite drink. It’s the kind of dish that brings everyone together, and trust me, it doesn’t just look great; it tastes fantastic too!

Filo Pizza is a delightful twist on the traditional pizza we know and love. Instead of your standard dough, this recipe uses thin sheets of phyllo pastry, creating an airy, crisp texture that balances perfectly with all your favorite toppings.
Add a little crunch from veggies, luscious cheese, and perhaps some tender chicken, and you’ve got yourself a dish that screams for a spot at any gathering.
You Might Like These Recipes!
What is Filo Pizza Recipe?
At its core, Filo Pizza is a creative take on the classic pizza using phyllo dough. This pastry isn’t just for sweet desserts; it shines in savory dishes too. By layering the phyllo sheets and filling them with fresh ingredients, you create a light yet satisfying alternative that will impress both guests and family alike. It’s an easy, make-ahead option that’s perfect for potlucks or busy weeknights.
Why This Recipe Works?
The magic lies in the texture and flavor. Phyllo dough bakes up delightfully crispy, allowing it to hold all those tasty toppings without being overwhelming. Plus, using ingredients like fresh vegetables, quality cheeses, and even a sprinkle of olives brings a dynamic range of flavors to your plate. This dish is perfect for customization; whether you’re vegetarian or a carnivore, there’s something for everyone here.
Ingredients You’ll Need To Make This Filo Pizza Recipe

To get started, here’s what you’ll need:
– 12 sheets of thawed phyllo pastry
– 1 to 2 cups of shredded mozzarella cheese
– 1/4 cup feta cheese, crumbled
– 1 cup grape or cherry tomatoes, sliced in half
– 1 green bell pepper, chopped, cleaned and dried
– 1/2 red onion, finely chopped
– 1/4 cup Kalamata olives, pitted and chopped
– 1 cup shredded rotisserie chicken (optional)
– 1/2 cup fresh parsley, finely chopped
– 1/4 cup extra virgin olive oil
– Kosher salt and freshly cracked black pepper to taste
– A pinch of crushed red pepper flakes (optional)
– 1/4 cup diced zucchini or yellow squash for extra flavor
– 1 tsp Italian seasoning for a fragrant kick
Ingredients From : themediterraneandish.com
How to Make Filo Pizza Recipe?
Let’s roll up our sleeves and get to the good part. Making Filo Pizza is simple and straightforward, perfect for novice cooks and seasoned pros alike. Here’s how to create this delicious dish!
Step-by-step Directions
Step 1: Preheat the Oven

Start by preheating your oven to 375°F (190°C). A good hot oven will help achieve that crunchy texture we all adore in a good pizza. It’s the best way to ensure we get that golden brown result at the end.
Step 2: Prepare Your Baking Pan

Next, grab a baking sheet and give it a light brushing with extra virgin olive oil. This will prevent sticking and impart a little flavor right from the get-go.
Step 3: Lay Down Phyllo Sheets

Now for the fun part! Lay down three sheets of phyllo pastry in the prepared baking pan. Brush the top of each layer generously with olive oil. Repeat this with three more sheets, creating a solid base; you should now have six sheets layered.
Step 4: Add Cheese

Sprinkle half of the shredded mozzarella over the phyllo base. Follow this with a light scatter of crumbled feta cheese. This cheesy layer adds a creamy texture that counterbalances the crisp phyllo.
Step 5: Continue Layering

Keep layering! Add another three phyllo sheets on top, brushing each one with olive oil as before. Once you’ve utilized all your phyllo, you’ll have a beautifully stacked foundation.
Step 6: Top with Cheese

Coat the very top sheet with olive oil once more. Throw on the remaining mozzarella and feta cheeses. This extra layer on top guarantees a cheesy, melty finish.
Step 7: Add Veggies and Toppings
Now it’s time to add your veggies! Evenly distribute the cherry tomatoes, chopped bell pepper, red onion, Kalamata olives, and shredded chicken (if using) over the cheese. Sprinkle over the fresh parsley and any additional seasonings, ensuring every bite has a burst of flavor.
Step 8: Cut It Up
Take a sharp knife and carefully slice the assembled pizza into three-inch squares. This will make serving a breeze once it’s baked. You should end up with a delicious grid of 12 squares.
Step 9: Bake
Slide the baking sheet onto the middle rack of your preheated oven. Bake for 15 to 20 minutes, or until the edges of the phyllo are golden brown and crispy. Your kitchen will smell divine!
Step 10: Serve and Enjoy!
Once it’s out of the oven, let it cool for a moment before serving. These squares are best enjoyed warm and fresh, but they can still be a hit when served at room temperature.
Tips
– Work Quickly with Phyllo: Phyllo dough dries out quickly, so keep the unused sheets covered with a damp cloth.
– Make It Ahead: This dish can be prepped in advance. Just assemble the ingredients and bake when you need it.
– Experiment with Toppings: Feel free to mix in your favorite veggies or proteins. Spinach, artichokes, or assorted cheeses would work wonderfully too!
– Presentation Matters: Serve with a side of marinara sauce or a drizzle of balsamic glaze for an elegant touch.
– Cutting Technique: Use a sharp knife to cut through the layers cleanly without tearing the phyllo.
How to Store the Leftovers?
If you happen to have any leftovers (which I highly doubt!), let the Filo Pizza cool completely. Then, store it in an airtight container in the fridge. It should keep well for up to three days. To reheat, pop it back in the oven at 350°F (about 175°C) for a few minutes, just until it warms through and the edges regain that lovely crunch.
What are some Recommended Side Dishes for Filo Pizza Recipe?
– Garden Salad: A fresh mixed greens salad dressed in a light vinaigrette offers a crisp contrast.
– Roasted Vegetables: Seasonal veggies roasted with olive oil and herbs complement the pizza’s flavors.
– Pasta Salad: A chilled pasta salad provides a nice textural change and heartiness.
– Caprese Skewers: These are fun, fresh, and easy to eat – just stack cherry tomatoes and mozzarella on toothpicks and drizzle with balsamic glaze.
– Tzatziki Sauce: A cool yogurt-based dip pairs beautifully for those who love a creamy accompaniment.
If the Items are Not Available in Your Pantry, What are Some Substitute Options for the Ingredients?
– Mozzarella Cheese: Try using provolone or gouda for a different cheesy flavor.
– Feta Cheese: Crumbled goat cheese works just as well and adds a tangy note.
– Kalamata Olives: Green olives can substitute nicely in a pinch.
– Rotisserie Chicken: Leftover turkey or even chickpeas for a vegetarian option can increase the protein content.
– Phyllo Dough: If you can’t find phyllo, consider using puff pastry, though it will yield a different texture.
Filo Pizza Recipe
Equipment
- Baking sheet
- pastry brush
- sharp knife
- Mixing bowl
Ingredients
- To get started here’s what you’ll need:
- – 12 sheets of thawed phyllo pastry
- – 1 to 2 cups of shredded mozzarella cheese
- – 1/4 cup feta cheese crumbled
- – 1 cup grape or cherry tomatoes sliced in half
- – 1 green bell pepper chopped, cleaned and dried
- – 1/2 red onion finely chopped
- – 1/4 cup Kalamata olives pitted and chopped
- – 1 cup shredded rotisserie chicken optional
- – 1/2 cup fresh parsley finely chopped
- – 1/4 cup extra virgin olive oil
- – Kosher salt and freshly cracked black pepper to taste
- – A pinch of crushed red pepper flakes optional
- – 1/4 cup diced zucchini or yellow squash for extra flavor
- – 1 tsp Italian seasoning for a fragrant kick
Instructions
Step 1: Preheat the Oven
- Start by preheating your oven to 375°F (190°C). A good hot oven will help achieve that crunchy texture we all adore in a good pizza. It’s the best way to ensure we get that golden brown result at the end.
Step 2: Prepare Your Baking Pan
- Next, grab a baking sheet and give it a light brushing with extra virgin olive oil. This will prevent sticking and impart a little flavor right from the get-go.
Step 3: Lay Down Phyllo Sheets
- Now for the fun part! Lay down three sheets of phyllo pastry in the prepared baking pan. Brush the top of each layer generously with olive oil. Repeat this with three more sheets, creating a solid base; you should now have six sheets layered.
Step 4: Add Cheese
- Sprinkle half of the shredded mozzarella over the phyllo base. Follow this with a light scatter of crumbled feta cheese. This cheesy layer adds a creamy texture that counterbalances the crisp phyllo.
Step 5: Continue Layering
- Keep layering! Add another three phyllo sheets on top, brushing each one with olive oil as before. Once you’ve utilized all your phyllo, you’ll have a beautifully stacked foundation.
Step 6: Top with Cheese
- Coat the very top sheet with olive oil once more. Throw on the remaining mozzarella and feta cheeses. This extra layer on top guarantees a cheesy, melty finish.
Step 7: Add Veggies and Toppings
- Now it’s time to add your veggies! Evenly distribute the cherry tomatoes, chopped bell pepper, red onion, Kalamata olives, and shredded chicken (if using) over the cheese. Sprinkle over the fresh parsley and any additional seasonings, ensuring every bite has a burst of flavor.
Step 8: Cut It Up
- Take a sharp knife and carefully slice the assembled pizza into three-inch squares. This will make serving a breeze once it’s baked. You should end up with a delicious grid of 12 squares.
Step 9: Bake
- Slide the baking sheet onto the middle rack of your preheated oven. Bake for 15 to 20 minutes, or until the edges of the phyllo are golden brown and crispy. Your kitchen will smell divine!
Step 10: Serve and Enjoy!
- Once it’s out of the oven, let it cool for a moment before serving. These squares are best enjoyed warm and fresh, but they can still be a hit when served at room temperature.
Notes
Nutrition
FAQs
1. Can Filo Pizza be made ahead of time?
Absolutely! You can assemble it the day before and store it in the fridge. Just bake when you’re ready to serve.
2. Is this recipe gluten-free?
Not as it stands, but you can use gluten-free phyllo pastry to make it suitable for gluten-sensitive friends.
3. Can I freeze Filo Pizza?
Yes, you can freeze it before baking. Just wrap it tightly and pop it in the freezer for up to two months. Thaw before baking.
4. Are there other cheese options I can use?
Certainly! Try using ricotta for creaminess or a blend of your favorite cheeses to suit your taste.
5. How do I prevent the phyllo from getting soggy?
Layering the phyllo with ingredients properly and ensuring you bake it until crispy helps. Using fresh ingredients also helps minimize sogginess.
Conclusion
Filo Pizza has officially earned a permanent spot in my recipe rotation due to its crispy, flaky layers and adaptability. Whether you’re serving it for a casual dinner or spicing up a get-together, this dish brings a burst of flavor and a cheerful crunch that’s hard to resist. I hope you give it a try—trust me, your family and friends will be back for seconds!