Diy Perfect Bars – Culinary Chase
Let’s talk about snacks. You know the type – you reach for something that feels indulgent yet actually does wonders for your body. Like a protein-packed bar that’s not only tasty but also gives you that extra boost of energy for your post-lunch slump. I’ve found that the best companions for DIY Perfect Bars are fresh fruit smoothies or a hot cup of herbal tea. Whether you’re tailgating with friends, headed to the gym, or just want something delightful on-the-go, these bars really do hit the spot every time.

DIY Perfect Bars are those snacks that bridge the gap between healthy and indulgent. They fit perfectly into busy schedules, serving as great options for breakfast, midday snacks, or satisfying treats. My journey with these bars began when I started experimenting in the kitchen, trying to create something that tasted fantastic and kept me fueled throughout the day. After several tweaks and taste tests (a lot of taste tests, let me tell you!), I’ve come up with a recipe that’s easy to make, deliciously satisfying, and utterly customizable!
You Might Also Like These Recipes!
Diabetic No Bake Cookies Recipe
Dairy Free Cake Chocolate Recipe
Dairy And Gluten Free Brownies Recipe
How I have used the ingredients in this recipe?
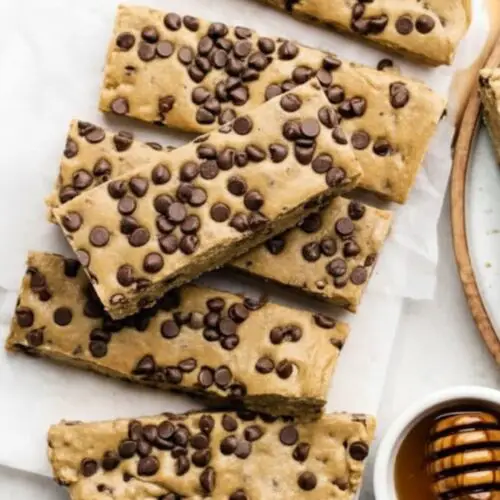
When it comes to making DIY Perfect Bars, the ingredient list plays a starring role. The foundation of oat flour and protein powder provides the structure and protein boost we crave. Natural peanut butter adds creaminess and flavor, while honey lends that perfect touch of sweetness. Vanilla takes it up a notch, and the use of coconut oil helps bind everything together while providing a subtle tropical flavor. Of course, mini chocolate chips are a must for that little chocolaty moment! This version also includes sunflower seeds and ground flaxseed for added flavor and nutrition, balancing health and satisfaction in every bite.
The Ingredients:

– 1 1/4 cup oat flour (use high-quality, store-bought for a fine texture)
– 1/4 cup vanilla protein powder
– 1/4 tsp salt
– 1/2 cup natural peanut butter
– 1/3 cup honey
– 1 tsp vanilla extract
– 2 tbsp melted coconut oil
– 3/4 cup mini chocolate chips
– 1/4 cup sunflower seeds (for added crunch)
– 2 tbsp ground flaxseed (for extra health benefits)
How to make DIY Perfect Bars?
Ready to whip up your DIY Perfect Bars? I’ll walk you through the steps, making it simple and enjoyable. It’s all about mixing, pressing, and letting those flavors develop. Once you master this, you’ll find yourself wanting to create different combinations for every occasion!
Step 1: Mix the Dry Ingredients

In a spacious mixing bowl, combine 1 1/4 cups of oat flour, 1/4 cup of vanilla protein powder, and 1/4 teaspoon of salt. Stir these dry ingredients together until well mixed. This step sets the foundation for your bars and makes sure every bite has the same great flavor.
Step 2: Add the Wet Ingredients

Now it’s time to bring in the star players: add in 1/2 cup of creamy peanut butter, 1/3 cup of honey, 1 teaspoon of vanilla extract, and 2 tablespoons of melted coconut oil. Use a spatula or your hands to mix everything together. The dough will feel thick, perhaps more like a really thick brownie batter, and that’s completely normal! To make this easier, I often dive in with my hands.
Step 3: Adjust the Consistency

If the mixture feels too dry and crumbly, add a touch more melted coconut oil; just a tablespoon at a time. You want your bars to be dense but firm, striking a balance between solid and too soft.
Step 4: Fold in the Goodies

Once everything is well combined, it’s time for the mini chocolate chips and those crunchy sunflower seeds! Add these in and mix until evenly distributed. I love getting my hands involved here – it’s therapeutic, and you can really feel everything combine.
Step 5: Press into the Pan

Grab an 8×4-inch bread pan and line it with parchment paper for easy removal later. Pour the mixture into the pan, and using your hands or a spatula, press it down firmly. For an extra treat, sprinkle some more chocolate chips on top and gently press them in.
Step 6: Chill and Set

Now, pop the pan in the refrigerator and let these bars chill for at least one hour. This helps them firm up nicely, making each bar easy to cut into clean squares. Once set, slice them up, store them, and enjoy!
Recipe Notes:
– For different flavors, try experimenting with nut butters like almond or cashew butter.
– The bars freeze beautifully; just wrap them individually for an easy grab-and-go option.
– If you prefer a sweeter bar, add a few more tablespoons of honey based on your taste.
– You can substitute any nuts or seeds you love in the recipe’s base.
– Always measure with care, especially for dry ingredients, to achieve the perfect texture.
Storage Tips:
To keep your DIY Perfect Bars fresh, store them in an airtight container in the refrigerator for up to one week. You can also freeze them for up to three months. Just take out what you need, and let them thaw at room temperature or pop them in the microwave for a few seconds for that fresh-from-the-pan feel.
Nutrition Information:
Each bar packs a punch with protein, healthy fats, and fiber, thanks to the layered ingredients. You can expect roughly 170 calories per bar, making them an ideal snack choice. With this wholesome blend, you’re getting sustained energy without crashing later on.
Serving Suggestions:
1. Post-Workout Snack: Pair with a smoothie to refuel your body after exercise.
2. Breakfast On-the-Go: Grab a bar with a piece of fruit for a quick breakfast when in a hurry.
3. Afternoon Boost: Perfect for staving off that afternoon slump; enjoy with a cup of green tea.
4. Lunchbox Treat: Ideal for kids’ lunchboxes, giving them energy for their day.
5. Sweet Craving Fix: A fantastic answer when you need a healthier dessert, maybe with some fresh berries on the side.
What other substitutes can I use in DIY Perfect Bars?
1. Nut Butters:Almond butter or sunflower seed butter work well if you have peanut allergies.
2. Liquid Sweeteners: You can swap honey for maple syrup for a vegan option.
3. Protein Powder:Pea protein can be an excellent alternative if you are plant-based or seeking dairy-free options.
4. Different Flours: Consider using whole wheat flour or almond flour for variety in textures.
5. Add-Ins: Swap chocolate chips with dried fruits like cranberries or apricots for a fruity twist.
Diy Perfect Bars
Equipment
- Mixing bowl
- rubber spatula
- 8×4-inch bread pan
- refrigerator
Ingredients
- – 1 1/4 cup oat flour use high-quality, store-bought for a fine texture
- – 1/4 cup vanilla protein powder
- – 1/4 tsp salt
- – 1/2 cup natural peanut butter
- – 1/3 cup honey
- – 1 tsp vanilla extract
- – 2 tbsp melted coconut oil
- – 3/4 cup mini chocolate chips
- – 1/4 cup sunflower seeds for added crunch
- – 2 tbsp ground flaxseed for extra health benefits
Instructions
Step 1: Mix the Dry Ingredients
- In a spacious mixing bowl, combine 1 1/4 cups of oat flour, 1/4 cup of vanilla protein powder, and 1/4 teaspoon of salt. Stir these dry ingredients together until well mixed. This step sets the foundation for your bars and makes sure every bite has the same great flavor.
Step 2: Add the Wet Ingredients
- Now it’s time to bring in the star players: add in 1/2 cup of creamy peanut butter, 1/3 cup of honey, 1 teaspoon of vanilla extract, and 2 tablespoons of melted coconut oil. Use a spatula or your hands to mix everything together. The dough will feel thick, perhaps more like a really thick brownie batter, and that’s completely normal! To make this easier, I often dive in with my hands.
Step 3: Adjust the Consistency
- If the mixture feels too dry and crumbly, add a touch more melted coconut oil; just a tablespoon at a time. You want your bars to be dense but firm, striking a balance between solid and too soft.
Step 4: Fold in the Goodies
- Once everything is well combined, it’s time for the mini chocolate chips and those crunchy sunflower seeds! Add these in and mix until evenly distributed. I love getting my hands involved here – it’s therapeutic, and you can really feel everything combine.
Step 5: Press into the Pan
- Grab an 8×4-inch bread pan and line it with parchment paper for easy removal later. Pour the mixture into the pan, and using your hands or a spatula, press it down firmly. For an extra treat, sprinkle some more chocolate chips on top and gently press them in.
Step 6: Chill and Set
- Now, pop the pan in the refrigerator and let these bars chill for at least one hour. This helps them firm up nicely, making each bar easy to cut into clean squares. Once set, slice them up, store them, and enjoy!
Notes
FAQs:
1. Can I customize the flavors of these bars?
Absolutely! Feel free to play around with different nut butters, proteins, and even spices like cinnamon or cocoa powder to create your perfect flavor.
2. Are these bars gluten-free?
If you’re using certified gluten-free oat flour, then yes! It’s a great snack for those with gluten sensitivities.
3. How do I know if the bars are set properly?
After an hour in the fridge, the bars should feel firm to the touch. They should hold together well when cut, but be cautious of making them too soft.
4. What should I do if I can’t find oat flour?
You can easily make oat flour at home by blending rolled oats in a blender until they reach a fine powder consistency.
5. Can I double the recipe?
Absolutely! Just remember to adjust your pan size accordingly—using a larger pan or baking in two separate ones can help.
Conclusion:
DIY Perfect Bars are a fantastic way to indulge without compromising on nutrition. They’re simple to prepare, customizable, and perfect for any occasion, whether you’re on the go or lounging at home. By crafting your own, you not only control the ingredients but also savor every delicious bite guilt-free. So, roll up your sleeves and start mixing—these bars are waiting to be made!