When I think about my favorite treat, cookies instantly come to mind. Who doesn’t love a sweet bite, especially when they’re fresh and loaded with flavor? Now, pair that with a warm cup of herbal tea or a glass of almond milk, and you’re looking …
If you’ve ever been to a good Chinese restaurant, you know that deep-fried wontons are often the highlight of the appetizer menu. There’s something about the crispy exterior that holds the savory filling inside, paired with a spicy sweet chili sauce that makes each bite …
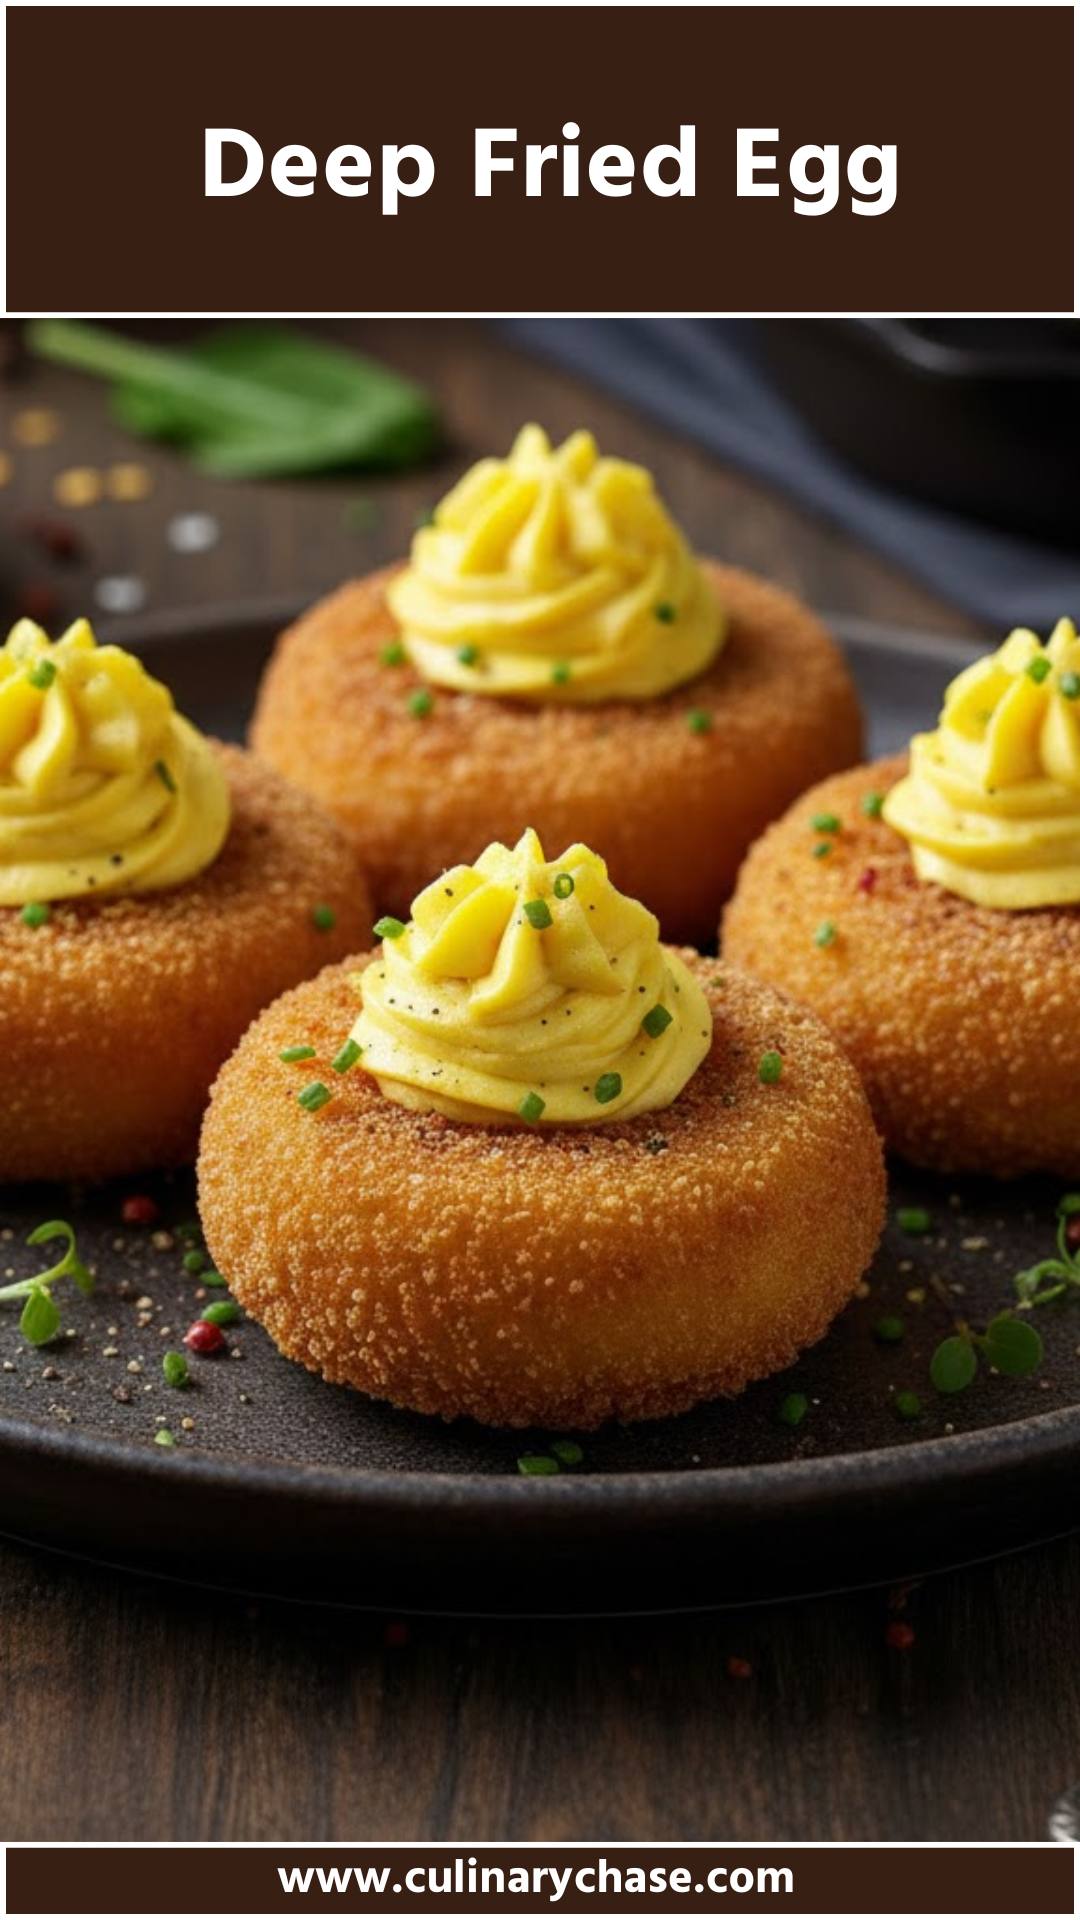
There’s something undeniably delightful about serving crunchy, golden snacks at gatherings. One of my personal favorites that never fails to impress is the deep-fried egg. Picture this: thinking about hosting a casual get-together or a game night with friends? Well, let me tell you, these little beauties could easily become the star of the show! Served alongside tangy dipping sauces or as part of a larger spread, they fit right in with an assortment of finger foods. I can almost hear the crunch as each guest takes a bite.
Today, we’re diving into a fun and innovative dish—the deep-fried egg. Imagine a hard-boiled egg with a crispy coat that takes it to a whole new level. This delightful snack is rich, creamy, and oh-so-satisfying. It’s the perfect combination of textures, and you can whip it up in no time, making it an ideal addition to your recipes collection.
Deep-fried eggs are essentially hard-boiled eggs that are breaded and fried until golden and crispy. They manage to keep the smooth, delicate yolk intact while achieving that crunchy texture we all crave in snacks. This dish is often mistaken as being complicated, but trust me—it’s as straightforward as pie. With a few steps, you can have these little bites of joy ready to wow your guests or treat yourself because you deserve it.
The Ingredients
Here’s what you need to whip up your deep fried eggs:
– 6 large hard-boiled eggs
– Oil for spritzing or frying
– Optional: a pinch of smoked paprika for an extra kick
Breading Ingredients:
– 1/4 cup of all-purpose flour
– 1/2 cup of fine bread crumbs
– 1/4 cup of panko bread crumbs
– 1/2 teaspoon of fine grind sea salt
– 1 large egg, beaten lightly
– 3 tablespoons of mayonnaise
– 1/2 teaspoon of white wine vinegar
– 1/2 teaspoon of spicy mustard
– A dash of garlic powder (new addition for flavor!)
Deviled Egg Filling Ingredients:
– 6 egg yolks
– 3 tablespoons of mayonnaise
– 1/2 teaspoon of white wine vinegar
– 1/2 teaspoon of spicy mustard (or your preferred mustard)
– 1 tablespoon of sweet pickle relish
– Pinch of salt and pepper to taste
– A small sprinkle of fresh dill for added flavor (new addition)!
How to Make Deep Fried Egg?
Now that you have your ingredients lined up, let’s roll our sleeves up and get cooking. The steps are quite easy and can be done within a reasonable time frame, leaving you plenty of time to kick back and relax before your guests arrive.
Step 1: Prepare the Hard-Boiled Eggs
Start by boiling your eggs. If you prefer, you can follow my pressure cooker method or the classic stove method. After boiling, let them cool completely. Once they’re cool, cut each egg in half lengthwise. The yolks should gently pop out into a bowl, while the whites will be set aside on a tray.
Step 2: Make the Filling
In the bowl with your egg yolks, add your 3 tablespoons of mayonnaise, the 1/2 teaspoon of white wine vinegar, and your 1/2 teaspoon of spicy mustard. Now here’s where the magic happens—use a hand mixer to whip this mixture until it’s delightfully smooth. If you’re feeling no rush, a fork works fine too, but it might not get that light and airy consistency.
Once that’s done, fold in your sweet pickle relish, along with that fresh dill you added earlier for an extra punch. Cover this creamy mixture and pop it in the refrigerator while you get the breading ready.
Step 3: Bread the Egg Whites
In a ziplock bag, throw in the flour combined with 1/4 teaspoon of fine grind sea salt. Shake it up to mix! In another bag, combine the traditional bread crumbs, panko, and the remaining 1/4 teaspoon of salt. Give it a good shake.
Now, in a medium bowl, whisk together your mayonnaise, white wine vinegar, spicy mustard, and that beaten egg until it’s all well blended.
Take the egg whites and toss them in the flour mixture. Make sure they’re coated well! Shake off any excess flour before dipping them into the wet batter. Coat every little surface of the egg whites, and let the excess batter drip off.
Slide those coated egg whites into the breadcrumb mixture to give them a generous covering. Once done, set these beauties on a tray, and repeat the process until all are ready!
Step 4: Air Frying (Optional Method)
For those who want to keep things a bit lighter, preheat the air fryer for about 10 minutes on its highest setting. Spritz the rounded part of each egg with oil, then arrange them in the basket, ensuring they’re not overcrowded.
Air fry at 390℉ (200℃) for about 5 minutes. No need to flip them! When the time’s up, let them sit for an additional 5 minutes before you remove them and let them cool. You’ll want to wait about 10 minutes before filling them.
Step 5: Deep Frying Method
If you’re going for the classic route, heat your oil in a deep fryer or a heavy pot to about 350℉ (176℃). Remember, not to overfill the pot to keep things safe!
Drop in 3-4 of your breaded egg whites at a time (don’t overcrowd—it’s key!). Fry for about 3-4 minutes or until golden brown. You can flip them if needed. Once done, pull them out and let them drain on a paper towel.
Repeat until all are perfectly crispy and golden. Provide them with a few moments to cool again before filling them with that devilish yolk mixture.
Step 6: Fill and Garnish
Here’s where you can be a bit creative. You can either use a spoon for filling or pipe the filling in with a piping bag for a neat touch. A quick sprinkle of paprika or any preferred garnish makes them even more enticing!
Notes
– Egg Freshness: Always start with fresh eggs for the best results.
– Season to Taste: Adjust your mustard and vinegar levels based on your taste preference.
– Avoid Overcrowding: Frying in batches ensures they crisp properly without getting soggy.
– Consistency Matters: Ensure your filling is smooth for easier filling.
– Experiment with Flavors: Feel free to add spices to the breadcrumbs for added flavor.
Storage Tips
If you have any leftovers (which rarely happens), store them in an airtight container in the fridge for up to two days. Just keep in mind that the breading may lose its crispness.
Nutrition Information
These deep-fried eggs are packed with protein and a good source of healthy fats from the mayonnaise. The addition of pickle relish provides a sweet touch, while the egg yolks are rich and creamy. Keep an eye on portion sizes, especially since they’re fried, to manage calorie intake.
Serving Suggestions
– With a Side of Dipping Sauce: Serve with a spicy mayo or zesty ranch dressing for a little extra.
– On a Salad Plate: Slice them in half and place on a bed of mixed greens, garnished with fresh herbs for a garnish.
– First Course Treat: Pair with a light soup or gazpacho as a delightful starter.
– Platter Delight: Arrange on a platter with other finger foods like vegetable sticks or cheese cubes.
– At a Picnics or BBQs: They travel well and provide a hit amongst kids and adults alike!
What Other Substitute Can I Use in Deep Fried Egg?
– Coconut Flour: For a gluten-free version, swap out the all-purpose flour for coconut flour.
– Avocado Oil: Use avocado oil for frying instead of traditional cooking oil to enhance health benefits.
– Greek Yogurt: Substitute mayonnaise with Greek yogurt for a tangy twist.
– Pickled Jalapeños: Instead of sweet relish, spicy pickled jalapeños can add a kick!
– Different Mustard Varieties: Use Dijon or honey mustard instead of spicy mustard for varied flavors.
Deep Fried Egg
Joe Williams
Today, we’re diving into a fun and innovative dish—the deep-fried egg. Imagine a hard-boiled egg with a crispy coat that takes it to a whole new level. This delightful snack is rich, creamy, and oh-so-satisfying. It’s the perfect combination of textures, and you can whip it up in no time, making it an ideal addition to your recipes collection.
Here’s what you need to whip up your deep fried eggs:
– 6 large hard-boiled eggs
– Oil for spritzing or frying
– Optional: a pinch of smoked paprika for an extra kick
Breading Ingredients:
– 1/4 cup of all-purpose flour
– 1/2 cup of fine bread crumbs
– 1/4 cup of panko bread crumbs
– 1/2 teaspoon of fine grind sea salt
– 1 large eggbeaten lightly
– 3 tablespoons of mayonnaise
– 1/2 teaspoon of white wine vinegar
– 1/2 teaspoon of spicy mustard
– A dash of garlic powdernew addition for flavor!
Deviled Egg Filling Ingredients:
– 6 egg yolks
– 3 tablespoons of mayonnaise
– 1/2 teaspoon of white wine vinegar
– 1/2 teaspoon of spicy mustardor your preferred mustard
– 1 tablespoon of sweet pickle relish
– Pinch of salt and pepper to taste
– A small sprinkle of fresh dill for added flavornew addition!
Instructions
Now that you have your ingredients lined up, let’s roll our sleeves up and get cooking. The steps are quite easy and can be done within a reasonable time frame, leaving you plenty of time to kick back and relax before your guests arrive.
Step 1: Prepare the Hard-Boiled Eggs
Start by boiling your eggs. If you prefer, you can follow my pressure cooker method or the classic stove method. After boiling, let them cool completely. Once they’re cool, cut each egg in half lengthwise. The yolks should gently pop out into a bowl, while the whites will be set aside on a tray.
Step 2: Make the Filling
In the bowl with your egg yolks, add your 3 tablespoons of mayonnaise, the 1/2 teaspoon of white wine vinegar, and your 1/2 teaspoon of spicy mustard. Now here’s where the magic happens—use a hand mixer to whip this mixture until it’s delightfully smooth. If you’re feeling no rush, a fork works fine too, but it might not get that light and airy consistency.
Once that’s done, fold in your sweet pickle relish, along with that fresh dill you added earlier for an extra punch. Cover this creamy mixture and pop it in the refrigerator while you get the breading ready.
Step 3: Bread the Egg Whites
In a ziplock bag, throw in the flour combined with 1/4 teaspoon of fine grind sea salt. Shake it up to mix! In another bag, combine the traditional bread crumbs, panko, and the remaining 1/4 teaspoon of salt. Give it a good shake.
Now, in a medium bowl, whisk together your mayonnaise, white wine vinegar, spicy mustard, and that beaten egg until it’s all well blended.
Take the egg whites and toss them in the flour mixture. Make sure they’re coated well! Shake off any excess flour before dipping them into the wet batter. Coat every little surface of the egg whites, and let the excess batter drip off.
Slide those coated egg whites into the breadcrumb mixture to give them a generous covering. Once done, set these beauties on a tray, and repeat the process until all are ready!
Step 4: Air Frying (Optional Method)
For those who want to keep things a bit lighter, preheat the air fryer for about 10 minutes on its highest setting. Spritz the rounded part of each egg with oil, then arrange them in the basket, ensuring they’re not overcrowded.
Air fry at 390℉ (200℃) for about 5 minutes. No need to flip them! When the time’s up, let them sit for an additional 5 minutes before you remove them and let them cool. You’ll want to wait about 10 minutes before filling them.
Step 5: Deep Frying Method
If you’re going for the classic route, heat your oil in a deep fryer or a heavy pot to about 350℉ (176℃). Remember, not to overfill the pot to keep things safe!
Drop in 3-4 of your breaded egg whites at a time (don’t overcrowd—it’s key!). Fry for about 3-4 minutes or until golden brown. You can flip them if needed. Once done, pull them out and let them drain on a paper towel.
Repeat until all are perfectly crispy and golden. Provide them with a few moments to cool again before filling them with that devilish yolk mixture.
Step 6: Fill and Garnish
Here’s where you can be a bit creative. You can either use a spoon for filling or pipe the filling in with a piping bag for a neat touch. A quick sprinkle of paprika or any preferred garnish makes them even more enticing!
Notes
– Egg Freshness: Always start with fresh eggs for the best results.– Season to Taste: Adjust your mustard and vinegar levels based on your taste preference.– Avoid Overcrowding: Frying in batches ensures they crisp properly without getting soggy.– Consistency Matters: Ensure your filling is smooth for easier filling.– Experiment with Flavors: Feel free to add spices to the breadcrumbs for added flavor.
Absolutely! You can prepare the eggs and filling ahead of time, then bread and fry them just before serving for the best crisp.
Q2: Can I use egg whites instead of hard-boiled eggs?
This recipe relies on the yolk filling for flavor, so it’s best to stick with whole hard-boiled eggs for the full experience.
Q3: What dipping sauces are best for serving?
Feel free to serve them with ranch, spicy mayo, or even a simple cocktail sauce for dipping.
Q4: Are there any health concerns with deep-frying?
While it’s best not to indulge frequently, using a good-quality oil, controlling the frying temperature, and keeping portions reasonable can make it feel indulgent without going overboard.
Q5: Can I bake these instead of deep frying?
Yes! You can bake them at a high temperature of around 425℉ for a crispy exterior, but don’t expect the same crunch as frying.
Conclusion
Deep-fried eggs are more than just a fun dish; they’re a versatile addition to any party platter or casual get-together. With a creamy filling and a crispy exterior, they combine textures and flavors in a unique way. Plus, they’re straightforward to make, ensuring you spend less time fussing in the kitchen and more time enjoying your company. So, the next time you need a fantastic appetizer, give these deep-fried eggs a spin. I think you’ll be pleasantly surprised!
Let me tell you, there’s nothing quite like enjoying crispy, golden-brown vegetable fritters fresh from the pan. They greet you with a satisfying crunch before softening into a tender bite. But the magic happens when you dip them into a dollop of creamy tartar sauce. …
There’s nothing quite like the smell of cake baking in the oven, is there? Whether you’re celebrating a birthday, hosting a family gathering, or just treating yourself on a Wednesday, cake instantly lifts the mood. Today, I’m excited to share my take on an indulgent—yet …
At the end of a long week, nothing lifts my spirits quite like a plate of warm, fudgy brownies. They’re my go-to comfort food. Picture it: a cozy evening, perhaps a movie playing in the background, and there I am with a brownie in one hand and a scoop of vanilla bean ice cream in the other. And if I’m feeling a little fancy, I might even add some fresh raspberries for that sweet-tart contrast. It’s a simple pleasure that never fails to delight.
Today, I’m excited to share my recipe for dairy and gluten-free brownies. These aren’t your typical brownies. They’re genuinely rich and moist, satisfying all the cravings while maintaining healthier components. If you think a gluten-free brownie can’t hold its own against the traditional version, I’m here to change your mind.
What are dairy and gluten-free brownies?
Dairy and gluten-free brownies are decadent treats that use gluten-free flour instead of traditional wheat flour and replace dairy products with either plant-based options or simply omit them altogether. This makes them suitable for those with gluten intolerance or dairy allergies, ensuring everyone can enjoy a rich dessert. When done right, they still pack that indulgent mouthfeel and chocolaty goodness we all love.
This recipe stands out because of its thoughtful combination of high-quality ingredients. Using a well-balanced mixture of gluten-free flour and cocoa powder ensures that these brownies have depth in flavor and texture. The melted butter or coconut oil adds moisture, making sure they are soft and fudgy rather than dry and crumbly. Plus, a handful of chocolate chips integrated into the batter and sprinkled on top provides that extra bit of gooey goodness.
Ingredients You’ll Need To Make These Dairy and Gluten-Free Brownies
Here’s what you’ll need to whip up these delightful brownies:
– 1 cup gluten-free flour (consider options like almond flour or a store-bought blend for variety)
– 3/4 cup Dutch-process cocoa powder (sift it if lumpy for a smoother texture)
– 1/4 teaspoon salt
– 3/4 cup + 2 tablespoons melted refined coconut oil (for a dairy-free twist, or use melted unsalted butter if you prefer)
– 1 1/2 cups granulated sugar (you can also use raw or coconut sugar)
– 1 tablespoon vanilla extract
– 3 large eggs (approximately 50 grams each, at room temperature)
– 3/4 cup semi-sweet chocolate chips (or chopped dairy-free chocolate)
– 1/4 cup mini chocolate chips (optional for that sprinkle of indulgence on top)
Making these brownies is straightforward and practically foolproof. Let’s dive into the step-by-step instructions.
Step-by-step Directions
Step 1: Prepare Your Baking Pan
Preheat your oven to 350 °F (175 °C). Grab an 8″×8″ baking pan and line it with parchment paper. Leaving some overhang will help you lift the brownies out later. Greasing the pan lightly before adding the parchment can help it stick.
Step 2: Mix the Dry Ingredients
In a medium mixing bowl, combine 1 cup of gluten-free flour, 3/4 cup of sifted cocoa powder, and 1/4 teaspoon of salt. Whisk them together until uniformly mixed, and set this bowl aside.
Step 3: Combine the Wet Ingredients
In a separate large mixing bowl, blend 3/4 cup plus 2 tablespoons of melted coconut oil with 1 1/2 cups of granulated sugar and 1 tablespoon of vanilla extract. This is your chance to add in that optional 1/2 teaspoon of instant espresso powder here for an extra chocolatey punch. Stir until everything is well combined.
Step 4: Add the Eggs
Crack in three large eggs, one at a time, into the wet mixture. Stir gently after each addition until just combined. The batter should look smooth and glossy.
Step 5: Mix the Dry and Wet Ingredients
Now, take your bowl of dry ingredients and add it to the wet mixture. Stir just until you see that there are no more streaks of flour. Be careful not to overmix—this is key to keeping the brownies fudgy and light.
Step 6: Fold in Chocolate Chips
Fold 3/4 cup of semi-sweet chocolate chips into the brownie batter. This will give wonderful pockets of chocolate goodness.
Step 7: Transfer to Baking Pan
Pour your rich batter into the prepared baking pan, spreading it evenly. If you’re feeling generous, sprinkle the remaining 1/4 cup of chocolate chips on top.
Step 8: Bake the Brownies
Place the pan in the preheated oven and let them bake for about 20-25 minutes. You’ll want to check for a thin crust forming on top and a slight jiggle in the center. A toothpick inserted into the sides should come out with a few moist crumbs but not raw batter.
Step 9: Cool and Store
Once baking is complete, remove the brownies from the oven and let them cool completely in the pan. Once cooled, carefully lift them out using the parchment paper and cut them into squares. Store brownies at room temperature for up to four days, or chill them in the fridge for a fudgier texture.
Tips
– Oven Calibration: Because oven temperatures can vary, check your brownies a few minutes before the suggested baking time.
– Flavor Boost: Consider adding a splash of almond extract for a different flavor profile.
– Gluten-Free Flour Tips: If using a gluten-free blend, ensure it contains xanthan gum for better structure.
– Chocolate Options: Don’t hesitate to mix in white chocolate chips or nuts for an extra crunch.
– Serving Tip: For a fancy touch, serve these brownies warm with a scoop of dairy-free ice cream and a sprinkle of sea salt.
How to Store The Leftovers?
To keep your brownies fresh, store them in an airtight container at room temperature for up to four days. If you want to extend their life, wrap them in plastic wrap and refrigerate them. They’ll also freeze well for up to three months; just make sure to cut them into squares first and place parchment paper between layers to avoid sticking.
Nutrition Information
Each brownie contains around 190 calories, packed with a balance of carbohydrates and a moderate amount of sugar. They provide a decent source of energy, especially if you’re looking for a quick pick-me-up or post-workout snack. With no gluten and no dairy, they fit within multiple dietary needs without sacrificing flavor.
What are some recommended side dishes for dairy and gluten-free brownies?
– Fresh Fruit Salad: A refreshing mix of your favorite seasonal fruits adds a bright contrast.
– Coconut Whipped Cream: This dairy-free delight complements the intensity of the brownies beautifully.
– Chocolate Sauce Drizzle: A little extra chocolate never hurt anyone!
– Coffee or Espresso: These beverages enhance the chocolate flavor, creating a perfect pair.
– Mint Chocolate Chip Ice Cream: The cool mint flavor adds a delightful twist when paired with the brownies.
If the items are not available in your pantry, what are some substitute options for the ingredients?
– Gluten-Free Flour: Use almond flour or a 1:1 gluten-free baking mix if you’re out of gluten-free flour.
– Coconut Oil: Melted vegetable oil or margarine can replace coconut oil if needed.
– Granulated Sugar: Honey or maple syrup can serve as a liquid sweetener alternative (reduce other liquids in the recipe slightly).
– Vanilla Extract: You can substitute with almond extract for a different, but still delicious, flavor twist.
– Chocolate Chips: If out of chocolate chips, chop up a bar of your favorite dairy-free chocolate.
Dairy and Gluten-Free Brownies
At the end of a long week, nothing lifts my spirits quite like a plate of warm, fudgy brownies. They’re my go-to comfort food. Picture it: a cozy evening, perhaps a movie playing in the background, and there I am with a brownie in one hand and a scoop of vanilla bean ice cream in the other.
Preheat your oven to 350 °F (175 °C). Grab an 8″×8″ baking pan and line it with parchment paper. Leaving some overhang will help you lift the brownies out later. Greasing the pan lightly before adding the parchment can help it stick.
Step 2: Mix the Dry Ingredients
In a medium mixing bowl, combine 1 cup of gluten-free flour, 3/4 cup of sifted cocoa powder, and 1/4 teaspoon of salt. Whisk them together until uniformly mixed, and set this bowl aside.
Step 3: Combine the Wet Ingredients
In a separate large mixing bowl, blend 3/4 cup plus 2 tablespoons of melted coconut oil with 1 1/2 cups of granulated sugar and 1 tablespoon of vanilla extract. This is your chance to add in that optional 1/2 teaspoon of instant espresso powder here for an extra chocolatey punch. Stir until everything is well combined.
Step 4: Add the Eggs
Crack in three large eggs, one at a time, into the wet mixture. Stir gently after each addition until just combined. The batter should look smooth and glossy.
Step 5: Mix the Dry and Wet Ingredients
Now, take your bowl of dry ingredients and add it to the wet mixture. Stir just until you see that there are no more streaks of flour. Be careful not to overmix—this is key to keeping the brownies fudgy and light.
Step 6: Fold in Chocolate Chips
Fold 3/4 cup of semi-sweet chocolate chips into the brownie batter. This will give wonderful pockets of chocolate goodness.
Step 7: Transfer to Baking Pan
Pour your rich batter into the prepared baking pan, spreading it evenly. If you’re feeling generous, sprinkle the remaining 1/4 cup of chocolate chips on top.
Step 8: Bake the Brownies
Place the pan in the preheated oven and let them bake for about 20-25 minutes. You’ll want to check for a thin crust forming on top and a slight jiggle in the center. A toothpick inserted into the sides should come out with a few moist crumbs but not raw batter.
Step 9: Cool and Store
Once baking is complete, remove the brownies from the oven and let them cool completely in the pan. Once cooled, carefully lift them out using the parchment paper and cut them into squares. Store brownies at room temperature for up to four days, or chill them in the fridge for a fudgier texture.
Notes
– Oven Calibration: Because oven temperatures can vary, check your brownies a few minutes before the suggested baking time.– Flavor Boost: Consider adding a splash of almond extract for a different flavor profile.– Gluten-Free Flour Tips: If using a gluten-free blend, ensure it contains xanthan gum for better structure.– Chocolate Options: Don’t hesitate to mix in white chocolate chips or nuts for an extra crunch.– Serving Tip: For a fancy touch, serve these brownies warm with a scoop of dairy-free ice cream and a sprinkle of sea salt.
Certainly! You can substitute half of the sugar with applesauce or mashed banana and add some chopped nuts for extra nutrition.
2. Do these brownies really taste as good as traditional ones?
Absolutely! I’ve personally tested this recipe multiple times and can assure you that they’re just as delicious, if not better.
3. Can I freeze these brownies?
Yes, they freeze beautifully. Just wrap them well, and they’ll last for about three months in the freezer.
4. What should I serve with these brownies at a party?
Try serving them with some fresh berries or a scoop of dairy-free ice cream to please all guests.
5. What’s the best way to get the brownies out of the pan?
Using the parchment paper overhang to lift them out once they’re cooled makes it easy. A sharp knife will help with cutting them into perfect squares.
Conclusion
Incorporating healthier ingredients doesn’t mean sacrificing taste—a point made clear with these scrumptious dairy and gluten-free brownies. By using thoughtful substitutions, you create a dessert that everyone can enjoy. Whether it’s a family gathering, barbecue, or just a cozy night at home, these brownies will make an appearance. I can’t wait for you to give them a try! Happy baking!
When you think of salt pepper squid, you want to have a meal that sings all the right notes. So, what can we pair with this delectable dish? Here are a few options: Ah, salt pepper squid! This dish has stolen my heart and, perhaps, …
What pairs well with a steaming bowl of beef lo mein? The answer is simpler than you might think. Picture this: a side of crispy spring rolls, perhaps? They add that crunchy texture that’s just delightful alongside the soft, saucy noodles. Or consider a refreshing …
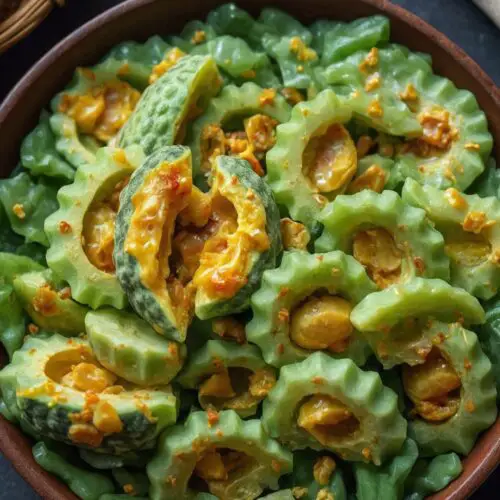
When I first encountered bitter melon, I was hesitant. Its name alone gave me pause. But as I delved into the world of cooking, I discovered how this uniquely bitter vegetable could shine when paired with eggs. Today, I want to take you through a flavorful exploration of bitter melon with eggs, a dish that is rich in nutrients and packed with taste. Trust me, you’ll want to join me in the kitchen for this one!
What is Bitter Melon with Eggs?
Bitter melon, also known as bitter gourd, is a green, wrinkly vegetable that has been used in Asian cuisines for centuries. Its distinct bitterness can be challenging for some, but when sautéed perfectly with eggs, it transforms. The bitterness mellows, offering a complex flavor profile that’s absolutely delightful.
Bitter melon with eggs is a dish that combines the health benefits of this intriguing vegetable with the rich, creamy texture of eggs. It’s a comforting dish that you can serve for breakfast or as a side. As someone who loves experimenting, I was intrigued by the combination of bitter and savory flavors.
Why You’ll Love Bitter Melon with Eggs
You might wonder why you should even consider making this dish. Let me give you a few compelling reasons:
1. Health Benefits: Bitter melon is known for its health benefits. It’s rich in vitamins A and C, and it’s believed to help regulate blood sugar levels. Added to that, eggs are a great source of protein.
2. Versatile: It’s perfect for breakfast, lunch, or dinner! You can serve it alongside rice or as a topping for toast.
3. Quick and Simple: The preparation is straightforward, making it an ideal weeknight dinner or a leisurely Sunday brunch dish.
4. Satisfying Flavor: The bitter taste is perfectly balanced by the eggs, creating a dish that’s both interesting and comforting to eat.
5. Culinary Adventure: If you’re someone looking to break away from the mundane, this dish is a wonderful way to introduce new flavors to your palate.
You will also like the following Side dishes recipes!
1 tbsp vegan fish sauce (optional): Creates depth in flavor.
2 tsp vegetable stock powder: Enhances the taste.
4 tbsp cooking oil: You’ll need it for frying.
1 tsp minced garlic: A touch of aromatic goodness.
1 1/2 tsp honey (or to taste): To balance the bitterness.
1/4 tsp white pepper powder: For subtle heat.
I assure you, this combination creates an extraordinary dish that showcases the beauty of bitter melon.
Step by Step Instructions
Step 1: Prepare Ingredients
Begin by washing your bitter melons thoroughly. Slice them in half lengthwise and remove the seeds with a spoon. Cut them into thin slices. Don’t worry if the slices are irregular—this isn’t about perfection. Set them aside.
Step 2: Whisk the Eggs
In a bowl, crack the six eggs and whisk them together until well combined. Add the vegan fish sauce, one teaspoon of vegetable stock powder, and a pinch of white pepper. This step flavors the eggs, ensuring that every bite is delicious.
Step 3: Sauté the Bitter Melon
Heat two tablespoons of cooking oil in a large skillet over medium heat. Once the oil shimmers, add the sliced bitter melon. Toss it gently with a spatula for about five minutes. Cook until it begins to soften but still retains some crunch. At this point, throw in the minced garlic and sauté for an additional minute. The aroma will be enticing!
Step 4: Season the Bitter Melon
While the bitter melon is cooking, add two tablespoons of light soy sauce, two tablespoons of oyster sauce, and one teaspoon of vegetable stock powder directly into the skillet. Stir everything well to ensure the flavors meld together.
Step 5: Add Honey
Now, add the honey. This ingredient is crucial as it helps balance the bitterness of the melon. Stir well, and taste! Adjust with more honey if necessary. You might find that a little touch makes a difference.
Step 6: Pour in the Eggs
Once the bitter melon is adequately seasoned and tender, push the mixture to one side of the skillet. Pour the whisked egg mixture on the other side. Allow the eggs to set for a moment without stirring. Then, gently fold the set eggs into the bitter melon mixture, letting the eggs cook through and mix with the flavorful sauté.
Step 7: Cook Until Done
Cook everything together for about three to four minutes until the eggs are fully cooked. Be careful not to overcook—nobody wants rubbery eggs! Remove the skillet from heat, and your dish is ready to be plated.
Step 8: Serve and Enjoy
Serve the bitter melon with eggs hot! I love to enjoy it with a bowl of rice or as a filling in a wrap. It’s genuinely a dish that feels good on the palate and nourishes the body.
Tips & Tricks
To ensure your dish shines, here are some handy tips:
1. Choose Ripe Bitter Melons: Look for melons that are bright green. Avoid overripe yellower ones as they can be overly bitter. 2. Pre-soak the Bitter Melon: If the bitterness is concerning, soak the slices in salt water for 30 minutes to help reduce the bitterness. 3. Use Fresh Eggs: Fresh eggs lead to better texture and taste. Always opt for quality! 4. Experiment With Spices: Feel free to play around with spices like turmeric or chili flakes for an extra kick. 5. Pair It Right: This dish works wonders with a side of jasmine rice and a simple vegetable stir-fry.
Nutrition Information
This dish is not just delicious, it’s healthy too! Let’s break it down:
Calories: Approximately 350 per serving
Protein: 20g
Carbohydrates: 10g
Fats: 25g
Fiber: 3g
Vitamin A: High
Vitamin C: High
Not too shabby for a satisfying meal, right? With all that nutrition wrapped up in one dish, you can’t go wrong.
Can I Store Bitter Melon with Eggs?
Yes, you can store this dish! If you have leftovers (which is rare in my case), let it cool to room temperature, and transfer it to an airtight container. It can be kept in the refrigerator for up to three days. Reheat gently in a skillet or microwave before serving.
What Can I Serve with Bitter Melon with Eggs?
This versatile dish can pair well with various sides. Here are some ideas:
1. Steamed Rice: The simple choice that complements the bitterness perfectly. 2. Tofu Stir-Fry: Add some extra protein and variety to your meal. 3. Fresh Salad: A light salad can counter the rich flavors of the dish. 4. Dipping Sauce: A side of soy or chili sauce could elevate your culinary adventure. 5. Noodles: Tossed with some soy sauce, it’s an excellent side to balance flavors.
Variations
This dish can be modified in several ways to cater to different tastes. Here are five variations:
1. Bitter Melon and Shrimp: Add some shrimp to the sauté for added protein and a delightful complementary flavor. Just sauté the shrimp until pink before adding the bitter melon.
2. Vegetarian Style: Substitute eggs with a tofu scramble for a vegan-friendly version. Use the same seasonings and allow the tofu to soak up those beautiful flavors.
3. Spicy Bitterness: If you enjoy a kick, add some sliced chili peppers during the sauté process. It amps up the heat and creates an exciting contrast.
4. Cheesy Delight: For cheese lovers, sprinkle some grated cheese on top just before serving. The melting cheese adds a creamy texture that’s hard to resist.
5. Curry Infusion: Incorporate curry powder into the eggs for a unique flavor twist. This will turn your dish into a savory adventure!
Bitter Melon with Eggs
When I first encountered bitter melon, I was hesitant. Its name alone gave me pause. But as I delved into the world of cooking, I discovered how this uniquely bitter vegetable could shine when paired with eggs.
2medium bitter melonssliced and seeds removed: The main vegetable here.
2tbsplight soy sauce: Essential for seasoning.
2tbspoyster sauceor vegetarian oyster sauce: For added umami.
1tbspvegan fish sauceoptional: Creates depth in flavor.
2tspvegetable stock powder: Enhances the taste.
4tbspcooking oil: You’ll need it for frying.
1tspminced garlic: A touch of aromatic goodness.
1 1/2tsphoneyor to taste: To balance the bitterness.
1/4tspwhite pepper powder: For subtle heat.
Instructions
Step 1: Prepare Ingredients
Begin by washing your bitter melons thoroughly. Slice them in half lengthwise and remove the seeds with a spoon. Cut them into thin slices. Don’t worry if the slices are irregular—this isn’t about perfection. Set them aside.
Step 2: Whisk the Eggs
In a bowl, crack the six eggs and whisk them together until well combined. Add the vegan fish sauce, one teaspoon of vegetable stock powder, and a pinch of white pepper. This step flavors the eggs, ensuring that every bite is delicious.
Step 3: Sauté the Bitter Melon
Heat two tablespoons of cooking oil in a large skillet over medium heat. Once the oil shimmers, add the sliced bitter melon. Toss it gently with a spatula for about five minutes. Cook until it begins to soften but still retains some crunch. At this point, throw in the minced garlic and sauté for an additional minute. The aroma will be enticing!
Step 4: Season the Bitter Melon
While the bitter melon is cooking, add two tablespoons of light soy sauce, two tablespoons of oyster sauce, and one teaspoon of vegetable stock powder directly into the skillet. Stir everything well to ensure the flavors meld together.
Step 5: Add Honey
Now, add the honey. This ingredient is crucial as it helps balance the bitterness of the melon. Stir well, and taste! Adjust with more honey if necessary. You might find that a little touch makes a difference.
Step 6: Pour in the Eggs
Once the bitter melon is adequately seasoned and tender, push the mixture to one side of the skillet. Pour the whisked egg mixture on the other side. Allow the eggs to set for a moment without stirring. Then, gently fold the set eggs into the bitter melon mixture, letting the eggs cook through and mix with the flavorful sauté.
Step 7: Cook Until Done
Cook everything together for about three to four minutes until the eggs are fully cooked. Be careful not to overcook—nobody wants rubbery eggs! Remove the skillet from heat, and your dish is ready to be plated.
Step 8: Serve and Enjoy
Serve the bitter melon with eggs hot! I love to enjoy it with a bowl of rice or as a filling in a wrap. It’s genuinely a dish that feels good on the palate and nourishes the body.
Notes
Choose Ripe Bitter Melons: Look for melons that are bright green. Avoid overripe yellower ones as they can be overly bitter. 2. Pre-soak the Bitter Melon: If the bitterness is concerning, soak the slices in salt water for 30 minutes to help reduce the bitterness. 3. Use Fresh Eggs: Fresh eggs lead to better texture and taste. Always opt for quality! 4. Experiment With Spices: Feel free to play around with spices like turmeric or chili flakes for an extra kick. 5. Pair It Right: This dish works wonders with a side of jasmine rice and a simple vegetable stir-fry.
Yes, you can! However, fresh is always better for texture and flavor. If using frozen, be sure to thaw and drain excess moisture.
2. How do I know if the bitter melon is too ripe?
Ripe bitter melons will have a yellow tint with a soft texture. Ideally, look for firm, dark green ones.
3. Can children eat bitter melon?
Yes, children can eat bitter melon, especially when combined with eggs. The bitterness can be adjusted by seasoning it well.
4. Is bitter melon good for weight loss?
Bitter melon is low in calories and high in fiber, making it great for weight management. It may help control hunger pangs.
5. How can I cook bitter melon differently?
Bitter melon can be grilled, stuffed, or added to soups and stir-fries. Its versatility allows for many culinary applications.
Conclusion
Creating a dish using bitter melon and eggs is not just about putting food on your plate. It’s an adventure in flavors, nutrition, and health. By following simple steps, you can master this delightful recipe. Whether you’re looking to impress friends at dinner, feed your family, or explore new culinary horizons, bitter melon with eggs fits the bill.
I invite you to give this dish a try. Embrace the bitterness, enjoy the flavors, and most importantly, savor every bite! You might just find yourself making this dish again and again.
Before diving into the savory world of soy sauce chicken, let’s chat about what brings out the dish’s intense flavor. While soy sauce chicken is a star on its own, it plays well with various sides and drinks. Here’s what you can pair with it: …


")